XMP profile is an Extreme Memory Profile that allows users to overclock their RAM. Supported motherboards have different XMP profiles, named XMP Profile 1, XMP Profile 2, etc. Users can enable and disable the required XMP profile by entering the BIOS. In this article, I will show you how to enable and disable XMP profile on MSI, Gigabyte, and ASUS motherboards.

Some computer motherboard manufacturers use different terms in place of XMP. Hence, based on your motherboard manufacturer, you may find an EOCP or DOCP profile instead of an XMP profile in the BIOS. Let’s see how to enable and disable the XMP profile on MSI, Gigabyte, and ASUS motherboards.
How to enable or disable the XMP profile on MSI motherboard
To enable or disable the Extreme Memory Profile on your MSI motherboard, enter MSI BIOS and then find the XMP profile option. If you do not know the key to access the MSI motherboard, go to the official MSI website and download the user manual of your motherboard. You will find the BIOS key and the method to access the BIOS in that user manual.

- Enter MSI BIOS by pressing the right BIOS key.
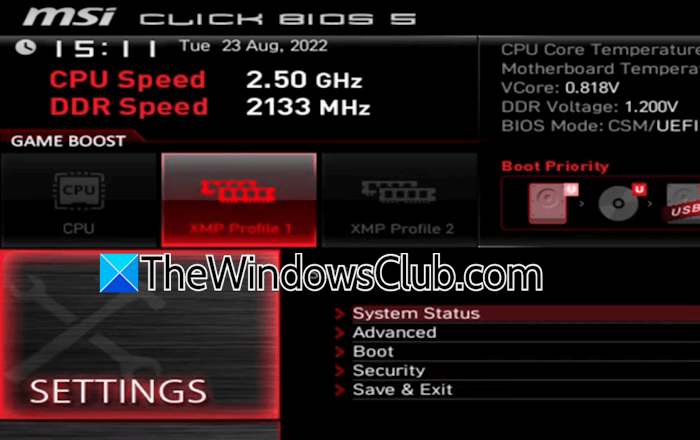
- If your motherboard supports the XMP profile(s), you will see the respective option on the main page in BIOS.
- Select the required XMP profile and press Enter to enable it. After enabling the XMP profile, it will become red.
- Now, select Settings and then select the Save & Exit option.
To disable the XMP profile, enter BIOS and select XMP profile which is enabled. Press Enter to disable it. After disabling the XMP profile, it will be shown in white.
Enable or disable the XMP profile on Gigabyte, and motherboard
To enable the Extreme Memory Profile on your Gigabyte motherboard, enter the BIOS. Refer to the user manual of your motherboard to know the exact process and key to access the BIOS. In some Gigabyte motherboards, the option to enable and disable the Extreme Memory Profile remains available on the home screen when you are in Easy Mode.

If you do not see the option to enable or disable XMP Profile in Easy Mode, switch to Advanced Mode and select the Tweaker category. There, you will see the XMP Profile option. Click on it and select the desired option to enable or disable the XMP profile.
In some Gigabyte motherboards, you need to switch to the Classic Mode and then select the M.I.T. tab on the screen. There, you will find the option to enable and disable the Extreme Memory Profile in the Advanced Memory Settings.
Enable or disable the XMP profile on ASUS motherboard
In some ASUS motherboards, the option to enable and disable the Extreme Memory profile is available on the home screen in BIOS. You will see this option after entering your BIOS. To know the exact BIOS key for your ASUS computer, refer to its user manual.

If the XMP option is not available on the Home screen in BIOS, go to the Advanced Mode in BIOS by pressing the F7 key. Select the AI Tweaker tab. Here, you will see the XMP profile option. In the BIOS of some ASUS motherboards, the XMP profile is named as D.O.C.P.
How to tell if XMP is enabled?
When the XMP profile is active, your RAM runs at a higher speed as defined by the manufacturer. You can check the RAM speed in the Task Manager. Another way to check if the XMP profile is active is by entering your BIOS. Enter BIOS and locate the XMP profile setting. If the setting shows Disabled, the profile is not active.
Why is XMP not enabled?
If your motherboard supports the XMP profile but your RAM sticks do not, you cannot enable the XMP profile. However, if you have supported motherboard and RAM sticks but the XMP is not working, check for a BIOS update.
Read next: Computer is not booting with two RAM sticks.