With the release of Windows 7, Microsoft started to group along with every open window in the taskbar. Earlier, they use to show an individual entry for each but after grouping them, it makes the taskbar look more organized and cleaner. But the main issue lies in the fact that the user has to now every time hover on to their desired window and get on to them. Currently, you have to press CTRL and then click on the taskbar icon to open the last active window. But after you apply this Last Active Click tweak, you have to only click on the program’s taskbar icon and the last active window will open. You need to know that this Last Active windows feature will only work if the taskbar buttons are combined.
Enable Last Active Click feature on Windows Taskbar
First of all, we would recommend you create a System Restore point. Because we will be playing with registry files and modifying some really critical Windows settings. Having done this, we will continue on our quest of enabling the last active window indicators on Windows Taskbar.
Modify the Registry

To enable the Last Active Click feature, hit the WINKEY + R button combination to launch the Run utility, type in regedit and hit Enter. Click on Yes for the UAC or User Account Control Prompt that you get.
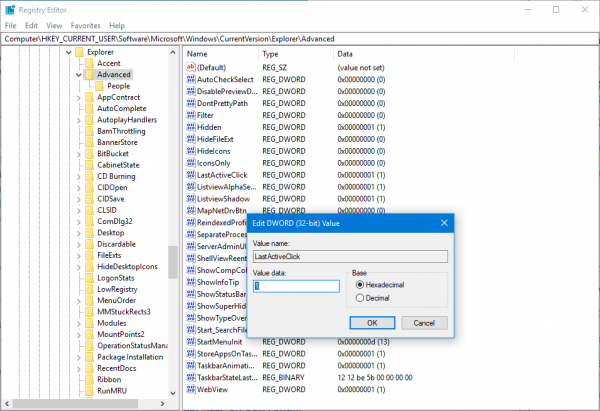
Once Registry Editor opens, navigate to the following key location-
HKEY_CURRENT_USER\Software\Microsoft\Windows\CurrentVersion\Explorer\Advanced
Now, right-click on the right-side panel and select New > DWORD (32-bit).
Name the newly created DWORD as LastActiveClick.
Double click on it to modify its Value Data. Set the Value Data for LastActiveClick to 1.
Click OK and then close the Registry Editor.
Reboot your computer for the changes to take effect.
Now, in order to revert back to the default configuration, just set the Value Data for the same DWORD to 0 or just delete that DWORD and Reboot your computer for the changes to take effect.
Use One click Registry file
Alternatively, you can just automatically add the entries in the Registry Editor by using a custom-created file by us.
First of all, download this ZIP archive from our server. Now, after downloading the archive, open it.
You will find two files named as Enable and Disable. Click on Enable to add the feature.
Reboot your computer for the change to take effect.
If you wish to reverse the changes, click on the Disable file.
Let us know how you like using this feature.
Leave a Reply