Having and using a strong password is always recommended – whether it is for your social account or internet banking account. It is also recommended to check for a data breach to monitor whether your passwords have been leaked or not. That is why you should use the leak detection feature for entered passwords in Google Chrome. You will not have to worry about password leaks since your browser will deal with that headache for you.
It is possible to enable password leak detection in Chrome using the experimental flag. However, now it is possible to turn on or off the same using the Registry Editor and the Local Group Policy Editor if you are using Windows 11/10. For that, you must download the Group Policy template for Chrome.
Turn On Leak Detection for entered Passwords in Chrome using GPEDIT
To turn on leak detection for entered passwords in Chrome using Group Policy, follow these steps-
- Search for gpedit.msc in the Taskbar search box.
- Open the individual result.
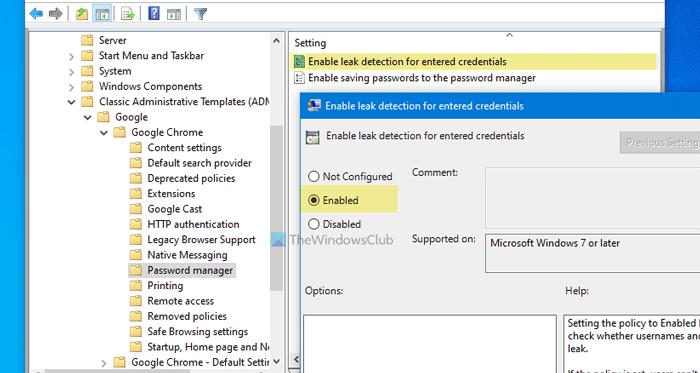
- Navigate to Password manager in Computer Configuration.
- Double-click on Enable leak detection for entered credentials.
- Select the Enabled option.
- Click the OK button.
To learn more about these steps, continue reading.
First of all, you have to open the Local Group Policy Editor on your computer. For that, you can search for gpedit.msc in the Taskbar search box and click on the individual result. After that, navigate to the following path-
Computer Configuration > Administrative Templates > Classic Administrative Templates > Google > Google Chrome > Password manager
Here you can see a setting called Enable leak detection for entered credentials on your right-hand side. Double-click on it and select the Enabled option.

At last, click the OK button to save all the changes. Once done, Chrome will detect any leaked password and notify you in real-time. However, choosing the Disabled or Not Configured option will turn this functionality off.
Enable passwords leak detection in Chrome using Registry
To enable passwords leak detection in Chrome using Registry, follow these steps-
- Press Win+R.
- Type regedit in the Run prompt and press the Enter key.
- Click on the Yes button.
- Navigate to Policies in HKEY_LOCAL_MACHINE.
- Right-click on Policies > New > Key.
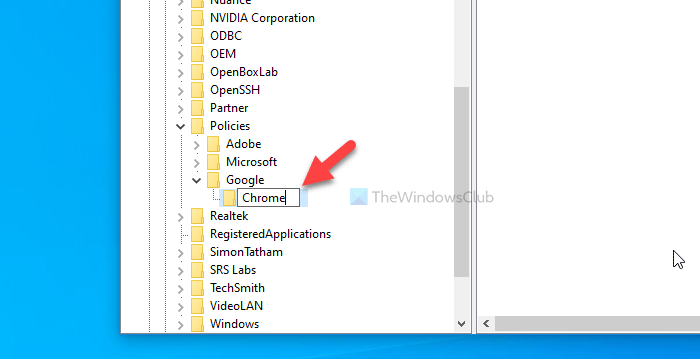
- Name it as Google.
- Right-click on Google > New > Key.
- Name it as Chrome.
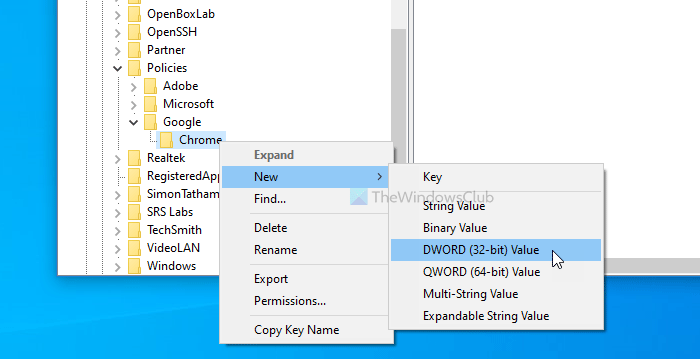
- Right-click on Chrome > New > DWORD (32-bit) Value.
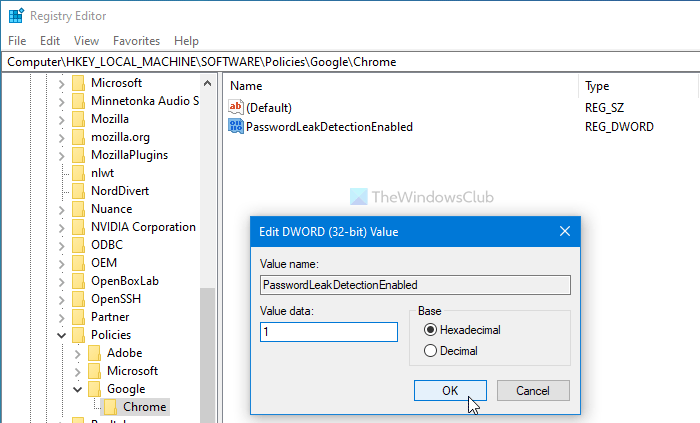
- Name it as PasswordLeakDetectionEnabled.
- Double-click on it to set the Value data as 1.
- Click the OK button.
Keep reading to know more about these steps in detail.
Precaution: Don’t forget to backup Registry files before heading to the steps.
At first, press Win+R, type regedit, and press the Enter key. Then, you must click on the Yes option on the UAC prompt to open Registry Editor. Once it is opened, navigate to this path-
HKEY_LOCAL_MACHINE\SOFTWARE\Policies
Here you have to create a new key. For that, right-click on the Policies and choose the New > Key option. Name it as Google. However, if you already have a key named Google in the Policies section, you can skip this particular step.
After that, right-click on the Google key and select New > Key to create a sub-key. Name it as Chrome.

Now, you need to create a REG_DWORD value in the Chrome key. For that, right-click on Chrome and select the New > DWORD (32-bit) Value.

Once done, name it as PasswordLeakDetectionEnabled. By default, it has 0 as the Value data, which means the feature is disabled. To enable password leak detection, you need to set the Value data as 1. For that, double-click on PasswordLeakDetectionEnabled, enter 1 and click the OK button.

If you want to turn off Chrome’s credentials leak detection, navigate to the same path and choose 0 as the value data.
That’s all! I hope it helps.
Read: Turn off Edge Notifications in Windows 11 with GPEDIT or REGEDIT.