Microsoft Skype features call captioning with live captions & subtitles. The capability was rolled out on a special occasion to commemorate the United Nations International Day of Persons with Disabilities. It’s designed specifically for people suffering from hearing disabilities. Let’s see how to enable Live Captions and Subtitles in Skype and discuss its characteristics in brief.
Individual preferences allow users to enable captions and subtitles for a single call or every call. In its present iteration, the feature can be configured to automatically scroll during the call and appear when people are talking.
Turn on Live Captions and Subtitles in Skype calls
Launch the Skype application. If you do not have it, download the app from Microsoft Store. During an audio or video call, select the more button (visible as 3 dots) and from the list of options displayed, select ‘Turn subtitles’ on.
Enable Live Captions and Subtitles as the default for all Skype calls
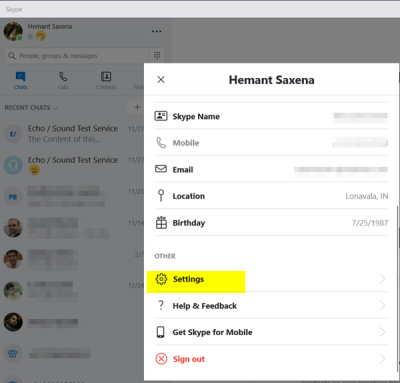
1] Select your profile picture and scroll down to locate ‘Settings’ option.
2] When found, click on ‘Settings’.

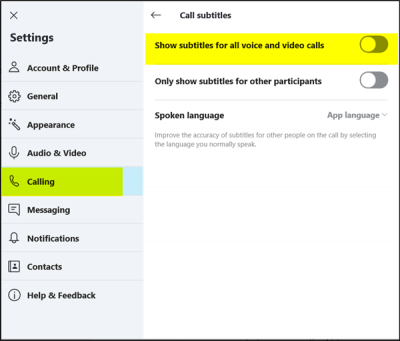
3] Next, from the ‘Settings’ sidebar menu, select ‘calling’ and under ‘Calling’ settings window choose ‘Call Subtitles’ option.

4] Toggle on ‘Show subtitles for all voice and video calls.’ You can improve the accuracy of subtitles for other people on the call by selecting the language you normally speak.
5] If you do not find this feature of much use, disable it by navigating to ‘More’ option during an audio or video call and Turn subtitles off.
Live captions and subtitles are optimized to be fast, continuous, and contextually updated as people speak. They work on the latest version of Skype for Windows 10 (version 14) for both one-on-one and group calls.
Lastly, the feature is not just limited to Skype but will also be available for Microsoft Office PowerPoint.
Now read: How to bookmark a Skype message on a Windows PC.
Leave a Reply