For distraction-free support calls, Microsoft Teams must have background noise-suppressing capability. The good news is the service supports a noise-cancellation feature that filters noise in real time. For help in getting started with and knowing how to enable the noise cancellation feature on Microsoft Teams, read this post.
Enable Noise Cancellation in Microsoft Teams
Microsoft Teams has already emerged as a robust alternative to the Zoom app. The AI-based background noise cancellation feature enhances the service’s utility. It automatically analyzes the audio to isolate the human voice and apply a filter to background noise, such as keyboard typing, the rustling sound of a bag of chips, or others that may cause other participants to lose focus.
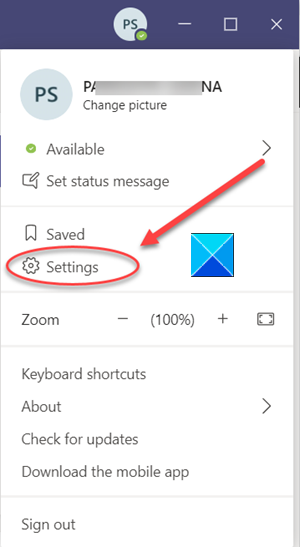
- Open your Microsoft Teams profile.
- Go to Settings.
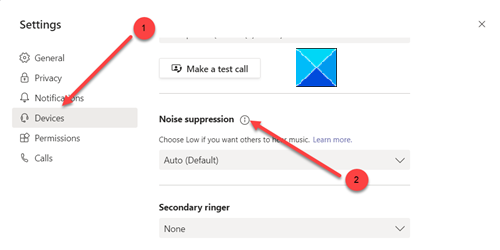
- Switch to the Device section in the left pane.
- Look for the Noise suppression entry.
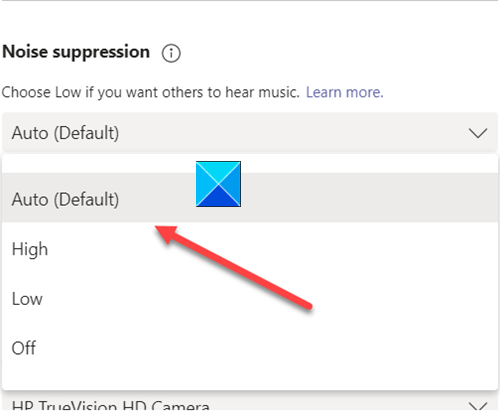
- Select Auto to enable background noise suppression.
Launch the Microsoft Teams app and open your profile.

Next, choose Settings by clicking on your profile icon in the upper-right corner.
From the list of options displayed in the left pane, scroll down to Devices.

On the right, locate Noise Suppression.

Click the entry to expand its menu and choose Auto to enable the noise cancellation feature in Microsoft Teams.
Once you’ve done this, go ahead and start a video call on Microsoft Teams. You’ll experience Microsoft AI working its magic and canceling the noise around you in real time.
Another alternative way to cancel the background noise and enable noise cancellation in Microsoft Teams is to do it during a call.
When in a meeting, click the 3-dot menu at the top-right corner and choose Device Settings.
Then, locate the Noise suppression option to adjust the level of noise cancellation from its drop-down menu.
That’s all there is to it!
Leave a Reply