If you reside in a location where Daylight Saving Time is available then you can set your device clock to be adjusted automatically as per your requirement. In this post, we will show how you can enable or disable the Daylight Saving Time feature on your Windows 11 or Windows 10 PC.
Enable or Disable Adjust for Daylight Saving Time
You can enable or disable adjust for daylight saving time using two methods, these are:
- Through the Settings app.
- Using the Control Panel.
Let us see both methods in details:
1] Through the Settings app
Follow the below suggestions to enable the adjustment for daylight saving time through the Settings app:
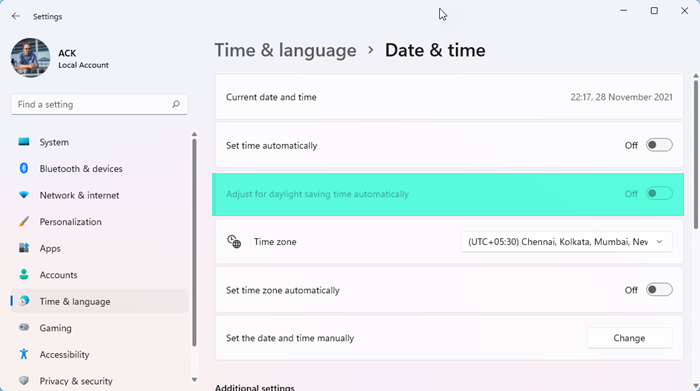
Windows 11

- Open Settings.
- Go to the Time & Language > Date & Time.
- Click on the toggle button next to the Adjust for daylight saving time automatically.
- To disable the feature, again click on the Adjust for daylight saving time automatically toggle button.
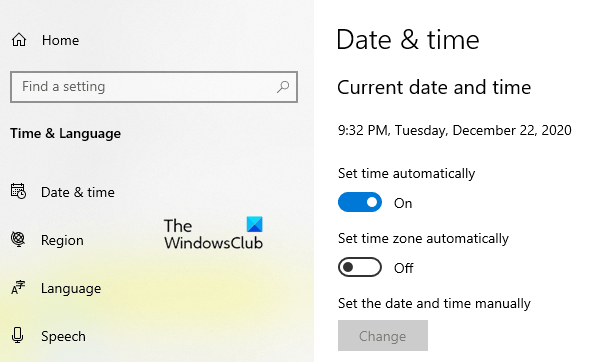
Windows 10
- Open Settings.
- Go to the Time & Language > Date & Time.
- Under the Time zone section, click on the toggle button next to the Adjust for daylight saving time automatically.
- To disable the feature, again click on the Adjust for daylight saving time automatically toggle button.

First of all, open the Settings app using the Windows + I shortcut keys.
Select the Time & Language section and then click on the “Date & time” tab.
In the right pane, scroll and search for the “Adjust for daylight saving time automatically”.
Once you find it, click on the toggle button to enable or disable the feature.
Here, one thing should be noted. If the Set time automatically and/or Set time zone automatically options are turned on, then Adjust for daylight saving time automatically option will be grayed out. Also, the daylight saving time feature is supported on selected regions and time zones only (like (UTC-06:00) Central Time (US & Canada)). If you select some time zone that is not supported, then also you will find that Adjust for daylight saving time automatically is greyed out.
Once you complete the steps, close the Settings window and you’re done.
2] Using the Control Panel
Alternatively, you can use the control panel to enable or disable the adjustment for daylight saving time:
- Open Control Panel.
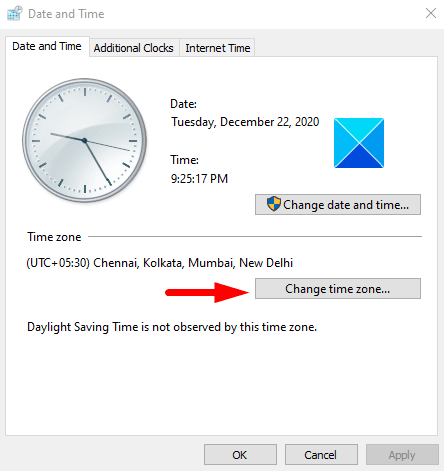
- Click on the Date and Time > Time zone > Change time zone.
- To enable the feature, tick the Automatically adjust clock for Daylight Saving Time box.
- Click the OK button.
- Uncheck the Automatically adjust clock for Daylight Saving Time option to disable the feature.

To do it, open the Control Panel first and then make sure the View is set by Large or Small icons.
Click on the Date and Time option.
On the Date and Time page, go to the Date and Time tab.
Time zone section and click on the Change time zone button.
Check the box near Automatically adjust clock for Daylight Saving Time option to enable the feature.
Then click on the OK button to apply the changes.
If you want to disable this feature, simply uncheck the Automatically adjust clock for Daylight Saving Time option and then save it.
If the correct time zone is set and Adjust for daylight saving time automatically option is enabled, Windows 11/10 will automatically adjust the clock for daylight saving time change. However, if you find some issue, then you should also check if your system time is synchronized with an Internet Time Server (say Windows time server).
Though your computer is set to automatically synchronize with a time server, you should check if the setting is configured correctly. Access the Internet Time Settings using the Date and Time window, select a time server, and make sure the option to Synchronize with an Internet time server is checked. Use the Update now button and press the OK button to save the setting.
That’s all!
Related reads: