In our previous tutorial, we had seen how to enable Audio Sandbox in the Edge browser. On similar lines, today, we’ll learn how to enable or disable audio input in Windows Sandbox on a Windows 11/10 PC.

Windows Sandbox provides a virtualized environment that is completely isolated from your main operating system. Using Windows Sandbox with the audio input policy configured allows for a versatile testing environment for applications that require microphone input.
Enable or disable Audio Input in Windows Sandbox
You must be signed in as an administrator to enable or disable the audio input policy in Windows Sandbox. The policy option configures Windows to receive audio input from the user. As such, running this policy inside Sandbox could be useful for users trying to test apps that use a microphone. However, this arrangement is only temporary. Once you are done with it and close it, all the programs and files and their states are deleted.
To enable or disable audio input in Windows Sandbox, follow these steps:
- Open the Registry Editor.
- Go to the Windows Sandbox key
- Create a new 32-bit DWORD value AllowAudioInput.
- Set the value to 0 to disable the Audio Input feature for Windows Sandbox.
- Delete the value to enable the Audio Input feature.
Using Registry Editor
Press Win+R in combination to open the ‘Run’ dialog box.
Type ‘regedit’ in the empty field of the box and press ‘Enter’.
Note: Before tweaking the Registry, make sure you have created a system restore point
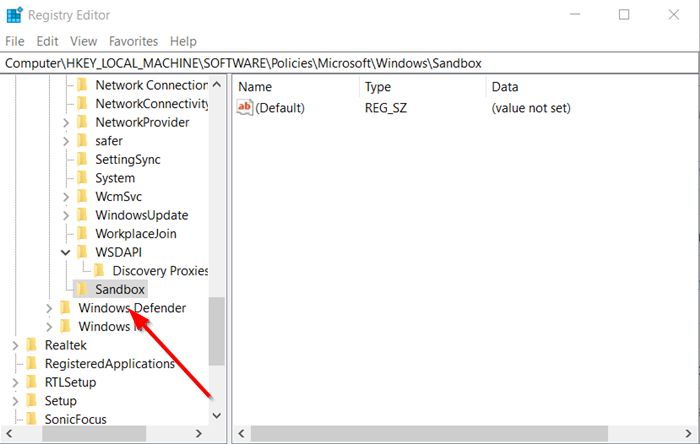
When the Registry Editor opens, navigate to the following path address –
HKEY_LOCAL_MACHINE\SOFTWARE\Policies\Microsoft\Windows\Sandbox.

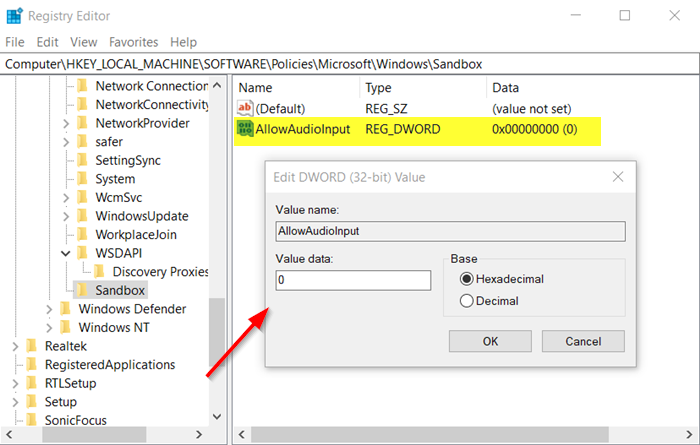
Create a new 32-bit DWORD value ‘AllowAudioInput’.

Keep the value to 0 to disable the Audio Input feature for Windows Sandbox. When the policy is disabled, Windows Sandbox will be stopped from receiving audio input from the user.
To enable the Audio Input feature, simply delete the value.
Now, close the Registry Editor and exit. Restart Windows 11/10 to allow the changes to take effect.
Using Group Policy Editor
Alternatively, you can enable or disable the same feature via the Group Policy Editor. For this,
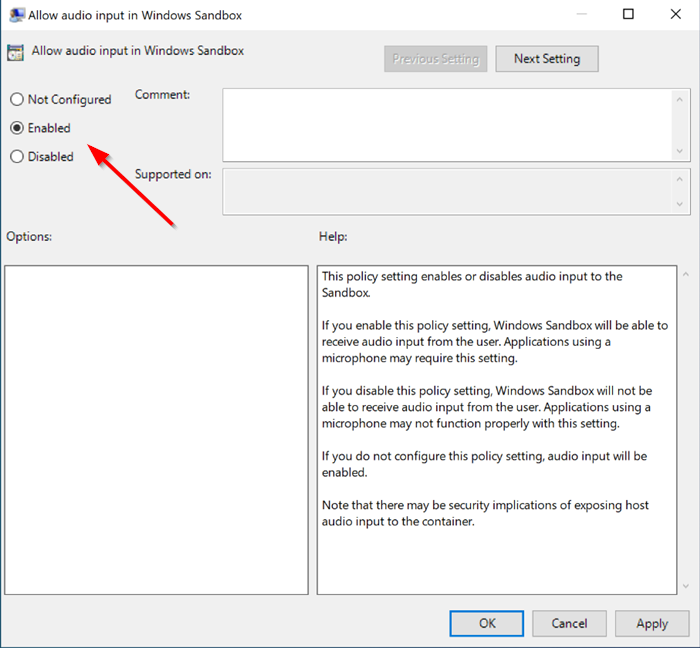
Open the Group Policy Editor and navigate to:
Computer Configuration\Administrative Templates\Windows Components\Windows Sandbox
Locate the policy setting with the following name ‘Allow audio input in Windows Sandbox’.

Now, to enable Audio Input in Windows Sandbox set the policy to either Enabled or Not Configured (default).
To disable the same, set the policy to ‘Disabled’.
That’s all there to it!
How do I allow video input in Windows Sandbox?
To allow video input in Windows Sandbox on a Windows 11/10 PC (Windows 10 build 20161 and later), you can use either the Registry Editor or Group Policy Editor. Open Registry Editor and navigate to the Sandbox key HKEY_LOCAL_MACHINE\SOFTWARE\Policies\Microsoft\Windows\Sandbox. If the key does not exist, create it. Right-click on the right panel, select New > DWORD (32-bit) Value. Name the new value AllowVideoInput. Set the value to 1 to enable video input. To disable video input, delete the AllowVideoInput value.
How do I know if my Windows sandbox is enabled?
To check if Windows Sandbox is enabled on your Windows 11/10 PC, press Win+R, type ‘optionalfeatures’ in the Run dialogue and press Enter. Scroll down the list of features in the Windows Features dialogue and locate Windows Sandbox. If the checkbox next to Windows Sandbox is checked, it means the feature is enabled. If it’s unchecked, the feature is not enabled. Note that the feature is exclusive to the Pro, Enterprise, and Education editions of Windows and is not available in the Home edition.
Read Next: Windows Sandbox failed to initialize.