Autofill helps you fill up an online form quicker than ever. But if you do not want to store your credit card details, you can disable Autofill in Microsoft Edge on Windows 11/10.
The new Microsoft Edge browser, based on Chromium, is one of the best browsers for Windows 11/10 and some other platforms, allowing users to browse the internet without any problem. Like passwords, you can autofill all the addresses and credit card fields in the Edge browser. This tutorial helps you enable or disable them via the Registry Editor and the Local Group Policy Editor.
It is recommended to create a backup of Registry files before making any change in the Registry Editor.
Enable or disable AutoFill for addresses and credit cards in Edge
To enable or disable AutoFill for addresses and credit cards in Edge, follow these steps-
- Press Win+R to open the Run prompt.
- Type regedit and hit the Enter button.
- Click the Yes button.
- Navigate to Microsoft in HKEY_LOCAL_MACHINE.
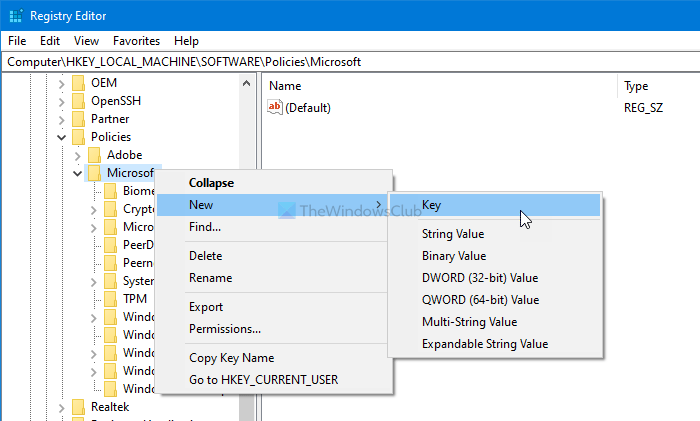
- Right-click on Microsoft > New > Key.
- Call it Edge.
- Right-click on Edge > New > Key.
- Name it as Recommended.
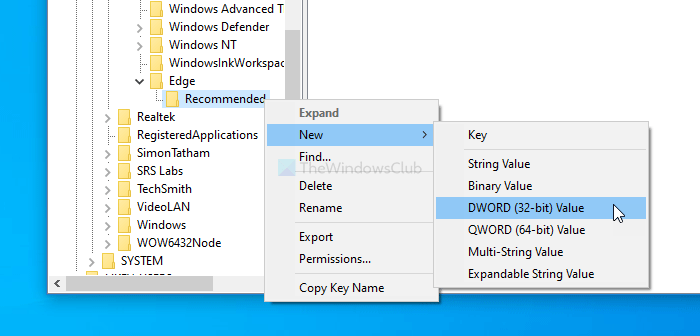
- Right-click on Recommended > New > DWORD (32-bit) Value.
- Name them as AutofillAddressEnabled and AutofillCreditCardEnabled.
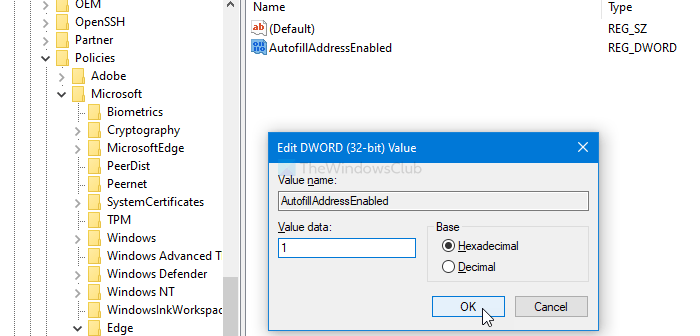
- Double-click on each of them to set the Value data as 1.
- Click the OK button.
To learn more about these steps, keep reading.
First, you have to open the Registry Editor on your computer. For that, press Win+R, type regedit and hit the Enter button. If the UAC prompt appears, click the Yes button visible in it.
Then, navigate to this path-
HKEY_LOCAL_MACHINE\SOFTWARE\Policies\Microsoft
If you can see Edge > Recommended key inside Microsoft, you do not have to follow the 5th, 6th, 7th, and 8th steps. Otherwise, you have to create them manually.
For that, right-click on Microsoft > New > Key and name it Edge.

Then right-click on Edge > New > Key, and call it Recommended.
Next, right-click on the Recommended key, and select New > DWORD (32-bit) value.

You have to set the name as AutofillAddressEnabled. Double-click on it to set the Value data as 1. This DWORD value helps you enable autofill for addresses.

If you want to turn on autofill for credit cards, follow the same steps to create a DWORD value named AutofillCreditCardEnabled. Set the Value data as 1.
In case you want to disable autofill for addresses and credit cards, set the Value data as 0.
Read: How to manage Credit Card info and Addresses on Microsoft Edge.
Turn on or off AutoFill for addresses and credit cards in Edge using Group Policy
To turn on or off autofill for addresses and credit cards in Edge using Group Policy, follow these steps-
- Press Win+R to display the Run prompt.
- Type gpedit.msc and hit the Enter button.
- Navigate to Microsoft Edge – Default Settings in Computer Configuration.
- Double-click on Enable AutoFill for address and Enable AutoFill for credit cards settings.
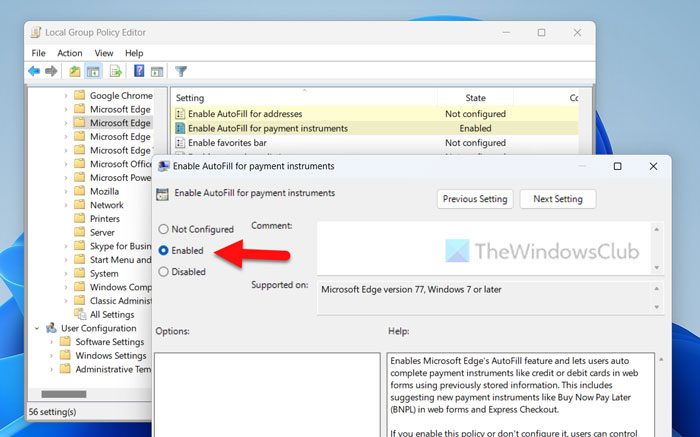
- Select the Enabled option.
- Click the OK button.
First, you have to open the Local Group Policy Editor on your computer. For that, press Win+R, type gpedit.msc, and hit the Enter button. Then, navigate to this path-
Computer Configuration > Administrative Templates > Classic Administrative Templates > Microsoft Edge – Default Settings
Or,
Computer Configuration > Administrative Templates > Microsoft Edge – Default Settings
Double-click on Enable AutoFill for addresses and Enable AutoFill for payment instruments settings one after one and select the Enabled option.

Next, click the OK button to save the change.
If you want to disable autofill for addresses and credit cards in the Edge browser, you can choose either the Not Configured or Disabled option from the Settings window.
If you are using Edge on Android, check out how to set up autofill for Credit Cards in Edge for Android.
That’s all!
Related: How to View Credit Card details in Chrome or Firefox.
Leave a Reply