In this tutorial, we will show you how to enable or disable Cellular Data Roaming (eSIM) in Windows 11. There is a dedicated setting in Windows 11 for data roaming that, if enabled or turned on, keeps the mobile data connection on. This lets you continue to use cellular data while in a roaming area or when the device is outside the network of your mobile operator. If you want to prevent the data roaming charges, you can also disable or turn off cellular data roaming when needed.
If your Windows 11 device has an eSIM or a built-in SIM card, you can first connect your Windows 11 PC to a cellular plan and then enable/disable cellular data roaming as per your requirements.
How to Enable or Disable Cellular Data Roaming in Windows 11
You can enable or disable cellular data roaming (eSIM) in Windows 11 using three native ways. These are:
- Turn on or off Cellular Data Roaming using the Settings app
- Enable or disable Cellular Data Roaming using Group Policy Editor
- Enable or disable Cellular Data Roaming using the Registry Editor.
Let’s check all these options in detail.
1] Turn on or off Cellular Data Roaming using the Settings app

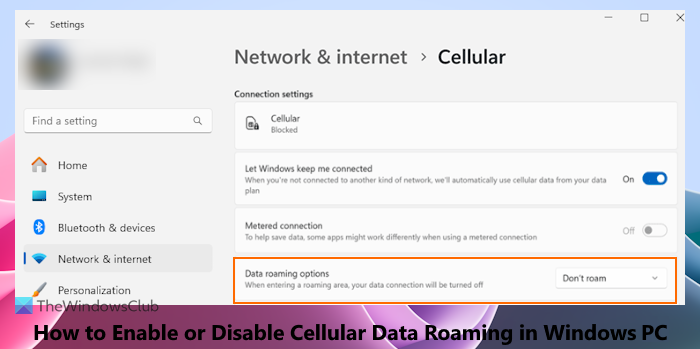
The easiest way to turn on or off cellular data roaming is by using the Settings app of Windows 11. For this, follow these steps:
- Right-click on the Start button and select the Settings option. This will open the Windows 11 Settings app
- Select the Network & internet setting from the left section
- Click on the Cellular option. You may need to turn on the Cellular option first if you haven’t turned it on already
- For Data roaming options (under the Connection settings section), use the Don’t roam option available in the drop-down menu. This will disable or turn off the cellular data roaming in Windows 11.
To turn on or enable the cellular data roaming in Windows 11, use the above steps, and select the Roam option from the drop-down menu of Data roaming options.
This setting can also be turned on/off from the Windows Registry. First, access the following path:
HKEY_LOCAL_MACHINE\SOFTWARE\Microsoft\WwanSvc\RoamingPolicyForPhone
Look for the GUID (Globally Unique Identifier) key for your cellular data connection and select it. You will see a DWORD value with the name InternetAlwaysOn. If you will set its Hex value data to 18000, then the Don’t Roam option will be set. If 18002 is set as Hex value data for this DWORD value, then Roam option will be set for Data roaming options in the Settings app.
2] Enable or disable Cellular Data Roaming using Group Policy Editor

This option completely disables cellular data roaming feature and you won’t be able to use the Settings app to turn on/off this feature. Later, you can enable the cellular data roaming feature anytime using this same option. Here are the steps:
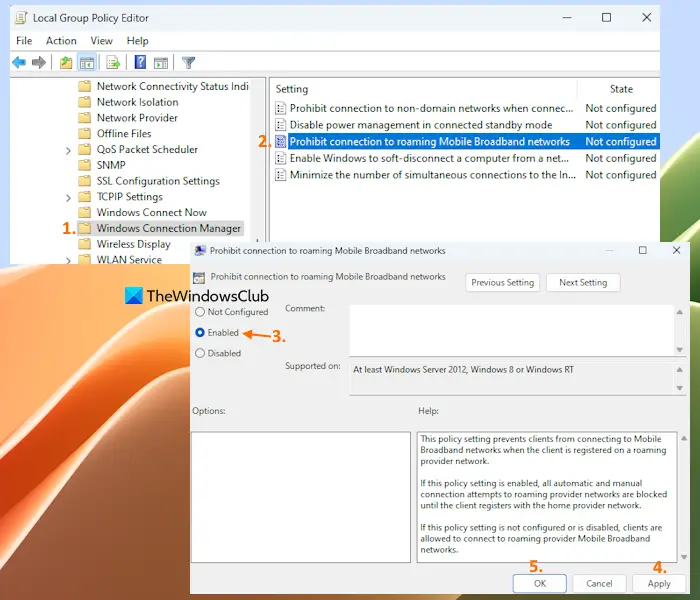
- Type gpedit.msc in the Search box and use the Enter key
- The Group Policy Editor window will open. Now access the Windows Connection Manager folder there. Its path is:
Computer Configuration > Administrative Templates > Network > Windows Connection Manager
- Double-click on the Prohibit connection to roaming Mobile Broadband Networks setting present in the right section. Now you can edit this setting
- Select the Enabled option
- Select the Apply button and OK button.
Now all the manual and automatic connection attempts to roaming provider networks will be blocked as the cellular data roaming is disabled with this setting.
To enable or use cellular data roaming again in Windows 11, you can follow the steps listed above, and click on the Not Configured option or Disabled option available for Prohibit connection to roaming Mobile Broadband networks setting. Click on the Apply button and OK button to save the new setting.
3] Enable or disable Cellular Data Roaming using the Registry Editor

This option is the same as the Group Policy Editor option. Before you enable or disable cellular data roaming using the Registry Editor, you should create a Registry backup that will help you restore the Registry in case something goes wrong. After that, use the steps covered below:
- In the Search box of Windows 11, type regedit, and press Enter to open the Registry Editor window
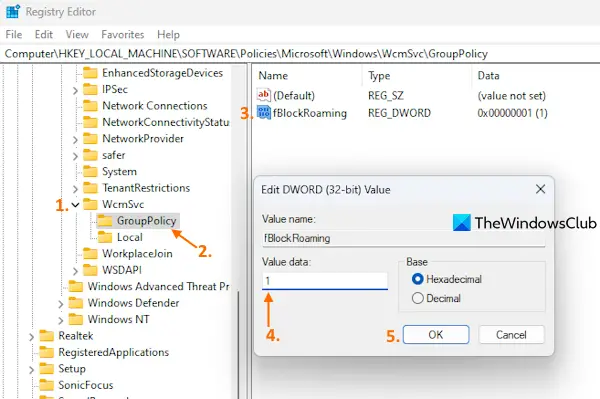
- Access the WcmSvc setting or Registry key. Here is the path to this Registry setting:
HKEY_LOCAL_MACHINE\SOFTWARE\Policies\Microsoft\Windows\WcmSvc
- Select the GroupPolicy key under the WcmSvc setting. This is the key that stores the option related to cellular data roaming for Windows 11 devices. If you don’t see this key, then create a new Registry key (right-click on WmcSvc > New > Key) and rename it to GroupPolicy
- Now create a DWORD (32-bit) Value on the right section and name it fBlockRoaming. This DWORD value helps to use or prevent access to the cellular data roaming feature in Windows 11. For that, you need to edit this value
- Double-click on the fBlockRoaming value. A small box will be in front of you. In the Value data field, add 1, and press the OK button to close the box.
This will disable the cellular data roaming on your Windows 11 device. Restart File Explorer if you don’t see the changes.
When you want to enable the cellular data roaming feature again using the Registry Editor, follow the steps mentioned above, and set the Value data of fBlockRoaming DWORD value to 0. Press the OK button to save the setting.
How do I turn on cellular data on Windows?
To enable or turn on the cellular data on Windows PC, make sure your Windows 11/10 system supports eSIM or there is a built-in SIM card installed in it. After that, you can use the Quick Settings in Windows 11 and Action Center feature in Windows 10 to enable cellular data. For this, press the Win+A hotkey, and then click on the Cellular button. After you enable the cellular option, click on the Manage cellular connections icon and select the mobile operator.
How do I enable WWAN on Windows 11?
To enable or use WWAN (or Wireless Wide Area Network) or cellular connection on Windows 11, you can use the Settings app. If you have an active WWAN service plan from your cellular provider and the SIM card is installed on your Windows 11 device, then you can use the WWAN network (say LTE network) using the cellular technology. Access the Network & internet category in Windows 11 Settings app and turn on the cellular option. Select your WWAN network and connect it to use the internet or cellular data.
Hope this is helpful.
Read next: How to connect to a Cellular Network on Windows in S Mode.
Leave a Reply