Discovery of Network designated Resolvers (DNR) is a new standard that makes it easier for devices to find encrypted DNS servers. DNS servers help devices find the websites they’re looking for online. Encrypted DNS servers help keep your internet activity more secure and private. Before DNR, using encrypted DNS was difficult because you had to manually find and set up the server. With DNR, it’s now easier for devices to use encrypted DNS without setting it up manually. In this post, we will share how you can enable or disable DNR or the discovery of network-designated Resolvers in Windows 11.

How does DNR work on Windows PC
The discovery process of network-designated resolvers on the end-user or client side involves four distinct phases, as detailed below:
- Network Configuration: Once a device is connected, it obtains the network configuration settings, including the resolver’s address designated by the network. These settings are generally obtained through DHCP and include the IP address and detailed information on the DNS resolver.
- DNS Query: When a user enters the URL of a particular website in the browser, a DNS Query is sent to the resolver to provide the corresponding IP address for the particular URL entered.
- DNS (Domain Name System): The DNS resolver is the most crucial component among the network configuration settings responsible for translating human-readable website addresses into machine-readable IP addresses.
- DHCP Server: While trying to query the IP address for the requested Domain, the device contacts the local DHCP server as the very first step of the process. The local machine also sends the DNR info obtained from its service provider to the said DHCP server, which then responds with the necessary information to the client device.
Read: Fix Unable to contact your DHCP Server error on Windows
Enable or Disable the DNR or Discovery of Network-designated Resolvers in Windows 11
DNR or Discovery of network designated resolvers begins with Windows 11 build 25982; hence, it’s only supported in Windows 11 and no other prior versions of the OS. Enabling the option would require users to make changes to the registry settings.
Note: Make sure to create a system restore point before making any changes to the registry.
- Open the Registry Editor by typing regedit in the Run window and pressing the Enter key.
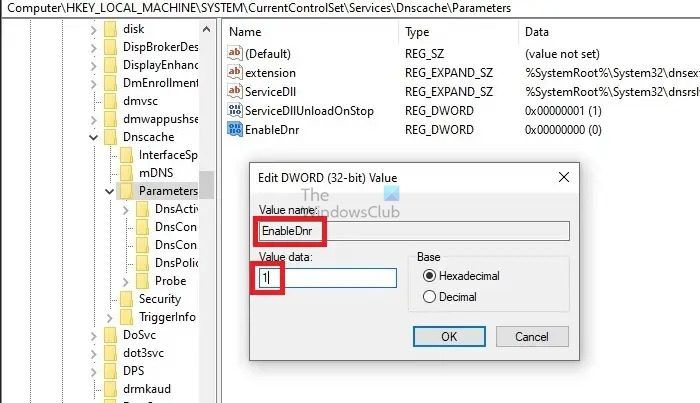
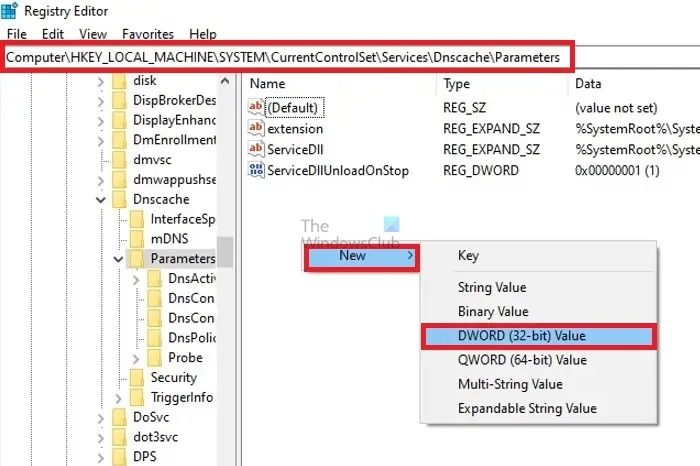
- Navigate to
HKEY_LOCAL_MACHINE\SYSTEM\CurrentControlSet\Services\Dnscache\Parameters.
- Double-click the REG_DWORD, EnableDnr, and enter the value 1 to enable it.

- If EnableDnr is not visible, right-click on the blank area on the right pane and create a new DWORD (32-bit) value with the name EnableDnr.

- Set the value of the newly created DWORD, EnableDnr, to 1.
- Restart the system for the changes to take effect.
Disabling DNR would involve the same process as enabling; only the DWORD for EnableDnr must be set to 0.
You can also use the following from Windows Terminal—the first adds the parameter to the registry, and the second changes the value to zero to disable.
reg add HKLM\SYSTEM\CurrentControlSet\Services\Dnscache\Parameters /v EnableDnr /t REG_DWORD /d 1 reg add HKLM\SYSTEM\CurrentControlSet\Services\Dnscache\Parameters /v EnableDnr /t REG_DWORD /d 0 Read: How to edit the Registry using Command Prompt in Windows
Conclusion
While trying to modify the DNR settings, users must exercise caution as the only way to turn the same on or off involves modifying the Windows Registry, as improper changes can destabilize the system. It is recommended that users take a backup of the registry or create a system restore point before proceeding with the above steps.
What is DDR DNS?
DDR DNS is a way to keep devices safe when they talk to the internet. It uses a secure DTLS method to protect how devices find and join networks. This is especially important for many gadgets like the Internet of Things (IoT). DDR DNS stops terrible actors from sneaking in and keeps the conversation between devices and the internet private and secure.
What are resolvers in networking?
The resolver helps apps find machine names. It asks a name server for info and gets what’s needed or directions to another server. This process allows applications to find the specific information they need about machine names by seeking assistance from the name server.
Leave a Reply