This post covers how to show or remove Quick Settings on a Windows 11 computer. When Windows 11 Quick Settings is enabled or turned on (which is a default action), users are able to open the Quick Settings panel or Quick Settings layout to access Accessibility, toggle Wi-Fi, and turn on/off Battery saver, Bluetooth, Airplane mode, and use other available options or features. But for those who don’t use it you can hide or remove Windows 11 Quick Settings, using two different options.
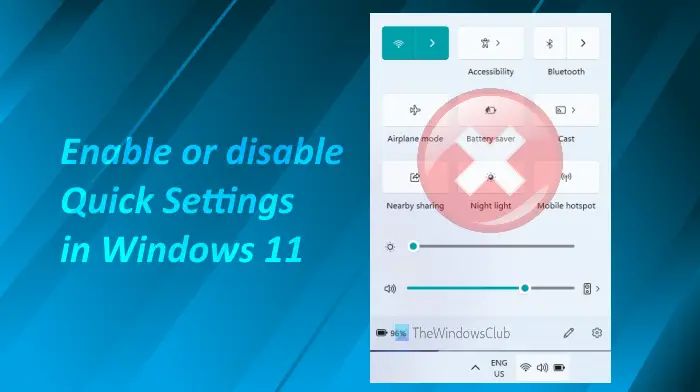
When you have removed this feature, the Quick Settings panel won’t open. Neither its hotkey (Win+A) will work nor you can open Quick Settings using the system tray icons (battery, volume, or Wi-Fi). But don’t worry, if you feel like using Quick Settings, you can re-enable and show it anytime.
How to remove Quick Settings on Windows 11 computer
There are two native options in Windows 11 OS using which you can show or remove Quick Settings. These are:
- Group Policy Editor
- Windows Registry Editor.
Let’s start with the Group Policy Editor option.
Remove Quick Settings using Group Policy Editor in Windows 11
Following are the steps to hide or remove Quick Settings using this option:
- Open Group Policy Editor
- Select the Start Menu and Taskbar folder
- Access Remove Quick Settings window
- Select the Enabled option
- Press the OK button.
In the first step, open the Group Policy Editor window using the Run Command box, Search box, or any other way.
After this, select a folder named Start Menu and Taskbar. The path to that folder is given below:
User Configuration > Administrative Templates > Start Menu and Taskbar
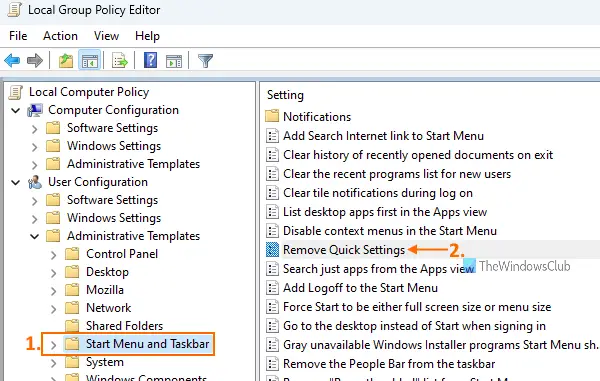
Now double-click on the Remove Quick Settings option available on the right section to open a separate window.
There, select the Enabled option present on the top left section. In the last step, press the OK button.
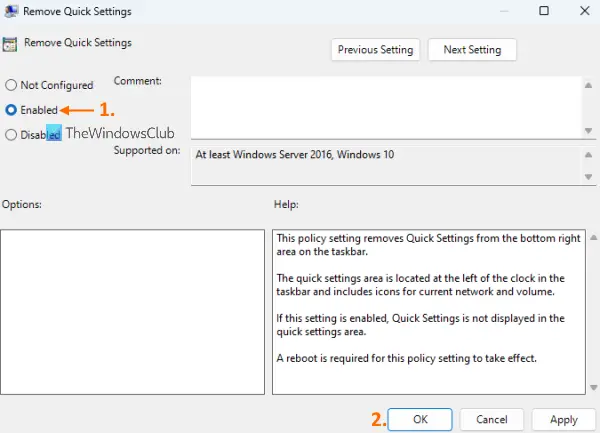
It will save the changes or you might need to restart the computer to save them. This will disable or remove Quick Settings on your Windows 11 computer.
To enable or show Quick Settings in Windows 11 again, you can repeat the steps mentioned above, and click on the Not Configured option present in the Remove Quick Settings window. Finally, use the OK button, and you will be able to access the Quick Settings panel. Restart your computer if the changes are not applied.
Related: Windows 11 Quick Settings not working.
Remove or Disable Quick Settings using Windows Registry Editor in Windows 11
You should backup Windows Registry before using this tip, just in case. After that, use these steps:
- Open Windows Registry Editor
- Select the Windows key
- Create Explorer key under Windows Registry key
- Create DisableControlCenter value
- Set DisableControlCenter Value data to 1
- Press the OK button
- Sign out and sign in to your computer.
Now let’s see the detailed explanation of all these steps.
In the first step, open Windows Registry Editor using the Search box or some other preferred way.
After opening the Registry Editor window, select the Windows key. The path to this Registry key is as follows:
HKEY_LOCAL_MACHINE\SOFTWARE\Policies\Microsoft\Windows
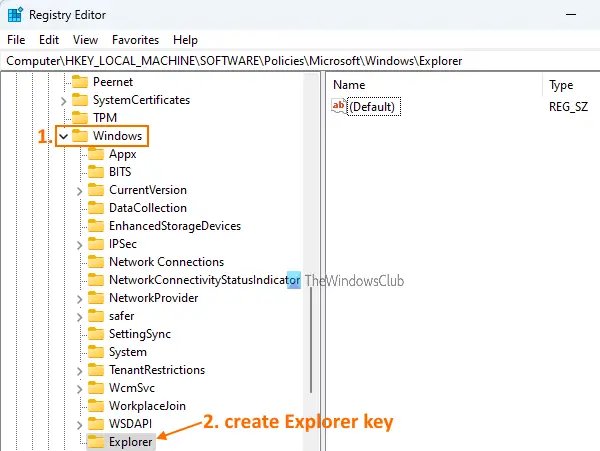
Under the Windows key, Create a new Registry key with the Explorer name. If that key is already present, then no need to create it.
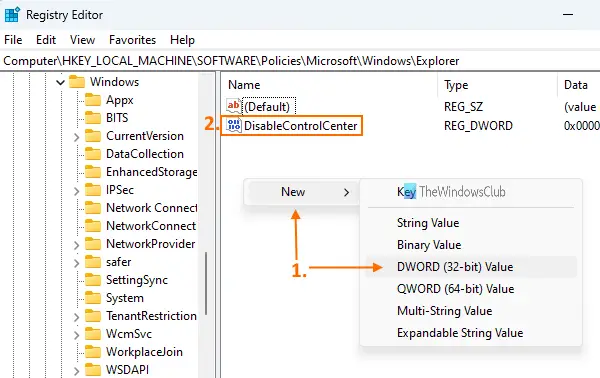
On the right section of this key, create a DWORD (32-bit) Value with the DisableControlCenter name. For creating it, do a right-click, open the New menu, and click on DWORD (32-bit) Value. Rename that new value as DisableControlCenter.
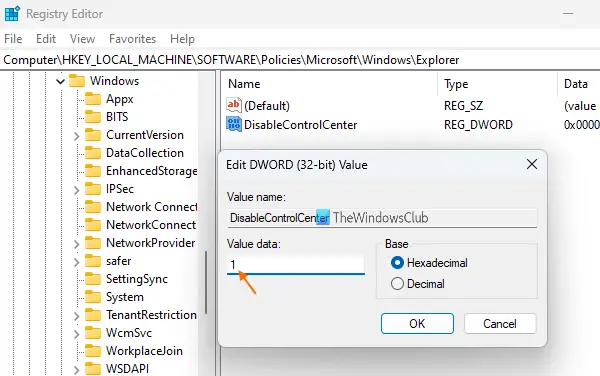
Now it’s time to set its Value data so that you can disable Quick Settings. In order to do it, double-click on the DisableControlCenter value, and it will open an Edit DWORD (32-bit) Value box. In the Value data field of that box, enter 1 and press the OK button.
In the final step, you need to sign out from your Windows 11 computer and then sign in again. Or else, simply restart your computer.
To use, show or enable Quick Settings on your Windows 11 computer, you can follow the steps mentioned above, and delete the Explorer key. After that, restart your computer, and you can start using Quick Settings again.
Read: How to enable Simplified Quick Settings in Windows 11
How do I change Quick Settings in Windows 11?
If you are not satisfied with the default options or icons in the Quick Settings panel of Windows 11, you can easily change them using the Edit quick settings icon present in the Quick Settings. It is a pencil icon that is available just before the Settings icon in the Quick Settings panel. After clicking that icon, an unpin icon will be visible for all the added Quick Settings to remove them. You will also see an Add option that lets you enter any of the available Quick Settings. Once you have added icons of your choice, press the Done button to save them.
Read: Add, Remove, Reset, Customize Quick Action Buttons in Windows
How do I reset Quick Settings?
To reset Quick Settings in Windows 11, you need to create a BAT (*.bat) file. The post helps you create that BAT file using Notepad and the required syntax. Once that BAT file is created, run it as administrator so that you can reset the Quick Settings. Before running that file, you should back up the Windows Registry or create a system restore point that will help you restore your computer from unexpected changes (if happens).
Read next: How to prevent editing Quick Settings in Windows 11.
Leave a Reply