This post will show you how to enable and disable thumbnail previews, as well as, display Thumbnail Previews on Network folders in File Explorer of Windows 11/10, using Registry Editor, Group Policy Editor, File Explorer Options, Control Panel and Performance Options.
In Windows, the File Explorer shows tiny previews of videos and images stored on the system’s hard disk. Most of us are accustomed to browsing through our collection by looking at the thumbnail previews.
This is because these thumbnails give us a quick walk through the contents of the file explorer, and we do not need to open every single file that may have confusing file names. Thumbnail previews make the navigation process notably fast, but it comes with its own set of troubles that may encourage you to disable Thumbnails in Explorer on your Windows 11/10 system.
Thumbnail previews can be useful as they let you view Windows files without opening them. The content of the File Explorer can be set to extra-large icons, large icons, medium icons, and details/tiles view, it is great for those who like to be organized. But as I said it brings its own set of troubles. Creating thumbnails for quick navigation/previewing of files slows down the other file operations, affects system performance, and causes UI clutter. In such a case, disabling the feature is a good idea.
How to Disable Thumbnails in Explorer
If your images or other files display a generic Windows icon, such as a mountain and lake scene for images or a media player icon for video files, the Thumbnail Previews feature is probably disabled. On the other hand, if you can view a small snapshot of the file’s content, the feature is enabled.
Here are different processes to enable and disable the thumbnail display feature in Windows 11/10 Explorer:
- Via File Explorer Options
- Using Control Panel
- Using the Registry Editor
- Via Performance options
- Using the Group Policy Editor.
These processes are described in more detail below.
1] Enable or disable thumbnail via File Explorer Options
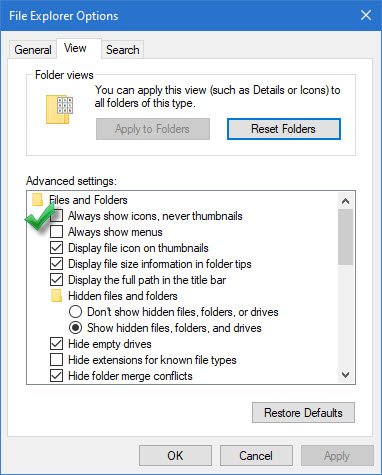
To disable follow these steps:
- Go the ‘File Explorer’ and click on the ‘File’
- In the ‘File Menu’ options, click on ‘Change folder and Search options’
- The above action will open the ‘Folder Options’ dialog box, here hit the ‘View’ tab.
- Now check the ‘Always show icons, never thumbnails’ option appearing under ‘Advanced Settings’.
- Click ‘Ok’ and ‘Apply’ settings.
To enable, follow the same aforementioned process until step ‘3’, and then uncheck the ‘Always show icons, never thumbnails’ option.
2] Show Thumbnails via Control Panel
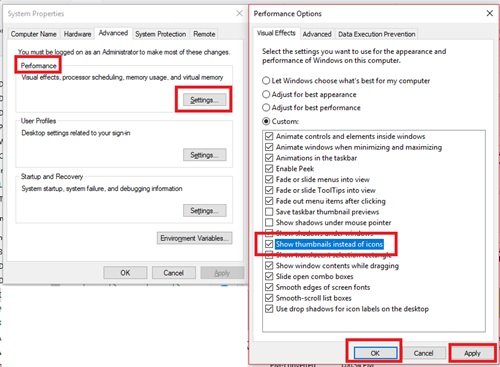
To enable follow these steps:
- From the ‘Start Menu’ go to the ‘Control Panel’
- Click on ‘System and Security’ and hit ‘System’.
- Select ‘Advance System Settings’ appearing on the left-side panel.
- In the ‘System Properties’ window, click ‘Settings’ under the ‘Performance’ heading.
- Now in the ‘Performance Options’ dialog, click the ‘Visual Effects’ tab
- Check the ‘Show thumbnails instead of icons’ under the ‘Custom:’ heading.
- Press ‘OK’ and ‘Apply’ to save changes.
To disable thumbnail previews via Control Panel, uncheck the ‘Show thumbnails instead of icons’ under the ‘Custom:’ heading.
Related: Enable or disable Taskbar Thumbnail Preview in Windows
3] Using Registry Editor to turn off Thumbnails in Windows 11/10
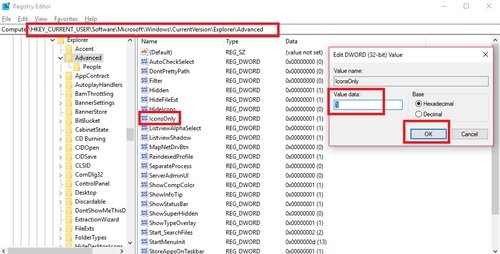
1] Press the ‘Windows key + R’ to open the ‘Run’ dialog.
2] Type ‘regedit’ and press ‘Enter’.
3] Navigate to the below path:
HKEY_CURRENT_USER\Software\Microsoft\Windows\CurrentVersion\Explorer\Advanced
4] On the right side of the Window, search for ‘IconsOnly’ and double-click on it.
5] Change values to Enable/Disable:
- ‘0’ to show thumbnails
- ‘1’ to hide thumbnails
6] Click ‘OK’ to save changes.
4] Via Performance options
Follow these steps:
- Press the ‘Windows Key + R’ to open the ‘Run’ dialog.
- Type ‘SystemPropertiesPerformance.exe’ and press ‘Enter’.
- Now, check or uncheck the ‘Show thumbnails instead of icons’ options to enable or disable thumbnail previews in Windows 10.
5] Using Group Policy Editor
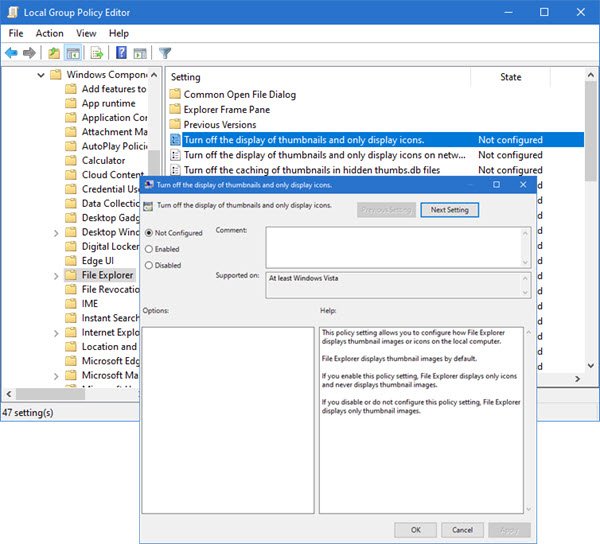
You can use the Group Policy Editor to enable/disable this feature. Follow these steps:
1] Press ‘Win + R’ keys to open the ‘Run’ dialog.
2] Now, type ‘gpedit.msc’ and press ‘Enter’.
3] When the window opens the browser to the following path:
User Configuration > Administrative Templates > Windows Components > File Explorer
4] Now, on the right-hand side of the window, double click on ‘Turn off the display of thumbnails and only display icons’
5] Click on ‘Enabled’ or ‘Disabled’ to turn the feature on/off.
You should now be able to enable the thumbnail previews easily.
How to display Thumbnail Previews on Network folders in File Explorer
File Explorer in Windows 11/10 never displays thumbnail previews (or images) on network files and folders by default. Only the icon of the default app is visible on a file thumbnail. However, we can change this behavior and show thumbnail previews (instead of icons) on network files and folders when using medium icons, large icons, tiles, and extra large icons. We can also disable thumbnail previews on network files/folders without turning off thumbnail previews on local files and folders. It can be done using Group Policy or Registry Editor.
1] Using Group Policy Editor
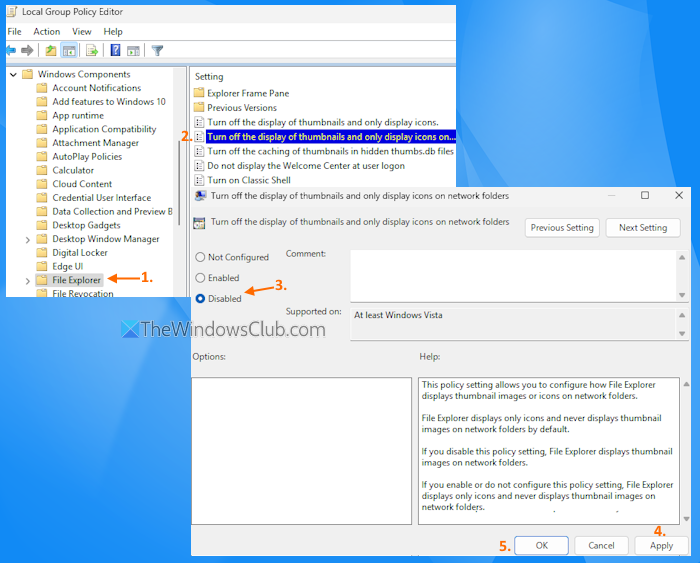
The steps are as follows:
- Open the Local Group Policy Editor window
- Navigate to the following path:
User Configuration > Administrative Templates > Windows Components > File Explorer
- Double-click on the Turn off the display of thumbnails and only display icons on network folders setting to open it
- Select the Disabled option to enable showing thumbnail previews on network folders. Otherwise, select the Not configured/Enabled option if you want to display only icons
- Press the Apply button and OK button
- Sign out and sign in to your PC or restart your system.
Now you can see thumbnail previews on network folders (including sub-folders and files). Make sure that the Folder Layout View is not set to Details, List, or Small icons.
2] Using Registry Editor
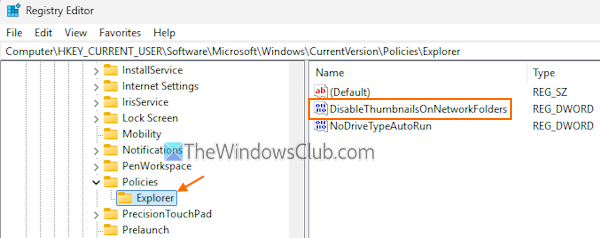
It is recommended to back up the Windows Registry before making any changes. Once done, use the following steps:
- Type regedit in the Search box and hit Enter to open the Registry Editor
- Access the Explorer key using this path:
HKEY_CURRENT_USER\Software\Microsoft\Windows\CurrentVersion\Policies\Explorer
- To enable showing thumbnail previews on network files and folders, create a new DWORD (32-bit) Value on the right part
- Rename the new value to DisableThumbnailsOnNetworkFolders
- Now restart your PC to apply the new setting.
To show only icons and turn off the display of thumbnails on network files and folders, repeat the above steps, and delete the DisableThumbnailsOnNetworkFolders DWORD (32-bit) Value. Restart your PC.
How to enable or disable Preview pane in File Explorer on Windows?
Open Windows 11/10 File Explorer, click on the View menu, and select the Preview pane option. A Preview pane sidebar will open on the right part to preview a selected file. A Preview button also appears on the top right part of File Explorer to show or hide the preview pane. To completely disable the Preview pane in File Explorer, access the Turn off Preview Pane setting in the Group Policy Editor, and enable that setting.
Read: How to show or hide file icon on thumbnails in Windows 11
Thumbnails not showing in File Explorer
The thumbnail preview on Windows normally uses thumbnail cache. Hence, if the thumbnail cache gets corrupted this issue may occur, and clearing the thumbnail cache becomes imperative. This post will show what to do if the Video or Picture Thumbnails are not showing in Explorer.
Do let us know if it was a smooth experience.
Related:
Leave a Reply