In this segment, we introduce a new feature called Sonic Sound on Windows 11 and Windows 10. You might have already guessed by now that this feature involves audio, and you are right. Windows Sonic is a surround sound emulator that enhances the audio quality of headphones.
This feature adds spatial sound and tries to enhance the sound even if you are not using high-end headphones. However, Windows Sonic Sound is not activated by default, and one needs to head over to the settings to toggle this feature on. We will guide you through the process of activating Sonic Sound step by step.
Enable Windows Sonic for Headphones or Spatial Sound in Windows 11
If you want a more immersive experience while listening to music or watching a movie then you should definitely enable Windows Sonic for Headphones or Spatial Sound in Windows 11.

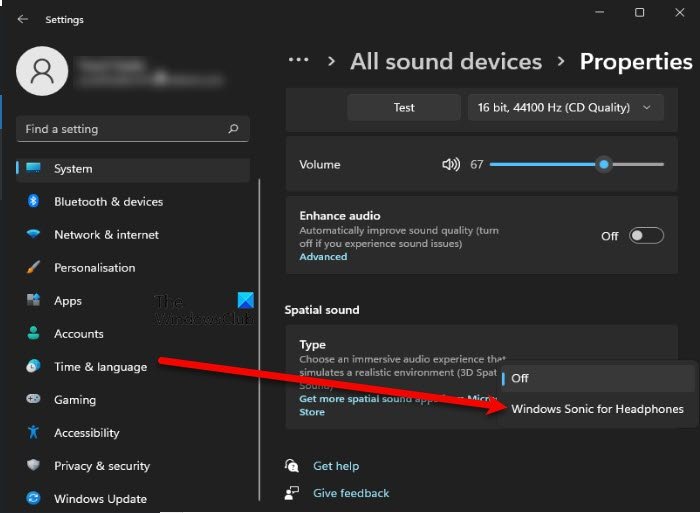
Enabling Spatial Sound in Windows 11 is quite simple, and will enhance your audio listening experience. To enable Windows Sonic for Headphones or Spatial Sound in Windows 11, you need to follow the given steps.
- Open Settings from the Start Menu.
- Go to System.
- Then click Sound > Speaker (from the Output section).
- Now, from Spatial Sound, change the Type to Windows Sonic for Headphones.
Now, you can enjoy watching movies and listening to music in a more immersive mode.
Enable Windows Sonic Sound on Windows 10
See that tiny loudspeaker icon on the system tray, which you use to check if your audio drivers are working properly.
- Click on the Speakers icon in the system tray.

- Select Spatial Sound

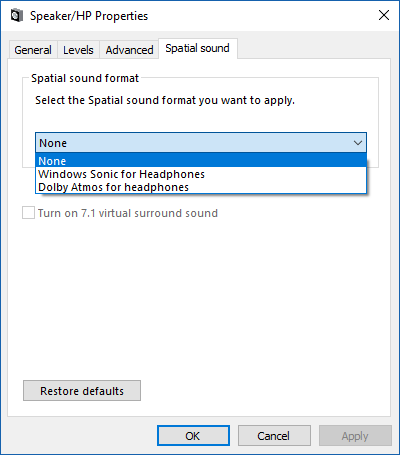
- A dropdown will appear, select the type of Spatial sound format you would like to apply
- Click on “Windows Sonic for Headphones”
- Now apply and click OK.
Voila! The Windows Sonic Sound is now enabled and you can check out the difference by playing a track right away.
Turn on options for other audio peripherals using Control Panel
This is for headphones; however, if you want to turn the options on for other audio peripherals like your external speakers, you can do so by following the steps below.
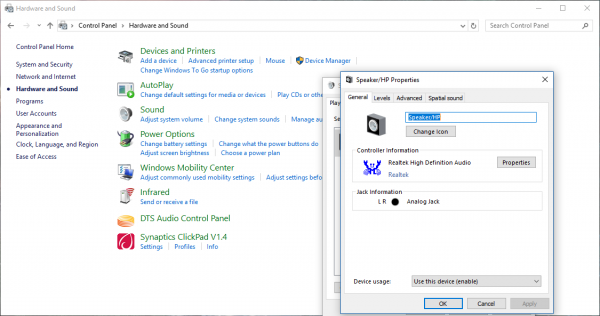
- Go to Search, Type Control Panel
- Select Control Panel

- Double-click on Playback option and select “Spatial Sound.”
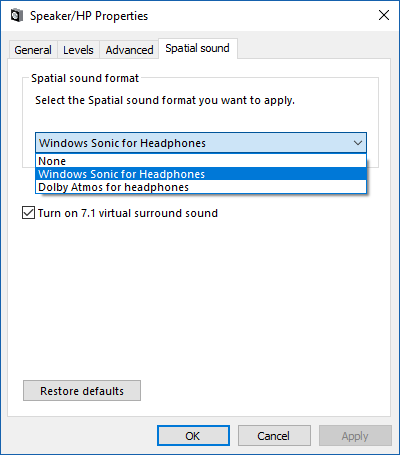
- Once again a dropdown will appear and ask you for the format of Windows Sonic you want to apply.

- From the drop-down select “Windows Sonic for Headphones”
- Select Apply and Click on OK.
After turning on the Windows Sonic Surround, I felt the depth and overall throw of the music enhanced. The setting also worked great for watching movies, and my Seinheisser responded very well to the new feature. That being said, I have heard many of my friends complaining that the feature doesn’t make any difference, but for me personally, it did enhance the overall audio experience.
Should I enable Spatial Sound?
Enabling Spatial Sound is a good practice; it makes the sound coming out of the headphones more immersive. No matter what you are doing on your computer, be it playing games, watching movies, listening to music, etc., you will see a noticeable change in the perceived output sound.
However, not all headphones support this sound type. Sometimes, it can cause trouble for you. If you are using an incompatible headset with Spatial Sound enabled, you can notice some distortion. Sometimes, you can notice distorted sound even with compatible headsets for various reasons. So, if you notice a dip in sound quality, try disabling the feature and check if it fixes the issue.
Read next: