Thunderbird is a popular free email client that comes with great features. Many people use it, and it has numerous add-ons which can be used to extend its functionality and appearance. Generally, the emails are sent over an untrusted network, which is vulnerable to security threats. To protect your data from being exposed to unintended intruders, you need to put in an encryption mechanism to Thunderbird.
Emails in Thunderbird are sent without encryption and are vulnerable to eavesdropping from internet hackers and intruders. Thunderbird doesn’t have a built-in capability to secure the email. However, they can be encrypted with the help of PGP, GPG suite and a Thunderbird extension called Enigmail. Enigmail connects to the GPG tool in order to implement the encryption.
In this article, we guide you on how to encrypt and digitally sign emails on Thunderbird using a popular public key encryption protocol called Pretty Good Privacy (PGP) client and a GPG tool that is based on PGP client. While the extension camouflages the sensitive information you send on an untrusted network, the public key encryption cannot encrypt transparent data like email subject lines, From and To addresses as these need to be clear in order to direct the data to the end user.
Encrypt Thunderbird Email
Download and Install the GPG Suite
GPG Suite is a package used to encrypt and decrypt the email messages. The GPG tool is based on PGP client, and it is available for free. This is an open-source project which can be installed with just a few clicks. The following steps will explain how to install the GPG suite.
- Download the GPG suite file here.
- To mount the image, double-click on the downloaded file and click on the Install button to install the GPG Suite.
Download and Install Enigmail in Thunderbird
- Launch Thunderbird and navigate to Tools.
- Click Add-ons and search for extension Enigmail.
- Hit the Add to Thunderbird button and once the installation is complete a new option called OpenPGP will be added to the menu.
Creating PGP keys
Follow the below steps to create your public and private keys.

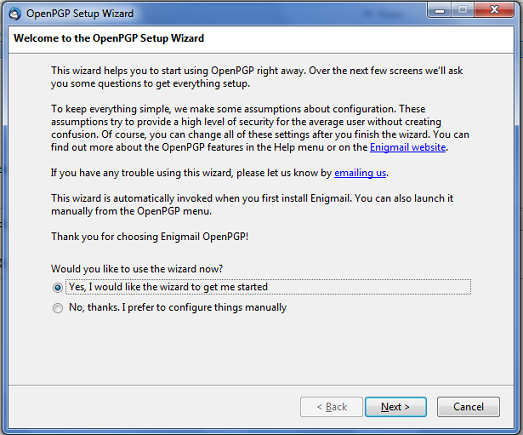
- Navigate to OpenPGP and click Setup Wizard.
- Choose the option Yes, I would like the wizard to get me started and click the Next button.
- In the new window that pops up, Select the appropriate option if you want to sign all your outgoing email by default and click the Next button.
- In the new window that pops up, Select the appropriate option if you want to encrypt all the outgoing email by default and click the Next button.
Now the Wizard will display email settings, which you can change to make sure there are no problems with signing and encrypting email on your machine. You can choose the option No if you have already made a change to a few default settings in order to make OpenPGP work better on your machine otherwise, you can select Yes to let the Wizard configure your email settings to make OpenPGP work more reliably.
- Next, create a new key pair to Sign and encrypt email. Here, you can either use one of your existing keys to sign, encrypt, and decrypt emails, or you can choose to create a new key pair for signing and encrypting emails.
- If you want to create a new key pair for signing and encrypting email, click the Next button.
In simple words, creating a key pair is nothing but generating a public key and a private key. In cryptography, the public key is shared with people who want to send you an email. The public key of a recipient is used for email encryption. The private key, on the other hand, is associated with the public key and is used for decrypting the encrypted email message.
- Enter the passphrase and click Next. This passphrase is essential to protect the private key.
In the Summary page, click the Next button to create a new 2048-bit OpenPGP key.
At last, you will be prompted to generate a revocation certificate. You can either choose to Skip or Generate a Certificate which can be used to invalidate your key in case your secret key gets lost or compromised.
Verify the Setup
Follow the below steps to check if everything is set up correctly
- Navigate to Tools
- Select Account Settings from the menu
- Select the account for which you generated key pair.
- Select OpenPGP Security from the menu.
- Make sure the option Enable OpenPGP support (Enigmail) for this identity is checked.
Also, the option Use specific OpenPGP key should be selected
Digitally Sign & Encrypt Thunderbird email
Once the Enigmail is set up the next step is to encrypt and decrypt the email. Follow the below steps to sign in and encrypt the Thunderbird email.
Launch Thunderbird and compose a new email.
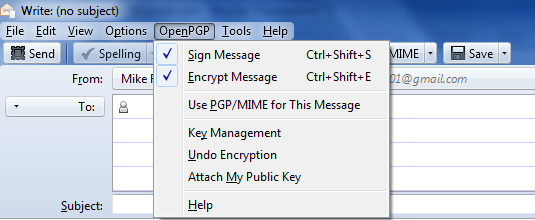
Navigate OpenPGP. Select the option Sign Message and Encrypt Message from the drop-down menu.

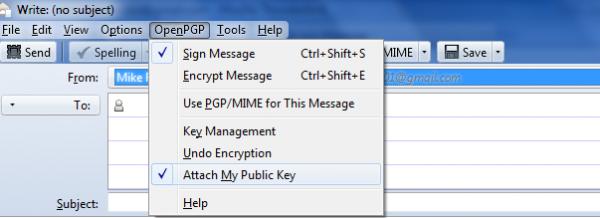
Click on the option Attach My Public Key to add a public key to the email. Enigmail gives an option to attach the public key on the email compose window or lets you upload the public key to public keyserver that can be accessed by anyone.

Give the recipient’s public key to encrypt email.
Once done, your message will be encrypted and sent.
To decrypt the encrypted message, you need to give the passphrase in order to display the message as any other email.
That’s all.
Leave a Reply