Some Windows 11 and Windows 10 users are unable to use the Printer. In this post, we will show you how to fix Windows cannot connect to the printer, Error Code 0x0000007c or 0x000006e4 on your Windows computer.
Why am I seeing Windows cannot connect to the printer Error 0x0000007c or 0x000006e4?
You may see error codes 0x0000007c or 0x000006e4 when trying to print a document. There are multiple variables that can cause this issue, such as buggy updates, outdated or corrupted Printer Driver, and more. More often than not, this error is seen in Windows Update KB5006670 for Windows 10 and KB5006674 for Windows 11. The issue can also occur if the Network Printer name or path is wrong. Other than that, the issue can be caused by a glitch in the Printer Spooler service. That you can fix by restarting the service itself. In the error is thrown up when trying to connect a Network Printer, ensure that the name/path is correct.
We have tried accumulating all the potential causes and their respective solutions to resolve this issue.
Fix Windows cannot connect to the printer Error 0x0000007c or 0x000006e4
If you experiencing Windows cannot connect to the printer Error 0x0000007c or 0x000006e4, then you can use these solutions to resolve the issue.
- Uninstall Buggy Updates
- Use Printer Troubleshooter
- Restart Printer Spooler
- Remove and add Printer
- Reinstall Printer Drivers
Let us talk about them in detail.
1] Uninstall Buggy Updates
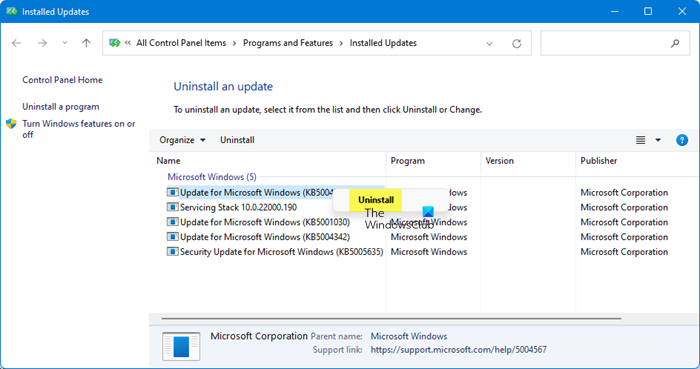
The most common reason for this issue is buggy updates. Usually, this update is KB5006670 for Windows 10 and KB5006674 for Windows 11. So, we have to remove them and check if the issue persists.
Before doing that, it is recommended to stop automatic updates in Windows 11/10. This way you won’t end up reinstalling the update that you are going to delete.
To remove cumulative updates in Windows 11, follow the given steps.
- Open Settings by Win + I.
- Click Windows Update.
- Then click Update History > Uninstall updates.
- Look for KB5006674.
- Right-click on them and select Uninstall.
To remove cumulative updates in Windows 10, follow the given steps.
- Open Settings by Win + I.
- Click Updates & Security.
- Then click Windows Update > View update history > Uninstall Updates
- Look for KB5006670.
- Right-click on them and select Uninstall.
After doing that, you need to restart your computer and try printing, hopefully, the issue will be resolved.
2] Use Printer Troubleshooter
If the issue is not because of a buggy update, then we have to opt for a general solution. So, run Printer Troubleshooter and check if the issue persists. To do that, open Command Prompt as an administrator and execute the following command.
msdt.exe /id PrinterDiagnostic
Now, wait for the process to complete and hopefully, the issue will be resolved for you.
Similar error: Windows couldn’t connect to the Printer.
3] Restart Printer Spooler
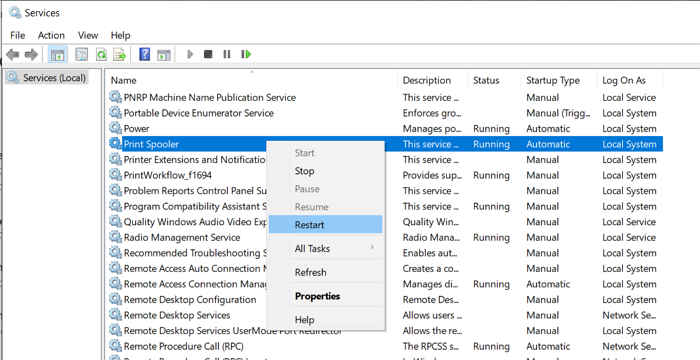
If the issue persists, then the issue can be because of a glitch in Printer Spooler service. So, we have to restart the Service, but first, clear out all its content.
So, open File Explorer from the Taskbar, and navigate to the following location.
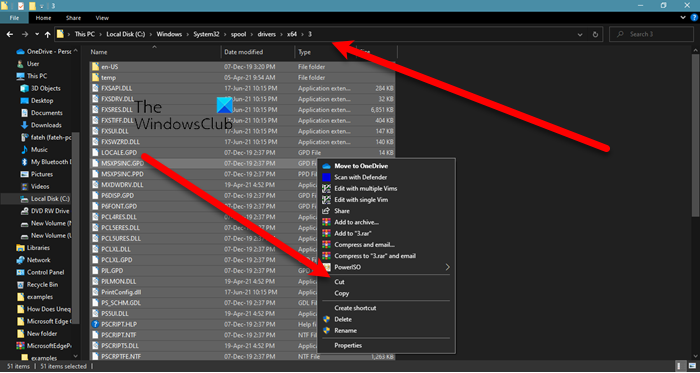
For 64-bit OS
C:\Windows\System32\spool\drivers\x64\3
For 32-bit OS
C:\Windows\System32\spool\drivers\W32X86\3
Now, cut paste its content, somewhere else, as a backup.
Open Services from the Start Menu. Look for Printer Spooler, right-click on it and select Restart.
After restarting, check if the issue is resolved. If the issue persists, then move to the next solution.
Similar error: Windows cannot connect to the printer, Errors 0x00000002,0x0000007a, 0x00004005, 0x00000057, 0x00000006.
4] Remove and add Printer
The issue can be because of a glitch that can be easily resolved by removing and re-adding the Printer to resolve the issue. So, go to Control Panel, remove and then add the Printer, and hopefully, your issue will be resolved.
5] Reinstall Printer Driver
Sometimes, the issue occurs because of corrupted Printer Drivers. The easiest way to resolve the issue is by reinstalling Printer Drivers.
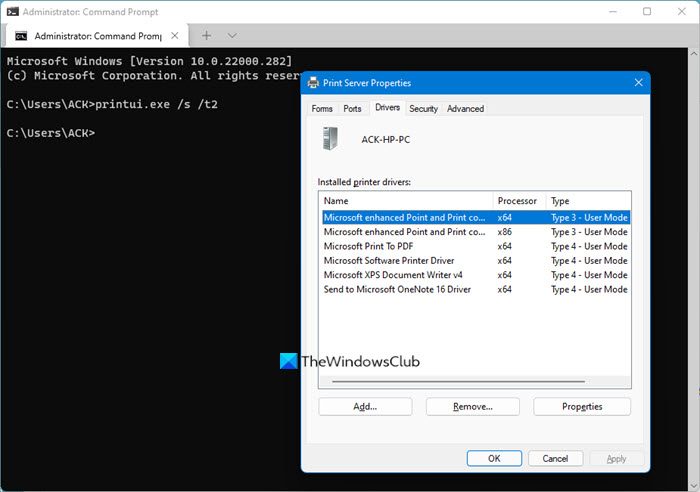
Open Terminal and run this command:
printui.exe /s /t2
You will see the list of installed printer drivers. Find the printer driver you want to reinstall and remove it by clicking Remove.
If you know your Printer driver then do the following:
- Open Device Manager from the Start Menu or by Win + X > Device Manager.
- Expand Printer queues.
- Right-click on your Printer Driver and select Uninstall device.
- After the uninstallation, right-click on Printer queues and click Scan for hardware changes.
Wait for the process to complete and hopefully, the issue will be resolved.
Read: How to change Printer Port in Windows the easy way.
How do I get my Wireless Printer to connect with my laptop?
To connect a Wireless Printer to your Laptop, follow the given steps.
- Turn on your Printer
- Search out “Printer and Scanner” from the Start Menu.
- Click Add a printer or scanner.
- Then follow the given steps to connect to your Printer
That’s it!
Also Check:
Leave a Reply