From unexpected freezing to annoying notifications, Windows 11/10 has such little quirks, but you can fix them with some help. For example, when you install or launch a service application in Windows, an error message is displayed with the following description –
Windows could not start the Service on Local Computer.
Error 1069: The service did not start due to a logon failure

Fix Error 1069, The service did not start due to a logon failure
The issue usually occurs when one of the following happens.
- A user provides the wrong account password when configuring your service, or
- A user has changed the password of the account used by the service but failed to update the information in the service.
To fix it, you’ll need to take the following steps.
- Open Services snap-in.
- Right-click on the service having the issue.
- Select Properties.
- Switch to Log On tab.
- Check if the Local system account radio button is selected.
- Change it to This account.
- Enter the correct password.
- Press OK.
Let’s explore the above steps in a bit more detail!
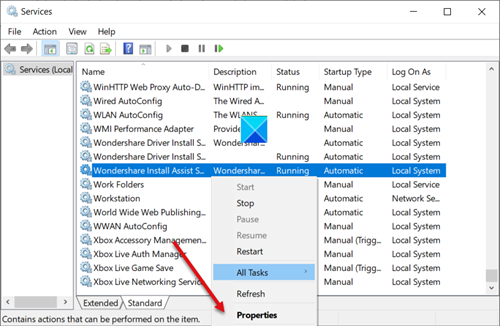
Type services.msc in the Windows Search box and select the Services option to open the Services snap-in.

Look for the service name that is having an issue. When found, right-click it and select the Properties option.
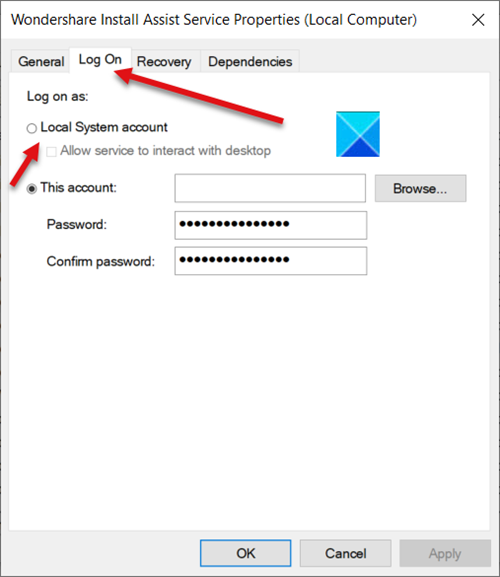
Next, under the service property sheet, switch to the Log On tab.
Here, check if the Local System account radio button is checked. If yes, you’ll need to deselect it.

Once done, check the ‘This account‘ radio button.
Enter the correct password.
When done, hit the OK button to save the changes and restart your computer.
Hereafter, when you try to run the service, you should not see the ‘The service did not start due to a logon failure’ message again in Windows 11/10.
I hope it helps!
TIP: More generic suggestions to troubleshoot Windows Services will not start issues.
Leave a Reply