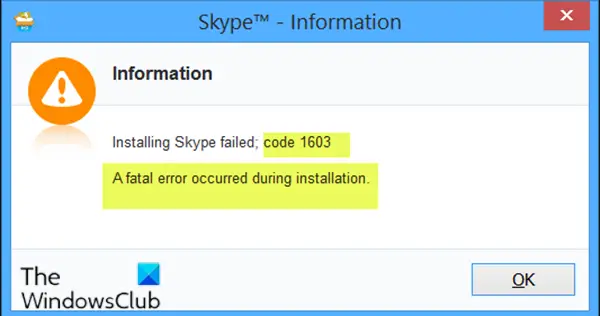
If when you try to install a Windows Installer (MSI) package, and you receive the error message A fatal error occurred during installation accompanied with the error code 1603, then this post is intended to help you. In this post, we will identify the potential causes, as well as provide the most suitable solutions to the issue.

If you click OK on the message box, the installation rolls back.
You may encounter this installation error due to one or more of the following reasons;
- The Microsoft Windows Installer Service is not installed correctly or disabled.
- The Windows Temp folder is full.
- The setup was corrupted after installation and, therefore, fails with this error during uninstallation.
- Windows Installer is attempting to install an app that is already installed on your PC.
- The folder that you are trying to install the Windows Installer package to is encrypted.
- The drive that contains the folder that you are trying to install the Windows Installer package to is accessed as a substitute drive.
- The SYSTEM account does not have Full Control permissions on the folder that you are trying to install the Windows Installer package to.
- A file is locked and cannot be overwritten.
- Short file name creation is disabled on the target machine.
Error 1603: A fatal error occurred during installation
If you’re faced with this issue, you can try our recommended solutions below in no particular order and see if that helps to resolve the issue.
- Clear Temp folder
- Uninstall software using third-party software uninstaller
- Run the Program Install and Uninstall Troubleshooter
- Change installation location
- Grant Full Control permissions to the SYSTEM account
- Ensure Windows Installer service is enabled
- Re-register Windows Installer Service
- Modify registry key value
Let’s take a look at the description of the process involved concerning each of the listed solutions.
1] Clear Temp folder
This solution requires you to clear the Temp folder and then try the software installation again and see if the Error 1603 is resolved.
2] Uninstall software using third-party software uninstaller
Check if the app is already installed on the PC. If so, uninstall the app using a third-party software uninstaller and reinstall the app. The uninstaller software will get rid of any residual files that might cause conflicts later on during fresh installation of the app in question.
3] Run the Program Install and Uninstall Troubleshooter
Microsoft has made available the Program Install and Uninstall troubleshooter that can help Windows 10 PC users automatically repair issues when you’re blocked from installing or removing programs. It also fixes corrupted registry keys.
4] Change installation location
If you receive the error message because you try to install the Windows Installer package to a folder that is encrypted, you can simply try and install the package to a folder that is not encrypted.
Likewise, if you receive the error message because the drive that contains the folder that you try to install the Windows Installer package to is accessed as a substitute drive, simply install the package to a drive that is not accessed as a substitute drive.
5] Grant Full Control permissions to the SYSTEM account
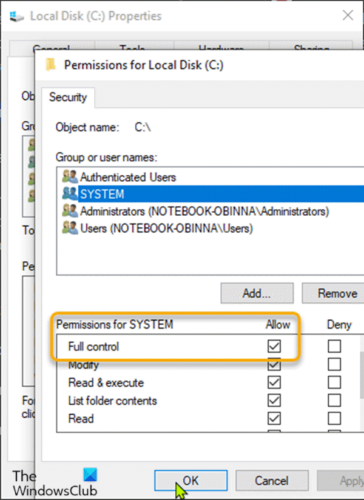
To grant Full Control permissions to the SYSTEM account, do the following:
- Press Windows key + E to open File Explorer.
- Right-click the drive that you want to install the Windows Installer package to, and then select Properties.
- Click the Security tab.
- Verify that the Group or user names box contains the SYSTEM user account.
If the SYSTEM user account doesn’t appear in the box, follow these steps to add the SYSTEM account:
Click Edit. If prompted, approve the User Account Control.
Click Add. The Select Users or Groups dialog box appears.
In the Enter the object names to select field, type SYSTEM, and then click Check names.
Click OK.
- To change permissions, click Edit. If prompted, approve the User Account Control.
- Select the SYSTEM user account, and verify in the Permissions section that Full Control is set to Allow. If not, select the Allow check box.

- Close the Permissions dialog and return to the Properties dialog.
- Still on the Security tab, click Advanced.
- Select Change permissions. If prompted, approve the User Account Control.
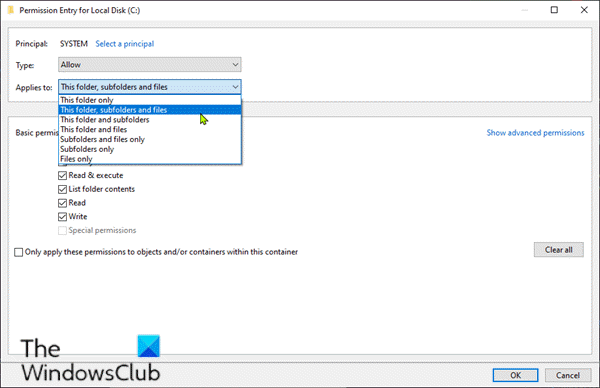
- In the Permissions tab, select the SYSTEM entry and click Edit.
- Click the Applies to drop-down and select This folder, subfolder, and files.

- Click OK. Wait for the permissions to be applied to all child folders.
- Click OK again.
- Click Apply > OK.
- Restart your computer.
On boot, run the Windows Installer package and see if the installation completes without the error. Otherwise, try the next solution.
6] Ensure Windows Installer service is enabled
If the MSI service is not enabled, you may receive this error. In this case, ensure that the Windows Installer Service is enabled.
7] Re-register Windows Installer Service
Do the following:
- Press Windows key + R to invoke the Run dialog.
- In the Run dialog box, type cmd and then press CTRL + SHIFT + ENTER to open Command Prompt in admin mode.
- In the command prompt window, type the command below and hit Enter. The command will unregister the Windows Installer service:
msiexec /unreg
- Once the command is processed successfully and you get the success message, input the following command and hit Enter to register the Windows Installer once again:
msiexec /regserver
After the second command is processed successfully, restart your computer, and try installing the software again. If the install/uninstall error persists, try the next solution.
8] Modify registry key value

If short file name creation is disabled, you’ll encounter this error. So, to fix the issue, you can enable short file name creation via the registry. Here’s how:
Since this is a registry operation, it is recommended that you back up the registry or create a system restore point as necessary precautionary measures. Once done, you can proceed as follows:
- Press Windows key + R to invoke the Run dialog.
- In the Run dialog box, type regedit and hit Enter to open Registry Editor.
- Navigate or jump to the registry key path below:
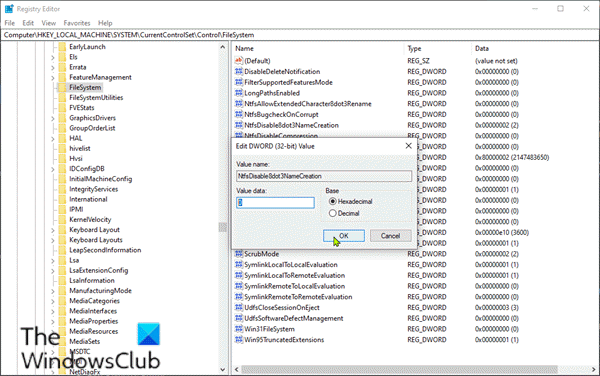
Computer\HKEY_LOCAL_MACHINE\SYSTEM\CurrentControlSet\Control\FileSystem
- At the location, on the right pane, double-click the NtfsDisable8dot3NameCreation entry to edit its properties.
- In the properties dialog, set the Value data to 0.
- Click OK to save changes.
- Exit Registry Editor.
- Restart computer.
On boot, try the software installation again – the install process should complete without errors.
Read: Fix Office installation Error Code 1603.
I hope this helps!