If your Ethernet keeps disconnecting in Windows 11/10, then the issue could be with the hardware or the operating system. In case the problem is with the Ethernet cable, you can consider replacing it; otherwise, this post offers some suggestions to help you fix the problem.
Ethernet keeps disconnecting in Windows 11/10
Try these solutions if the Ethernet connection keeps disconnecting randomly on your Windows 11/10 computer:
- Run the Network Adapter troubleshooter
- Update the Network Adapter drivers
- Make changes to driver power management
- Use Network Reset.
1] Run the Network Adapter troubleshooter

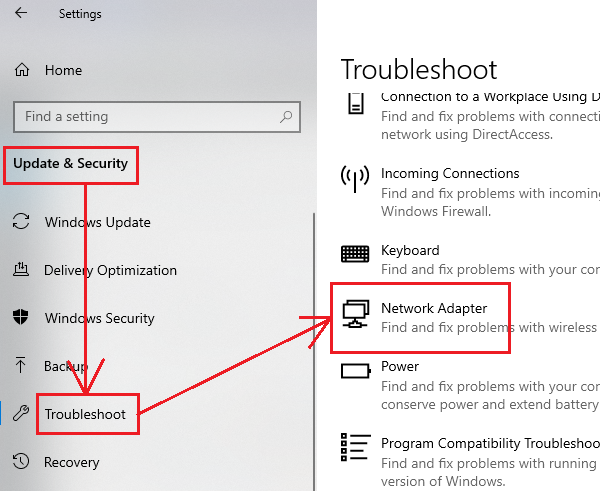
The Network Adapter troubleshooter is an excellent tool for checking issues related to the network and resolving them if possible. The procedure to run the Network Adapter troubleshooter is as follows:
- Windows 10: Click on Start and go to Settings > Updates & Security > Troubleshoot > Additional troubleshooters.
- Windows 11: Click on Start and go to Settings > System > Troubleshoot > Additional troubleshooters.
Select the Network Adapter troubleshooter from the list and run it.
Reboot your system once you are done.
Read: Network Adapter missing.
2] Update the Network Adapter drivers
If the Network Adapter drivers are obsolete or corrupt, you must replace them. While updating Windows automatically updates all the drivers, it isn’t necessarily true for all drivers.
In such a case, you can consider downloading the Network Adapter drivers from Intel.com and simply run the application named Wired PROSet. That’s it!
Read: Ethernet slower than WiFi in Windows 11
3] Make changes to driver power management

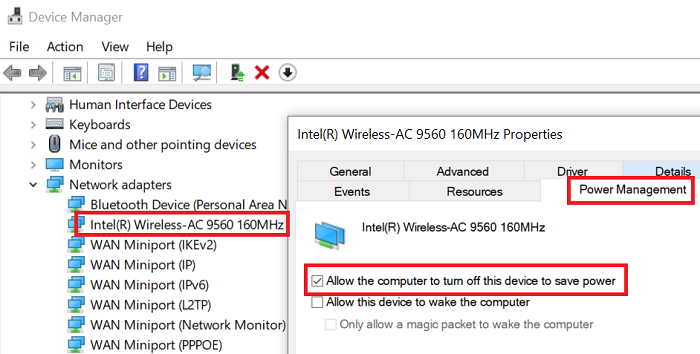
If the Network Adapter troubleshooter doesn’t solve the problem in the discussion, try making changes in the Device Manager as follows:
Open the Network Adapter Properties as shown in the previous solution.
Go to the Power Management tab and uncheck the option associated with Allow computer to turn off this device to save power.
Click OK and restart the system.
Related: Ethernet connection is not working in Windows.
4] Use Network Reset
If nothing helps, the wise thing to do would be to perform a Network Reset on the system.
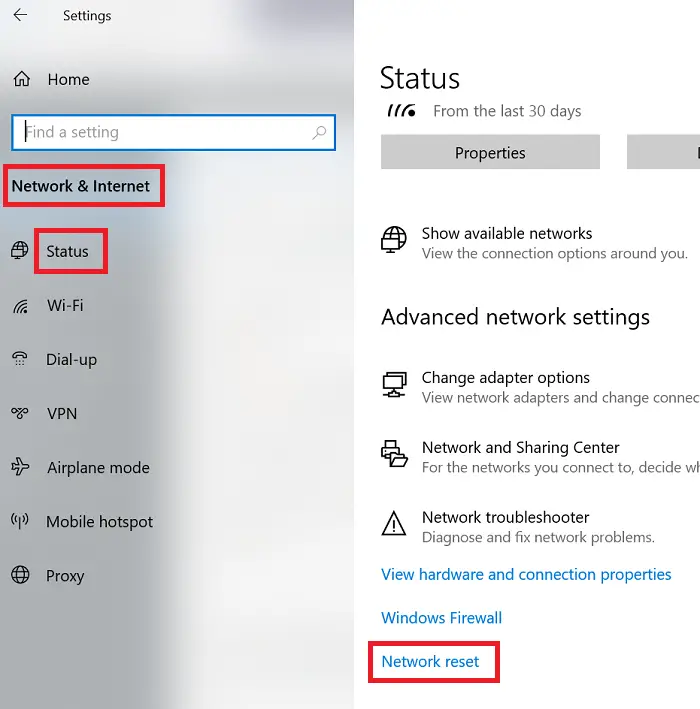
In Windows 10, click on the Start button

- Go to Settings > Network & Internet > Status.
- Scroll down and you will find the Network Reset option. Click on it.
- On the next page, select Reset now to perform the Network Reset procedure on your system.
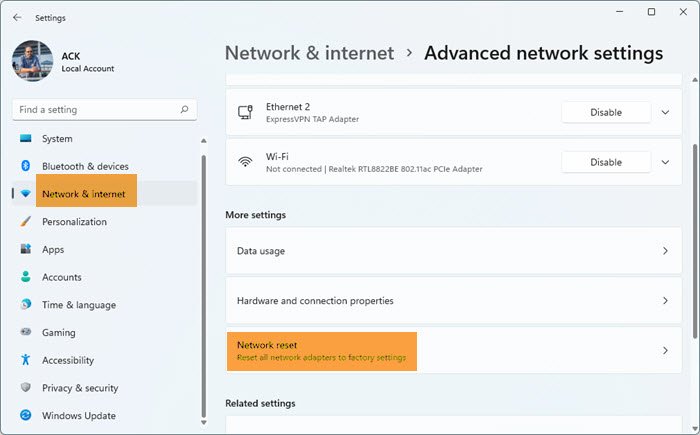
In Windows 11, open Settings

- Click open Network and internet settings
- On the right, scroll down till you see Advanced network settings and then click on it
- Again scroll down on the next screen till you see More settings
- Here click on Network reset
- On the next screen, click on the Reset now button and wait for the process to complete.
- Restart your computer.
I hope this helps.
Leave a Reply