Internet connection issues are common with Windows but imagine a situation in which your Ethernet cable works, however, the Wi-Fi adapter doesn’t. If you encounter this problem on your system, then please read through this article for the causes and resolutions.

Ethernet works but not WiFi in Windows 11/10
The causes could be either the adapter or some other software setting on the computer. In either of these cases, you can try the following solutions sequentially:
- Check if your computer supports Wi-Fi
- Check for a physical Wi-Fi switch on the keyboard
- Make sure your system is in the range of the wireless network
- Check if the wireless adapter is Enabled
- Check if the Wi-Fi network is connected or not
- Run the Network Adapter troubleshooter
- Update the Network drivers
- Turn OFF the anti-virus and Windows Defender Firewall temporarily
- Power-cycle modem, router, and computer
- Release IP address.
1] Check if your computer supports Wi-Fi
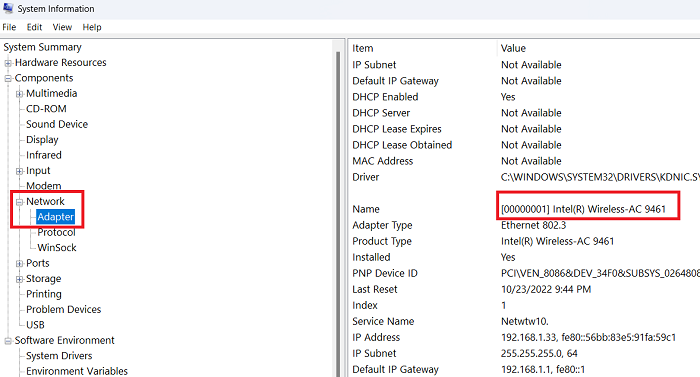
Older computers did not come with a physical Wi-Fi adapter. Other than this, many desktops don’t necessarily have a Wi-Fi adapter. Please check your system’s information to know whether your system has a valid Wi-Fi adapter. The procedure is as follows:
- Search for System information in the Windows Search bar.
- Open the application.
- Go to Components >> Network >> Adapter.
- Now check for the names of the adapters and whether a Wireless adapter is present or not.
- If a wireless adapter is not present in your system, then you can use an external USB Wi-Fi adapter on your system.
2] Check for a physical Wi-Fi switch on the keyboard
Many computers come with a separate Wi-Fi switch on them. Check if your keyboard has one. Rather most keyboards have an option whether the Fn key is used along with another Function key to switch the Wi-Fi adapter ON or OFF. Press the combination once to check if it fixes the problem.
Read: Ethernet or WiFi not working after BIOS update
3] Make sure your system is in the range of the wireless network
Unlike an Ethernet cable, the range of a wireless network depends on the distance from the router. If your system is placed in a different room with thick walls, then you can use a wireless extender to extend the range of the router. Otherwise, you can buy a stronger router.
4] Check if the wireless adapter is Enabled
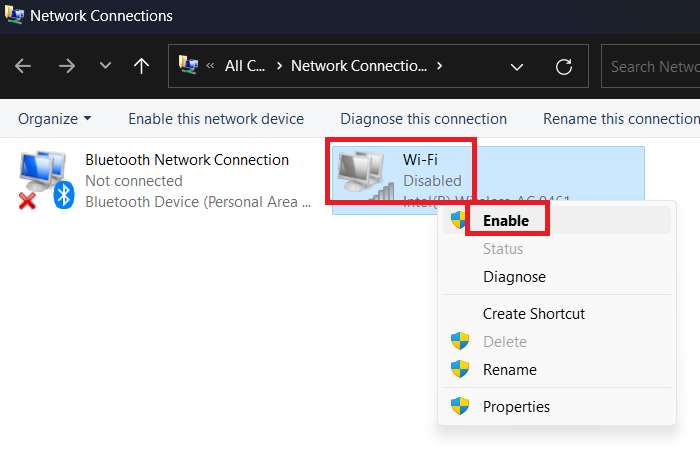
It is important to check whether the wireless adapter is Enabled. You can verify this as follows:
- Press Win+R to open the Run window.
- In the Run window, type the command NCPA.CPL and hit Enter to open the Network Connections window.
- If you see a Disabled sign, right-click on it and select Enable.
- Then reboot your system and the wireless network will start working.
5] Check if the Wi-Fi network is connected or not
Unlike the ethernet cable, the Wi-Fi network necessarily needs a password to connect. It should specifically be marked Connected when you check the Wi-Fi symbol. In some cases, it is merely marked as secured.
Try clicking on the network and entering the password once again.
6] Run the Network Adapter troubleshooter
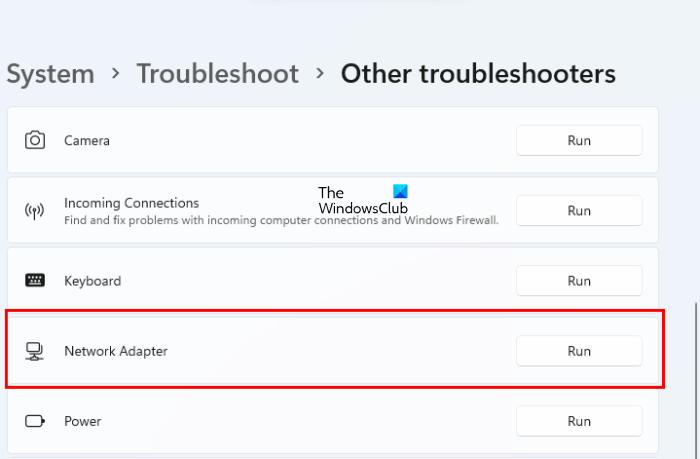
The Network Adapter troubleshooter checks for problems related to the network adapter and resolves them if possible. The procedure is as follows:
- Right-click on the Start button and select Settings from the menu.
- Go to the System tab on the list on the left-hand side.
- In the right pane, select Troubleshoot >> Other troubleshooters.
- Click on Run corresponding to the Network Adapter troubleshooter.
Let the troubleshooter do its job and check if it resolves the problem.
7] Update the Network drivers
Windows Update is probably the most efficient way to update network drivers in Windows 11. Whether it is a Wi-Fi driver or Ethernet driver, you can use the Windows Update to download and install the pending updates. The best thing is that you can download such updates manually. To update Network drivers in Windows 11 using Windows Updates, follow these steps:
- Press Win+I to open Windows Settings.
- Go to the Windows Update tab on the left side.
- Click on the Advanced options.
- Click the Options updates menu under Additional options.
- Expand the Drivers updates section.
- Tick the checkbox and click the Download & install button.
It will start downloading and installing the update automatically.
You can also use the Device Manager to update Network drivers:
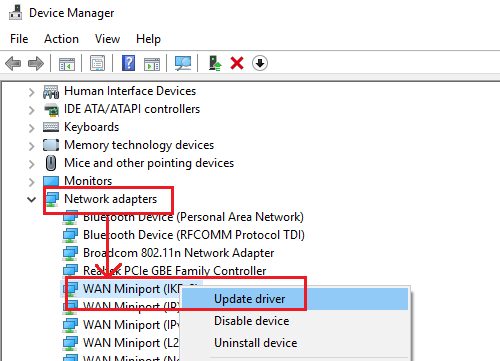
The procedure is as follows:
- Press Win+R to open the Run window.
- In the Run window, type the command DEVMGMT.MSC and hit Enter. This will open the Device Manager window.
- In the Device Manager window, expand the list of Network adapters.
- Right-click on the wireless network adapter and select Update driver.
- Reboot your system.
Read: How to install WiFi Drivers on Windows?
8] Turn OFF anti-virus and Windows Defender Firewall temporarily
At times, an overprotective anti-virus or Windows Defender Firewall can prevent access to the wireless network. In this case, you can turn these OFF temporarily to isolate the cause. In case of third-party anti-virus software products, please contact the product manufacturer. Then you can turn OFF the Windows Defender Firewall. You can also turn OFF Windows Security.
Later, remember to turn all these options back ON.
9] Power-cycle modem, router, and computer
In the case of wireless networks, it is quite common for the system to pick an APIPA IP address. In this case, the resolution can be power cycling the modem, router, and system. The procedure is as follows:
- Switch OFF the modem, router, and computer all three devices.
- Now, switch ON the modem and wait for a few minutes for the lights to be stable.
- After this, switch ON the router and wait for the lights to be stable on it.
- Lastly, switch ON the computer and it will probably pick up the correct IP address this time.
10] Release IP address
The last solution will be to release and renew the IP address of the system. The procedure is as follows:
Search for Command Prompt in the Windows Search bar.
Click on Run as administrator in the right pane to open the elevated Command Prompt window.
Type the following commands and hit Enter after each command to execute them. to change the IP address:
IPCONFIG /RELEASE
IPCONFIG /RENEW
Reboot your system after these commands have been executed. Then check if it resolves the problem.
Fix: Network & Internet connection problems in Windows
Why is Ethernet working but not WiFi?
Several things could be responsible for this error on Windows PC. For example, the wireless device driver, network adapter, security application, etc., could be the reasons why Ethernet is not working but WiFi is not working at all. You can go through the aforementioned solutions to find the problem and fix it accordingly.
Why won’t my Windows 11 let me connect to WiFi?
If your Windows 11 computer has a faulty wireless driver, it won’t let you connect to the network. On the other hand, your computer must have the 5GHz adapter if you are trying to connect to a 5GHz network. Apart from that, you can also check the network adapter driver, firewall settings, etc., as well.