In this post, we will see how you can export and back up your Device Drivers using PowerShell in Windows 11/10. Windows 11/10 ships with PowerShell which is a command-line shell and scripting language, built on the .NET Framework, designed for system administration, IT professionals and developers. We have already seen a bunch of posts where we have seen how PowerShell can help us simplify carrying out of tasks. You can update Windows Defender definitions, list Drives, uninstall Universal apps, find scheduled tasks queued status, create System Image, create a desktop shortcut to open Windows Store apps, and even get an Installed Driver list, to mention a few.
Backup Windows Drivers using PowerShell

Open PowerShell as an Administrator. To open an elevated PowerShell prompt, in the taskbar search, type powershell. Now see the result Windows PowerShell which appears on the top. Right-click on it and select Run as Administrator.
We will be using the Export-WindowsDriver cmdlet to back up your drivers. The Export-WindowsDriver cmdlet exports all third-party drivers from a Windows image to a destination folder.
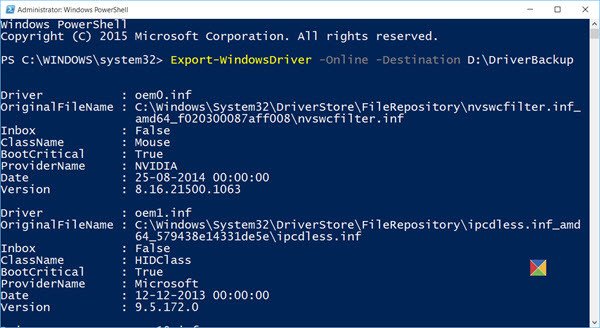
In the PowerShell window, type the following command and hit Enter:
Export-WindowsDriver -Online -Destination D:\DriverBackup
Here D:\Driver Backup is the destination folder, where the Drivers will be exported and saved to.
You can also export drivers from an offline image. This command exports third-party drivers from an offline image mounted at c:\offline-image is:
Export-WindowsDriver -Path c:\offline-image -Destination D:\DriverBackup
A detailed read can be found at TechNet.
Now take a look at how to generate a list of Disabled Features or a list of installed Drivers on Windows 11/10 using PowerShell.
How to do driver backup from PowerShell in Windows?
To backup drivers in Windows 11/10 using PowerShell, you need to open the PowerShell window with administrator privileges first. Then, you can enter this command: Export-WindowsDriver -Online -Destination D:\DriverBackup. For your information, you can change the location as per your requirements. On the other hand, you can use the Windows Terminal to execute the same command.
How do I backup and restore drivers in Windows?
To backup and restore drivers in Windows 11/10 PC, you can follow the aforementioned guide. For that, you need to enter an elevated PowerShell window and use this command: Export-WindowsDriver -Online -Destination D:\DriverBackup. If you want to export drivers from an offline image, you need to use this command: Export-WindowsDriver -Path c:\offline-image -Destination D:\DriverBackup.
You can also use the built-in Device Manager to manage, backup, restore your Drivers. Then there are freeware like Double Driver, Driver Fusion, Free Driver Backup, etc, that help you easily backup and restore drivers.
Very valuable information here… it’s nice finding others who speak your language.
Would be nice to include instructions to import those backed up files as well.
Just throw DPInst into every driver folder, run it, and it’s going to install it. Heck, you can even create an automatized script for it.
how to restore?
Dism /online /Add-Driver /Driver:E: /Recurse