Sharing large files with friends, families, and even business associates over the web is no easy task. Yes, you could use a cloud storage platform, but who wants to waste time downloading large files anyway. To reduce time, we recommend compressing the files with a ZIP compression tool. Folks have been using such tools for decades, and contrary to what you might think, they are quite proficient at what they do.
Now, there are a lot of ZIP tools out there that are free to use, but we’re not going to talk about the obvious ones today. Instead, we’ve decided to look at Express Zip File Compression. It’s a neat tool because it supports all the popular formats and then some. Not only that, but it has an easy-to-understand user interface, and that’s great for novices who are not used to using tools such as these. Well, let’s look at what Express ZIP File Compression has to offer.
Express ZIP File Compression for Windows
Let us see some of its features and how to use it.
1] Create a new ZIP archive

When it comes down to creating a new ZIP archive with Express ZIP File Compression, first-time users should have no problems, at least from our point of view.
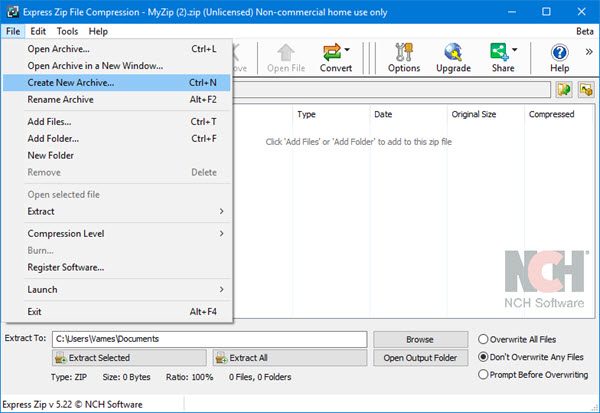
OK, so to create a ZIP archive, you’ll need to launch the software, then click on File > Create New Archive or CTRL + N. A new window will pop up that gives you the ability to save the archive in your preferred location.
Type the name for your new archive, then choose whether or not it’ll be a regular ZIP archive, or 7ZIP instead. Hit the save button, and you’re good to go. Bear in mind that you will be able to drag and drop files into the archive without problems.
Alternatively, you could create a folder with the files inside, then right-click on that folder from within Windows Explorer, and select Express ZIP > Compress to.
2] Encrypt archive

If you’re interested in using this option, then maybe it’s because you have some “important” pictures and videos no one should look at but yourself. To encrypt these files, be sure to create a folder and transfer all files to the newly created folder.
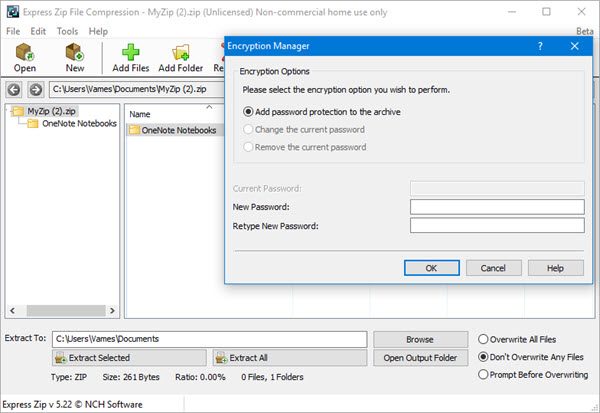
You’ll now need to click on the Add Folder button from within the tool, then search for the folder you want to encrypt. You’ll see the folder in the middle, so just click on it, then select Tools > Encrypt.
You’ll be asked to add a password, so do that, then hit the OK button to complete the encryption.
3] Convert ZIP archive to another format
To convert from ZIP to 7ZIP or other formats, click on the button that says Open, then search for your preferred ZIP folder. Click on it, hit the OK button, then select the Convert button. From here, you can choose from any of the support formats.
Bear in mind that outside of ZIP and 7ZIP, the other supported formats are not editable.
4] Options

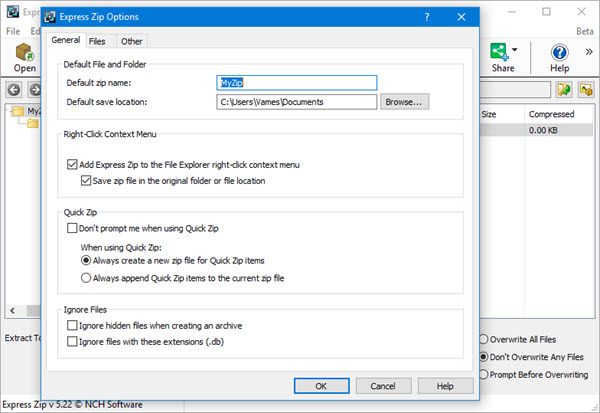
When it comes down to opening the options section, you’ll need to click on Home then Options. From here you can change the default ZIP name, the default Save location, and whether or not Express ZIP File Compression will show up in the context menu.
You can also choose if you want the tool to become the default archiver for all supported formats.
What is the quickest way to zip a file?
The quickest and easiest way to zip a file is to use the built-in feature of Windows 11/10. First, select the files, then right-click and go to “Send to > Compressed (zipped) folder.” If you are a Windows 11 user, you will see the “Compress to Zip file” option directly in the right-click context menu.
How do I unzip an express zip file?
You can easily unzip an express zip file on your Windows 11/10 computer. An express zip file is a file created by using the Express Zip File Compression software. Right-click on the zip file and select Extract All. Alternatively, you can also use the Express Zip File Compression software for the same.
Download Express Zip File Compression tool directly from the official website. It is available FREE for non-commercial use only.
That’s it,
Read next: Best Free File Compression software for Windows 11/10.
Leave a Reply