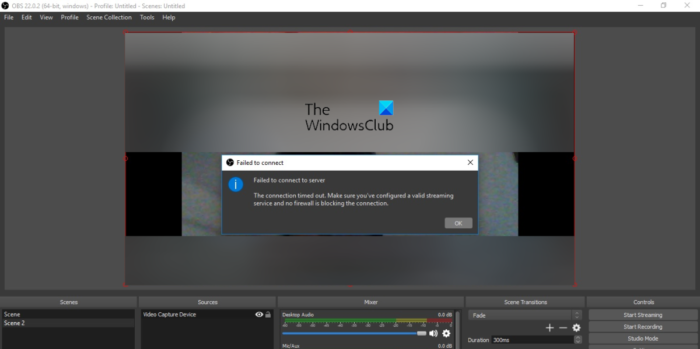
OBS Studio is a free and open-source video recording and live-streaming application for Twitch, Facebook, YouTube, Mixer, SoundCloud, and many more services. A lot of OBS users have complained about getting the Failed to connect to server error when trying to use a streaming service. When triggered, you will get the following error message:
Failed to Connect to Server
The connection timed out. Make sure you’ve configured a valid streaming service and no firewall is blocking the connection.

Now, there can be various reasons why this error might occur.
- The error could be caused if your OBS app is not up-to-date.
- Also, if your internet connection is weak or unstable, you might get the error at hand.
- It might also be the case that the streaming server is currently down and unavailable which is why you are experiencing the error at hand.
- Your firewall can be another reason for the error. If your firewall is preventing connection establishment between the OBS Studio and the streaming service, you will get the error at hand.
There can also be some other scenarios that might cause the error at hand. If you are one of the affected users who keep getting the “Failed to connect to server” error on OBS Studio, this post will interest you. In this guide, we will explain the fixes that you can use to get away with this error. So, let us get straight to the solutions now.
Fix Failed to connect to server error on OBS Studio
Here are the fixes you can use if you get the “Failed to connect to server” error while streaming on OBS Studio:
- Use some generic troubleshooting methods.
- Make sure the OBS Studio app and Windows are up-to-date.
- Switch to a different streaming server.
- Reset the Stream key.
- Turn on Dynamic Bitrate in OBS Studio.
- Modify the Bind to IP option.
- Allow OBS Studio through your firewall.
- Reduce the MTU Size.
- Reset your router.
1] Use some generic troubleshooting methods
Before getting your hands on advanced fixes, we recommend using some regular workarounds that might fix the issue for you. At first, you should try closing OBS Studio and then reopening it to check if you are able to use streaming services without the error at hand. Apart from that, you can also reboot your PC as well as your networking device to check if it fixes the problem or not.
You can also try using OBS Studio on some other device and see if it works fine or not. Apart from that, make sure that the streaming servers are available and running at the moment.
You also need to ensure that your internet connection is stable and active. Try streaming videos on some other service and see if the internet is working fine or not.
If these tips don’t help, you can move on to the next potential fix to resolve the “Failed to connect to server” error on OBS Studio.
2] Make sure the OBS Studio app and Windows are up-to-date
Also, you need to ensure that your OBS Studio app is up-to-date. The app might not work well and you are likely to run into such errors if you are using an outdated version of OBS Studio. Hence, if the scenario is applicable, update your OBS Studio app and then try streaming to check if the error is fixed or not. In addition to that, make sure you have installed all the pending Windows updates.
To update OBS Studio, you can follow the below steps:
- Firstly, open the OBS Studio app.
- Now, go to the Help menu and select the Check for updates option.
- Once the updates are installed, restart your computer and then see if the error is fixed or not.
For updating Windows, you can use the Settings app. Open Settings, go to Windows Updates and press the Check for updates button.
If the error is still not resolved, you can follow the next potential solution.
Read: Fix OBS Game capture black screen on Windows.
3] Switch to a different streaming server
If the streaming server for the service you are trying to use is down currently, you will face the “Failed to connect to server” error on OBS Studio. However, you can fix the error by switching to a different streaming server location that is available currently. Here are the steps to do that:
- First, open the OBS Studio app and tap on the File > Settings menu.
- Now, inside the Settings window, move to the Stream tab and select the streaming service you are having a problem with.
- After that, click on the Server drop-down menu option and choose a different server location.
- Next, save the settings by clicking on the Apply button and restart OBS Studio to check if the error is gone or not.
You can try changing the streaming server multiple times and see which one works for you. If you still encounter the same error, move on to the next potential fix.
4] Reset the Stream key
There might be some issue with your streaming key which is why you keep experiencing the error at hand. So, in that case, you can try resetting your streaming key and re-entering it in OBS Studio to check if the error is fixed. For example, if you are experiencing this error with the Twitch service, you can follow the below steps to reset your stream key:
- Firstly, open Twitch in a web browser and sign in to your account.
- After that, navigate to your profile and move to the main dashboard.
- Next, press the Settings option and click on Stream.
- Now, tap on the Reset button present next to Primary Stream Key and copy the newly generated stream key.
- Once done, open the OBS Studio app and click on the File > Settings menu option.
- Now, go to the Stream section, select the Stream service accordingly, and inside the Stream Key box, enter the new stream key.
- Finally, apply changes by pressing the Apply button and then check if the error is fixed or not.
Similarly, you can reset the stream key on other services like Facebook, YouTube, etc., and then re-enter the stream key in OBS Studio settings.
If the error continues, you can move on to the next potential solution.
Read: Fix OBS not capturing Game Audio on Windows.
5] Turn on Dynamic Bitrate in OBS Studio

The error could be triggered if the frames keep on dropping while streaming. Hence, if the scenario is applicable, you can enable the Dynamic Bitrate option on OBS to fix the error. The Dynamic Bitrate feature basically detects if your internet is limited. If so, it will decrease your bitrate so that the frames are not dropped.
Here are the steps to enable Dynamic Bitrate in OBS Studio:
- Firstly, open OBS Studio and go to the File > Settings option.
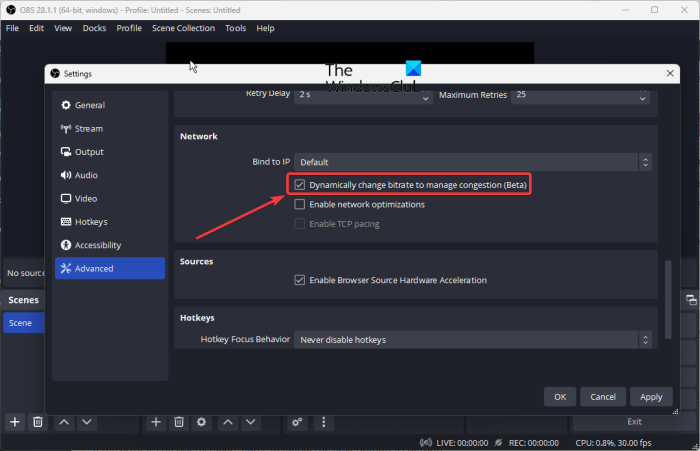
- In the Settings window, move to the Advanced tab and scroll down to the Network section.
- After that, tick the Dynamically change bitrate to manage congestion checkbox and press the Apply button.
- Finally, restart OBS Studio and see if the error is gone now.
If you still get the same error, you can move on to the next potential fix.
6] Modify the Bind to IP option

If the above solutions didn’t work, you can try changing the Bind to IP option in OBS Studio and see if the problem is resolved. Misconfigured Bind to IP settings in OBS can cause the error at hand. Hence, configure it properly using the below steps:
- First, start the OBS Studio app and press the File > Settings option.
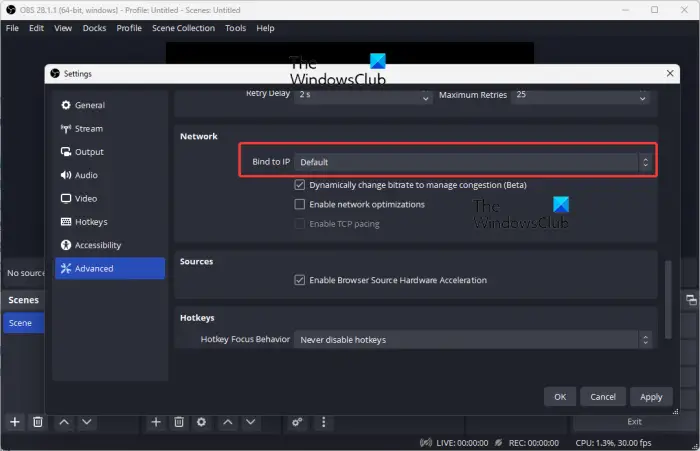
- Now, go to the Advanced tab and scroll down towards the end in the left pane to the Network section.
- After that, click on the Bind to IP drop-down button and choose the Default option. If the Default option is already chosen, you can choose the IP address with the network connection name.
- Finally, apply settings and then check if the “Failed to connect to server” error is fixed or not.
In case you don’t find any luck with this method, move on to the next potential fix to resolve the error.
See: Fix OBS Studio keeps crashing on Windows PC.
7] Allow OBS Studio through your firewall
As the error message prompts, this error could be triggered if your firewall is blocking the connection between the OBS Studio app and streaming servers. And thus, you are getting the “Failed to connect to server” error. Hence, try disabling your firewall and then see if the error is gone. If yes, you can fix the error permanently by allowing OBS Studio through your firewall.
Here are the steps to do that:
- First, open the Windows Defender Security Center app and click on the Firewall and Network Protection option.
- After that, press the Allow an app through firewall option and click on the Change Settings button.
- Next, look for the OBS Studio app in the list and tick the checkmark associated with it. If you don’t find it in the list, click on the Add another app option, add the main executable of OBS Studio, and checkmark the app.
- Now, allow the app on both Private and Public networks by ticking the respective checkboxes and then click on the OK button.
- Lastly, launch OBS and see if the error at hand is fixed or not.
RELATED: Fix OBS not capturing Game Video on Windows PC.
8] Reduce the MTU Size
One more fix that you can use is lower the MTU size and see if the error is fixed. MTU, which stands for Maximum Transmission Unit, is basically the maximum packet or frame size that is allowed to be sent on a network. You might face the error at hand if the streaming server starts dropping packets that are greater than the configured MTU size. Hence, if the scenario is applicable, reducing the MTU size should work for you.
Here’s how to do that:
- Firstly, open Windows PowerShell with administrator rights.
- Now, enter the below command in the window:
netsh int ipv4 show subinterface
- After that, check your network’s name in the Interface column and then enter the below command accordingly:
netsh interface ipv4 set subinterface <subinterface_name> mtu=1400 store=persistent
- Finally, reboot your computer and see if the error is fixed or not.
If the error still keeps popping up, we have one more fix that you can try. So, move on to the next potential troubleshooting method.
9] Reset your router
The fault might lie with your router settings which may be corrupted and old. Hence, you can try resetting your router to its default settings and see if it works for you. For that, make sure that your router is switched on and then locate the Reset button on the device. After that, press and hold the Reset button for about 30 seconds and let it be reset successfully. Once done, you can check if the error is resolved or not.
Read: Fix OBS not capturing Game Video on PC.
How do I fix Streamlabs failed to connect to server?
To fix the Failed to connect to server error on OBS, you can update the OBS app to its latest version. Apart from that, try changing to a different streaming server location as the current server might be unavailable or down. Besides that, you can reset and re-enter your stream key, lower the MTU size, enable the Dynamic Bitrate feature on OBS, etc. If nothing works, make sure to allow OBS through your firewall as your firewall might be the main culprit.
How do I fix OBS Studio Failed to connect to the server on Facebook?
If you are getting the Failed to connect to the server error on OBS while streaming on Facebook, try resetting your stream key on Facebook and then re-enter it in OBS settings. Other than that, you can also fix the error by updating your app, allowing OBS through your firewall, resetting your router, enabling Dynamic Bitrate, etc.
Leave a Reply