You may get the Failed to create a proxy device for the USB device error when you try to plug in an external USB device like a hard drive in VirtualBox on your Windows 11 or Windows 10 computer. This post provides the most applicable solutions to the issue for affected PC users.
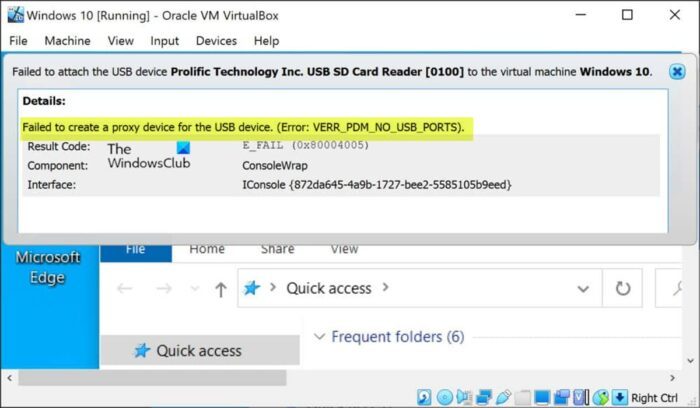
Failed to create a proxy device for the USB device. (Error: VERR_PDM_NO_USB_PORTS).
Failed to create a proxy device for the USB device — VirtualBox error
If you get the Failed to create a proxy device for the USB device error when you try to connect an external USB hardware when running a virtual machine in VirtualBox on your Windows 11/10 PC, you can try our recommended solutions presented below in no particular order and see if your problem is resolved on your device.
- Initial checklist
- Install VirtualBox Guest Additions
- Install VirtualBox Extension Pack
- Enable USB 3.0 Controller
- Manually install USB driver for VirtualBox
- Modify Windows Registry
Let’s take a look at the description of the process involved concerning each of the listed solutions.
1] Initial checklist
Before you proceed with the solutions below, to see if you can resolve the issue, you can first eject the USB device from the host machine, and then re-attach the device. To do this on your host computer, click on the arrow sign on your taskbar, right-click the USB ejector icon and select the USB device that you want to remove from your system. Once removed, you can now reconnect or remount the ejected USB device. If this didn’t work, you can unplug the USB device, then restart the PC to rule out any possibility of a glitch or one-time bug on the system. After the host machine restarts, you can start the virtual machine and plug in the USB device. Now, you should see the USB device has appeared on your system.
2] Install VirtualBox Guest Additions
Guest Additions in VirtualBox consist of applications and device drivers that help to enhance the performance of the operating system. After you must have successfully installed Windows in a VirtualBox VM, it’s recommended to install the Guest Additions package for better usability and performance.
To install VirtualBox Guest Additions, do the following:
- Launch VirtualBox.
- Right-click the virtual machine, and select the Start submenu.
- Next, choose the Normal Start option.
- Sign in to your Windows 11/10 account.
- Click the Devices menu.
- Select the Insert Guest Additions CD image option.
- Next, open File Explorer in the virtual machine.
- On the left navigation pane, click on This PC.
- Under the Devices and drives section, double-click to open the VirtualBox Guest Additions disc.
- Next, double-click the VBoxWindowsAdditions.exe file to launch the installer.
- Click the Next button.
- Click the Next button again.
- Click the Install button.
- Select the Reboot now option.
- Click the Finish button.
Once the installation is done, connect your USB device and see if the Failed to create a proxy device for the USB device error reoccurs. If so, try the next solution.
Read: How to speed up a VirtualBox Virtual Machine and make it run faster
3] Install VirtualBox Extension Pack
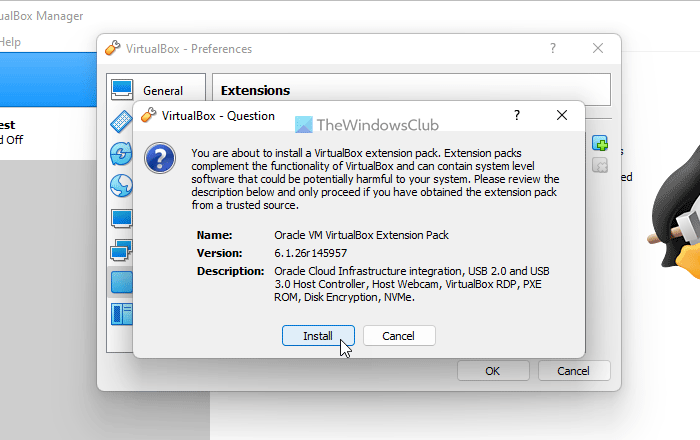
The VirtualBox Extension Pack helps greatly in improving the functions of the operating system, and it also extends the functionality of the app. The package adds the following functionality: Support for USB 2.0 and USB 3.0 devices. To get the Oracle version, you need to download the Extension Pack for all supported platforms.
To install VirtualBox Extension Pack, do the following:
- Launch VirtualBox.
- Click File > Preferences.
- Click the Extension tab.
- Click the + button.
- Navigate to where you saved the Extension Pack.
- Select the Extension Pack.
- Click Open.
- When prompted, click the Install button.
- Scroll through the EULA and then click I Agree.
If this is not the case for you because you already have the package installed, but the issue in highlight isn’t resolved, you can try the next solution.
4] Enable USB 3.0 Controller
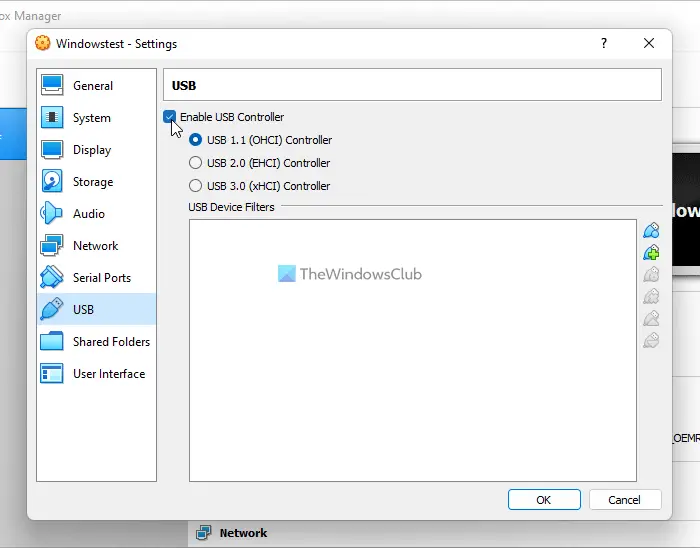
The issue you are currently facing could be due to you trying to use a USB 3.0 device with a guest that does not support USB 3.0, or you haven’t enabled the USB 3.0 Controller option in the VM settings.
To enable the USB 3.0 Controller option, do the following:
- Open the VirtualBox on your computer.
- Right-click on the virtual machine and select the Settings option.
- Next, click on Ports > USB tab.
- Check the Enable USB Controller option.
- Now, select the radio button for the USB 3.0 (xHCI) Controller option.
- Next, click on the Add button and select the USB device unable to connect.
- Click on OK and select Exit.
Once all the steps are done, connect the USB device and see if the error has been resolved. Otherwise, try the next solution.
Read: USB 3.0 External Hard Drive not recognized in Windows
5] Manually install USB driver for VirtualBox
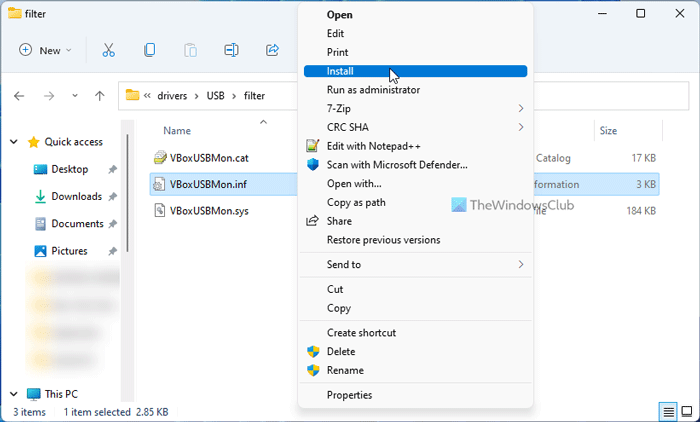
If there is an issue with the virtual USB driver, you’re likely to encounter the issue in focus. In this case, you need to manually install the USB driver on your Windows 11/10 host machine. To perform this task, do the following:
- Press the Windows key + E to open File Explorer on your computer.
- Navigate to the directory path below:
C:\Program Files\Oracle\VirtualBox\drivers\USB
- At the location, open the device folder.
- Right-click on the VBoxUSB.inf file and select the Install option.
- Open the filter folder.
- Right-click on the VBoxUSBMon.inf and select the Install option.
Once you complete the installation procedure, restart the VirtualBox application and check if the issue is resolved. If not, try the next solution.
Read: How to fix VirtualBox USB not detected in Windows computer
6] Modify Windows Registry
This solution requires you to edit or modify the registry by deleting the UpperFilters key. UpperFilters and LowerFilters are add-ons added by third-party software during installation. It helps installed programs communicate with your device (system) drivers. Sometimes, these filters can cause Device Manager errors.
First, you need to find the Class GUID for the USB device as follows:
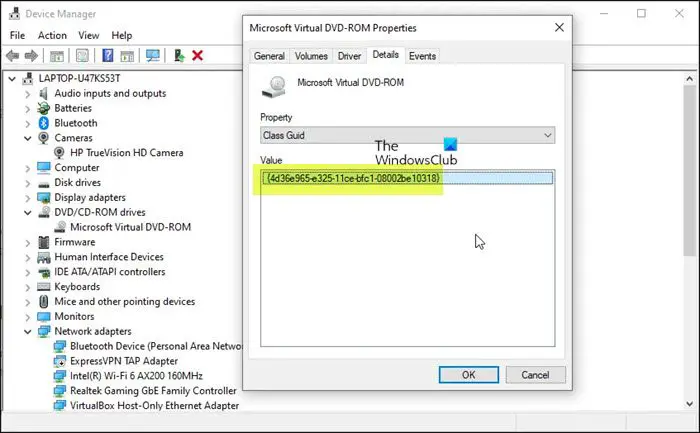
- Press the Windows key + R to open Run.
- In the Run dialog box, type devmgmt.msc and hit Enter to open the Device Manager.
- In Device Manager, expand the device category for which you want to view the Class GUID.
- Right-click on the device driver and choose Properties.
- Open the Details tab.
- Click the drop-down menu and choose Class GUID.
The Class GUID will show up under the Value section and looks like this {ca3e7ab9-b4c3-4ae6-8251-579ef933890f}. Now, with the Class GUID, you can proceed to delete the registry Filter keys for the USB device. Since this is a registry operation, it is recommended that you back up the registry or create a system restore point as necessary precautionary measures. Once done, you can proceed as follows:
- Press the Windows key + R to invoke the Run dialog.
- In the Run dialog box, type regedit and hit Enter to open Registry Editor.
- Navigate or jump to the registry key path below. Substitute the DeviceDriverGUID placeholder with the value you identified earlier.
HKEY_LOCAL_MACHINE\SYSTEM\CurrentControlSet\Control\Class\DeviceDriverGUID
- At the location, on the right pane, right-click on the UpperFilters value and choose Delete.
- Click Yes to confirm the action.
- Next, delete the LowerFilters value if it exists for the same GUID class subkey.
- Exit Registry Editor when done.
- Restart your PC.
On boot, launch the VirtualBox app and fire up your VM, then reconnect the USB device. The issue should be resolved now. You may have to reinstall the USB device driver or any software that is required by the device.
I hope this post helps you!
Related post: VirtualBox Failed to attach the USB device to the virtual machine
How do I get VirtualBox to recognize my USB?
Open settings in VirtualBox, browse to the USB tab, and click the Add button on the very right of the window. Select the USB device that you wish to use from the list. Once done, click OK to save changes and exit. Now go back into your VM window, and from the Host options, select Device > Usb Devices then select your USB device.
If VirtualBox is not detecting USB on your Windows 11/10 PC, do the following:
- Open the VirtualBox on your computer.
- Right-click on the virtual machine and select the Settings option.
- Switch to the USB tab.
- Tick the Enable USB Controller checkbox.
- Click the plus icon on the right side.
- Select the USB device that was not detected.
- Click the OK button. The USB should appear as available.
Read: VirtualBox failed to open/create the internal network
What is a USB filter in VirtualBox?
USB filters in VirtualBox allow you to automatically mount USB devices in VMs running in VirtualBox. To set up a VirtualBox USB filter, right-click on the VM and go to USB. Enable the USB controller and click on the “+” sign on the right side of the window. This will show a list of currently available USB devices.
How do I transfer files from USB to VirtualBox?
Insert the USB device you wish to use. Launch VirtualBox and click File > Preferences, then Extensions and click +. Browse to the downloaded Extension Pack, click Open, then when prompted, Install and follow the prompts to complete the process.
Read: How to transfer Files to Windows Sandbox
How do I transfer files from a PC to virtual machine?
To transfer a file from the host/physical machine to the virtual machine, simply drag the files to the virtual machine window (where the guest OS is displayed). Alternatively, you can right-click the file on the physical computer and select Copy, then right-click in the guest OS and select Paste.