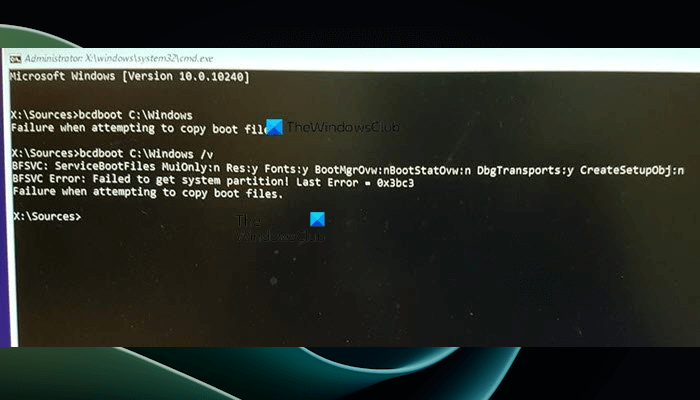
If you receive an error message – Failure when attempting to copy boot files, then this post may be able to help you fix the problem. BCDBoot is a command-line utility that is used to configure boot files, so when you turn on the computer, it knows where to boot from or where Windows is located. The tool is also used to repair system partition or repair the boot menu and also set up a computer to boot from a virtual hard disk.

Failure when attempting to copy boot files in Windows 11/10
There are known multiple ways to fix the problem, and sometimes the problem could be because of UEFI or BIOS difference. Make sure this is followed by someone who knows how to manage things technically on the computer-
- Set Partition as Active
- Check if you have BIOS or UEFI
- Fix MBR or Rebuild it
The scenario here is that you are trying to copy the boot files to either the active partition on the primary hard drive or trying to create boot entries on a USB flash drive or a partition. Doing that, it is failing. If there is anything else that is causing the problem, then using the repair command is a better option.
1] Set Partition as Active
The partition on which the file will be copied has to be active. When the computer starts, it first looks for an active partition and then locates the boot files. Use the following command to set the partition as active using the diskpart tool. You can use this command from Advanced Recovery or from Windows itself when doing it for a USB drive.
diskpart
select disk 0
list partition
select partition Z
active
exit
When you execute the list partition command, note the partition number where Windows is installed. In the above command, Z is the partition where Windows is available. Then execute the bcdboot command to copy the files.
2] Check if you have BIOS or UEFI
A lot of things depend on whether you have UEFI or BIOS. When you boot into advanced recovery, the command is by default set to work with it. So if you boot into BIOS but are mentioning UEFI in the command, then it will result in the said error.
A lot of us simply copy the command and run it, but these are minor things that are important. So if there is confusion, and you are not sure if the computer, i.e., UEFI or Legacy, use the following command.
bcdboot c:\windows /s Z: /f ALL
Here Z is the volume letter of the system partition, and /s has to be used for that. The option /f is for firmware type. You can use BIOS or EFI if you are sure.
3] Fix MBR and Rebuild BCD
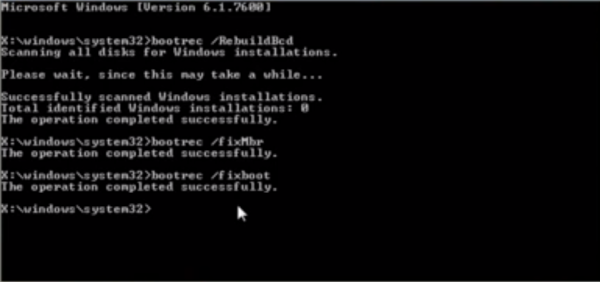
If you are facing this all of a sudden, and you did nothing but turn on the laptop, then it’s probably the boot record that needs a fix. You can fix the MBR and Rebuild BCD to fix the problem. This can be done by booting into the advanced recovery using a Windows 11/10 Bootable media.

When in Advanced Recovery, choose Troubleshoot > Advanced > Command Prompt. And execute the following one after the other. It will self-repair, and let Windows boot normally.
bootrec /fixmbr
bootrec /fixboot
bootrec /scanos
bootrec /rebuildbcd
We will also suggest backup MBR or creating a System Recovery Disk. In case something similar happens, you don’t have to run for the Windows Recovery Disk. To create a system recovery drive in Windows, search for “RecoveryDrive.exe” and follow the wizard.
MBR Backup & HDHacker are two freeware that can help you backup and restore the MBR & Boot Sector.
I hope the post was easy to follow and you were able to resolve the problem with an error message.
What causes PC boot failure?
There are multiple causes of a PC boot failure. Both hardware and software causes are responsible for boot issues on a Windows computer. You may experience boot issues in different scenarios, like boot issues after enabling the Secure Boot, PC won’t boot after updating BIOS, Windows can’t boot after upgrading or installing a new SSD, PC boot failure after replacing the CMOS battery, etc. Different boot failure scenarios require different fixes to resolve the issue.
Can BIOS cause boot failure?
In some cases, boot issues occur after updating the BIOS. If you experience such an issue, you can try some fixes to resolve the issue. First, clear CMOS. For this, you have to open your computer case or laptop and then remove the CMOS battery. Reinsert the CMOS battery after some time of removing it. This step will also reset the BIOS settings to the default. Other fixes include running the Startup Repair through Windows Recovery Environment, reflashing BIOS, rebuilding MBR and BCD, etc. Moreover, the problem may also be associated with your computer motherboard. Contact a professional computer repair technician for further assistance.
Read next: Windows PC not booting after new CPU.
Leave a Reply