In Windows 11/10/8, Microsoft includes a faster way to start your computer. This feature is called Fast Startup. In Windows 7, users could either shut down their computers, put them to Sleep, or Hibernate. According to usage data, it found that a very small percentage of users preferred to use the Hibernate option.
What is Fast Startup in Windows 11/10?
This Fast Startup mode is a hybrid of the traditional cold boot and resuming from hibernate option. In Windows 7, during a shutdown, the OS closes the user session and the kernel session. But in Windows 11/10/8, the kernel session is not closed, but it is hibernated.

Unlike the full hibernate data, whose file size is very large, this “kernel only” or 0 Hibernation data file is much smaller. As a result, it takes much less time to write it to disk. Using this file during boot gives a substantial time advantage while starting Windows 11/10/8.
How to Enable or Disable Fast Startup in Windows 11/10
You can enable or disable Fast Startup in Windows 11/10 by using any one of these methods:
- Using Control Panel
- Using Command Prompt
- Using Group Policy Editor
- Using Registry Editor.
1] Using Control Panel
The Fast Startup option is enabled by default in Windows 11/10/8. You can access its settings here.
Open Power Options using the Search bar. Alternatively, you could click on the Power icon in your notification area and select More Power Options.
Clicking on Power Options will open the following window.
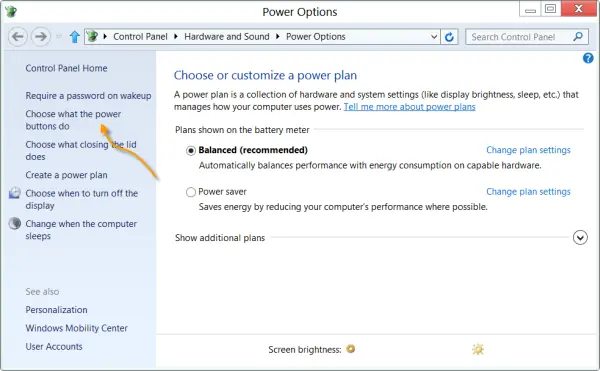
In the left pane, you will see the option: Choose what the power buttons do. Click on it.
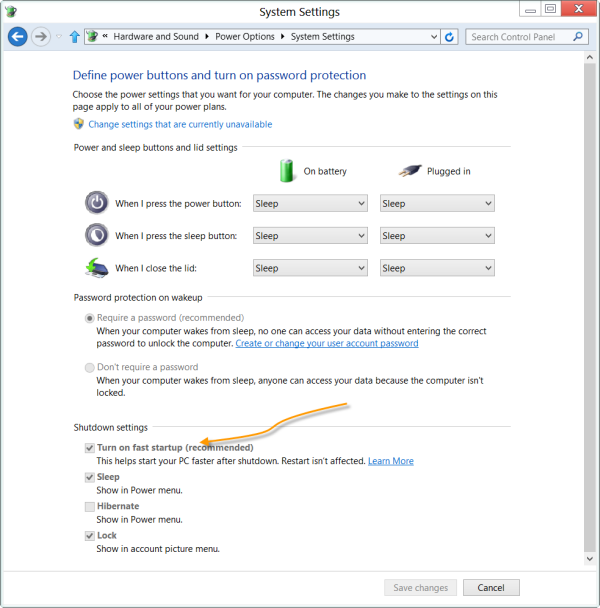
Here, you will see that the default recommended setting box Turn on fast startup (recommended) is checked.This is one of the reasons, why Windows now starts faster.
Uncheck this box and save the changes to disable Fast startup.
2] Using Command Prompt
Open an elevated command prompt window and execute the following command to disable Fast startup:
powercfg -h off
To re-enable Fast startup, use:
powercfg -h on
3] Using Group Policy Editor
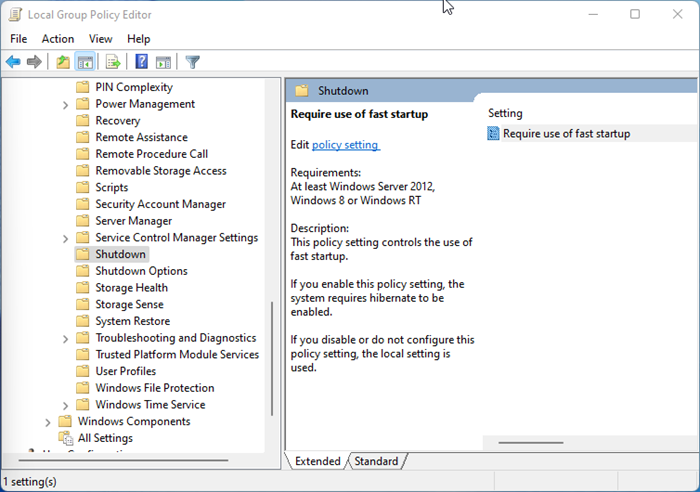
Open Group Policy Editor and navigate to the following setting:
Computer Configuration\Administrative Templates\System\Shutdown
Double-click Require use of fast startup policy on the right side
This policy setting controls the use of fast startup.
If you enable this policy setting, the system requires hibernate to be enabled.
If you disable or do not configure this policy setting, the local setting is used.
Make your selection as follows:
- Enabled: Fast Startup will always be used if this setting is selected.
- Disabled: Fast Startup is not enforced and will use the local policy or the Control panel settings.
- Not Configured: By default, most computers will have this set to not configured. If this option is used, Fast Startup is not enforced and will use the local policy (aka control panel settings).
4] Using Registry Editor
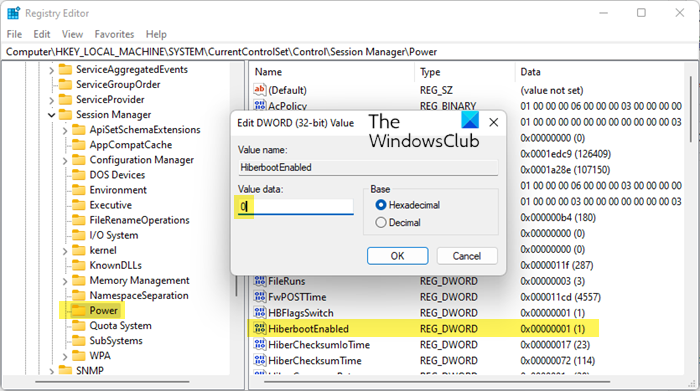
Open Registry Editor and go to the following key:
HKEY_LOCAL_MACHINE\SYSTEM\CurrentControlSet\Control\Session Manager\Power
Now on the right side, locate HiberbootEnabled, double-click on it, and change its value from 1 to to 0 to disable Fast Startup.
You can also run this command in CMD to change the Registry value to disable Fast Startup:
Set-ItemProperty -path 'HKLM:\SYSTEM\CurrentControlSet\Control\Session Manager\Power' -Name HiberbootEnabled -Value 0
A few things to note:
- Fast Startup setting doesn’t apply to Restart.
- Fast Startup is enabled by default in Windows.
- Disabling Fast Startup is not recommended by Microsoft.
- Fast startup settings come into play only when you are shutting down the computer and not when you are restarting it. To fully reinitialize Windows 11/10, you must force a full shutdown.
This post will help you if the Turn on Fast Startup option is missing.
Should I enable or disable Windows Fast Startup?
Fast Startup is enabled by default in Windows 11/10, and it gives a substantial time advantage while starting Windows. But if you face issues with Wake-on-LAN or any other features, you can safely disable it. Sometimes, Windows Updates may not be installed with Fast Startup enabled. Or it can cause hibernation or shutdown to fail.
Windows Updates may fail to install with Fast Startup enabled
Windows updates might not be installed on your system after you shut down your computer. This behavior occurs when the Fast Startup feature is enabled. This behavior doesn’t occur when you restart your computer.
Computer may fail to Hibernate or Shutdown with Fast Startup enabled
When Fast Startup is enabled and a user shuts down the computer, all sessions are logged off, and the computer enters hibernation. As part of the hibernation process, Windows initializes the system’s memory dump configuration. If the driver is not loaded, it fails to hibernate, and the event that’s mentioned in the Symptoms section is logged. This brings you back to the Windows Lock screen.
If you see Event ID 45 in the System log, check the contents under the DumpFilters registry value:
- Open Regedit and go to the following key:
HKEY_LOCAL_MACHINE\System\CurrentControlSet\Control\CrashControl\
- On the right side, check the DumpFilters registry value.
- Remove everything EXCEPT dumpfve.sys
- Exit Registry editor.
- Restart the computer to enable Fast Startup.
TIP: If you want to shut down the computer without using Hybrid Shutdown, you can use Shutdown.exe instead. Full shutdown is the default when you use Shutdown.exe, as follows:
Shutdown /s /t 0
The Shutdown.exe command also includes an optional /hybrid parameter that can be used if you want to use the new method:
Shutdown /s /hybrid /t 0
Related: Check if Windows last boot was from Fast Startup, Full Shutdown, or Hibernate.
TIP: Similar to Fast Startup in Windows 11/10 but slightly different in functionality, Fast Boot is a feature in UEFI/BIOS that reduces your computer boot time with the initialization of a minimal set of devices required to launch the active boot option. This post shows how to enable or disable Fast Boot in UEFI/BIOS.
So, if I buy W8 I can save, what, 30 seconds of my life every time I start up? Why, that’s almost enough time to … er … um … yeah, maybe I’ll just stick to W7!
To activate and add Windows 8 Normal Shutdown and Hybrid Shutdown in your context menu you can copy registry entry below. Then save as shutdown.reg and double click it and enjoy! Right click on desktop and see the Power Menu at the bottom of your context menu.
—————-copy file below —————————-
Windows Registry Editor Version 5.00
[HKEY_CLASSES_ROOTDesktopBackgroundShellPower Menu]
“MUIVerb”=”Power Menu”
“SubCommands”=”shutdown;hybridshutdown”
“Icon”=”shell32.dll,215”
“Position”=”bottom”
[HKEY_LOCAL_MACHINESOFTWAREMicrosoftWindowsCurrentVersionExplorerCommandStore
shellshutdown]
@=”Shut Down (Normal)”
[HKEY_LOCAL_MACHINESOFTWAREMicrosoftWindowsCurrentVersionExplorerCommandStore
shellshutdowncommand]
@=”Shutdown -s -f -t 00″
[HKEY_LOCAL_MACHINESOFTWAREMicrosoftWindowsCurrentVersionExplorerCommandStore
shellhybridshutdown]
@=”Shut Down (Hybrid)”
[HKEY_LOCAL_MACHINESOFTWAREMicrosoftWindowsCurrentVersionExplorerCommandStore
shellhybridshutdowncommand]
@=”Shutdown -s -f -t 00 -hybrid”
Also noticed on my Desktop, when ‘Turn on fast startup’ is ticked, the PC starts as soon as UPS Power is On even W/O PC’s Power button is pressed.
I use the power button to shut down, in this case which shut down is working? Normal or hybrid?
Thanks.
Power button in charms bar? Then its Hybrid.
Not in charms bar. On the computer physical button. :)
Oh – that should result in a full shut down, imo.
Eeeek!!!! I ended up turning off “Fast Startup” after I upgraded to 8.1 Whenever I booted back up from sleep, my screen would start dark. Would ultimately have to force a hard shutdown then turn everything back on. This happened repeatedly until my tech support person recommended this – after downloading and installing a ton of new drivers, including video drivers
never worked never will
how complicated and stupid
So, if I keep on using fast boot is there any chance of loosing data when it looses power source?