When a high-demand service or website is hosted on a server, it is usually designed with multiple balancing nodes. These nodes ensure that when one node fails, there are other nodes that can take care of it. In the case of Windows Server, node balancing works through a quorum system. In this guide, we will discuss the Windows File Share Witness feature.
File Share Witness & Quorum system
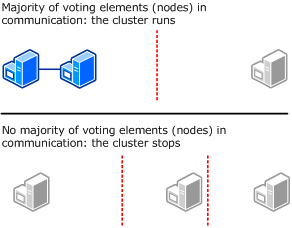
A quorum system is a vote-based system where several notes should be present to ensure they work in case of failure. Sometimes, the voting system comes to halt when there is an “even number” of total votes. The point of voting is simple. It makes sure that nodes are not overloaded. Introducing a File Share Witness act as a tiebreaker. It can provide an additional quorum vote when necessary. This ensures that a cluster continues to run in the event of a site outage.

So if you have four nodes that are balanced in a 2-2 format, and if one of the nodes fails, the other 2 nodes should be able to balance it. However, with 2-2 format, it gets stuck. If IT admins can deploy a File Share Witness which can add a vote to 2 of those existing nodes, a quorum will be reached, and nodes can take care of everything. Read more about Legacy & Modern FSW here.
What is File Share Witness feature in Windows Server?
One of the key requirements for FSW to work is that it should be part is that it must be domain-joined and a part of the same forest. This criterion was important because the failover Cluster utilizes Kerberos for the Cluster Name Object (CNO) to connect and authenticate the share. This sometimes might not be possible for several reasons, including
- Poor internet connection.
- The domain controller is not available.
- No active directory CNO object
- and lastly no shared drives for a disk witness.
Considering these scenarios, Microsft added a feature in Windows in which the quorum system works even when it’s not part of a domain. This was possible by using a local user account on the server the FSW is connected to.
IT admins can create a local (not administrative) user account, give that local account full rights to the share, and connect the cluster to the share. Here are the steps:
- Log on to SERVER and create a local user account (i.e. FSW-ACCT)
- Create a folder on the SERVER and share it out
- Give the local user account (FSW-ACCT) full rights to the share
- Log in to one of your cluster nodes and run the PowerShell command:
Set-ClusterQuorum -FileShareWitness \\SERVER\SHARE -Credential $(Get-Credential)
- You will be prompted for the account and password for which you should enter SERVER\FSW-ACCT and the password.

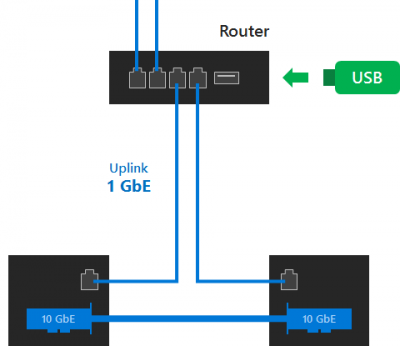
Further, if no extra server is available, a USB drive connected to a router works as well. Once connected, you can set up your shared name, username, and password for access. This works with SMB 2.0 and above.
You can read more about File Share Witness feature on MSDN.