After upgrading their computers to Windows 11, some users have found that their personal user files and data are missing. If you face this issue, this post will interest you.
Files missing after Windows 11 upgrade or update

If you find that your files are missing after a Windows 11 or Windows 10 upgrade, then this post will suggest a few ways, which can help you recover your lost files.
1] Search using a 3rd-party tool
First of all, search for the files using Windows Search or any good third-party alternative Search Tool. Maybe the files have been relocated elsewhere.
2] Sign in with an admin account and see
Next, confirm that you are signed in with your own profile and not with a temporary profile. You must be signed in with your own username or an administrator account to access your user files.
Read: How to extract Edge Favorites from Windows.old.
3] Check if your files are stuck in a disabled account
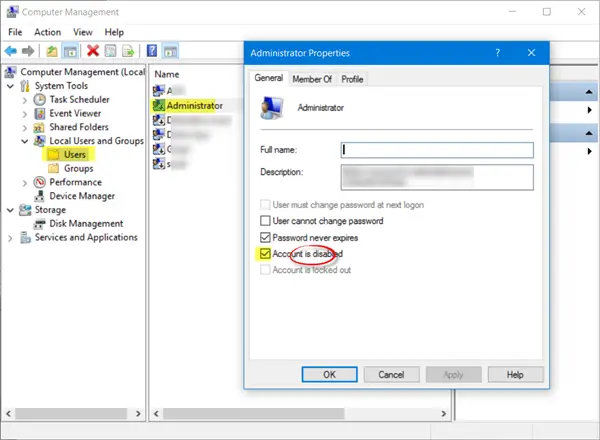
You may want to also check if your files are stuck in some disabled administrator account. Maybe after the upgrade, the files were moved to an admin account which may have now been disabled. To check this, type Computer Management is the taskbar search and open it. Click on System Tools > Local Users and Groups > Users.

Now see if you see any Administrator account which has an arrow pointing downwards. This means that the account has been disabled. Double-click on it open its Properties box and uncheck the Account is disabled check box. Click Apply/OK and exit.
Restart your computer, log in with this account and see if you can find the files.
4] Restore them from backups
If you have backups, restore them from the backups. If you don’t then see if you can retrieve the files from the Windows.old folder. You could also make use of the Data Recovery Tool from Microsoft.
5] Check theses folders too
There are other places you could see. If these folders exist on your system please see if the lost files are there:
%SYSTEMDRIVE%\$INPLACE.~TR\

%SYSTEMDRIVE%\$INPLACE.~TR\Machine\Data\Documents and Settings\<User_Name>\

%SYSTEMDRIVE%\$WINDOWS.~Q\

%SYSTEMDRIVE%\$WINDOWS.~Q\Data\Documents and Settings\<User_Name>\
This is applicable if your upgrade failed or if your data migration was incomplete. You will be required to show hidden and operating system files and folders.
6] Check the entire drive for the missing data files
In case you are unable to locate data, use an Administrator command prompt to perform a check on the entire drive for the missing data files.
In the case of incomplete data migration, you can search for data files using DIR in the following folders:
For instance, to check for images, type the following commands one after the other:
cd\
dir *.jpg /a /s > %userprofile%\desktop\jpg-files.txt
Once the run is completed, you will see a jpg-files text file generated on your desktop, which will list all the jpg image files on your C drive.
If you can identify the location where the data has been copied, use drag and drop or robocopy.exe to help put the files in a more accessible location.
7] Ensure that it was an upgrade
If you cannot locate any data files on the machine, check the \Windows\Panther\Setupact.log file and ensure this was an upgrade installation. If not, you can determine whether the partition was formatted in the log, as well as know to check other partitions for the data.
Related read: How to recover deleted User data files & folders after Feature Update.
Windows 10 Free does not show local users and groups in computer management. Tried the run command (lusrmgr.msc) but this pops up a window telling me “this snapin may not be used with this edition of windows 10”. Hence I used the run command control /name Microsoft.UserAccounts.
Thanks for the article, Anand – I’ll be keeping your notes in my notes repository for future reference.