We run ChkDsk on our computer systems to find and fix the errors. After completing the scanning, the chkdsk results are saved in Event Viewer. You can read the chkdsk results in the Event Viewer with some clicks. In the case of corruption, sudden power failure, etc., Windows executes the chkdsk command automatically and checks the system for errors. Besides this, you can also schedule the chkdsk in Windows 11/10 for disk error checking. The chkdsk utility in Windows 11/10 fixes various performance issues and makes the system run smoothly.
Windows saves the chkdsk results in Event Viewer so that the user can read them and take additional troubleshooting steps. But many users do not know how to read the Event Viewer Log for Check Disk on a Windows machine. In this article, we will show you the steps that help you find the chkdsk results in Event Viewer logs.
Where is Chkdsk Log File location?
Chkdsk logs are stored in the System Volume Information folder on the system drive in Windows 11/10.
How to view ChkDsk log in Event Viewer
We will use the following two methods to view the Event Viewer logs for chkdsk:
- Using the Event Viewer app on Windows.
- Using the Windows PowerShell.
1] Reading ChkDsk results using the Event Viewer app
Follow the below-listed steps.
1] Type “Event Viewer” in the Windows search box and click on the app to launch it.
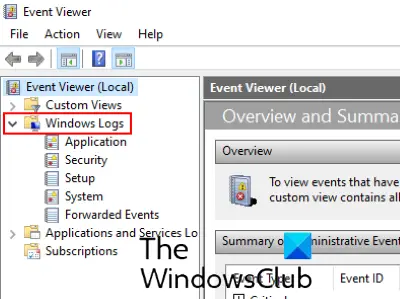
2] In the Event Viewer app, expand the “Windows Logs” section in the left panel.

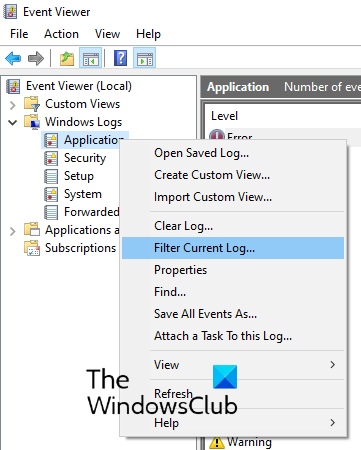
3] Now, right-click on the “Application” option and click “Filter Current Log.”

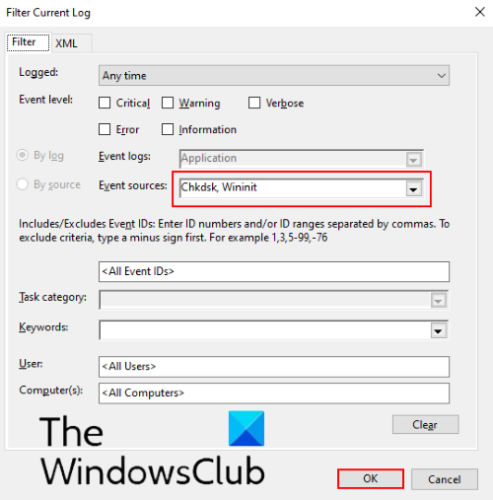
3] In the Event Sources drop-down menu, select the checkboxes for “chkdsk” and “wininit.” When you are done, click OK.

After performing these steps, you will be able to view the chkdsk results in the Event Viewer center panel.
Select a particular log and its details will be available in the bottom center panel.
2] Viewing ChkDsk results using the PowerShell
Let’s see the steps to view chkdsk results using the Windows PowerShell.
1] Type PowerShell in the Windows search box and click on the Windows PowerShell app.
2] In the PowerShell window, type the following command and press the Enter key to execute it.
get-winevent -FilterHashTable @{logname="Application"; id="1001"}| ?{$_.providername –match "wininit"} | fl timecreated, message
This will show you the chkdsk logs.
3] You can also export the chkdsk logs in the text file. For this, type the following command in the PowerShell and hit Enter.
get-winevent -FilterHashTable @{logname="Application"; id="1001"}| ?{$_.providername –match "wininit"} | fl timecreated, message | out-file Desktop\chkdsklog.txt
The file will be saved on your Desktop with the name “chkdsklog.”
Do note that the PowerShell command provides you only with the most recent chkdsk logs. Hence, if you want a detailed chkdsk log, please follow the first method listed in this article.
This is how you can find and view the chkdsk results in Event Viewer logs.
Related post that you may like to read: ChkDsk stuck at a particular % or hangs at some stage.
Leave a Reply