One thing that can be observed on Windows 11, Windows 10, or any other Windows operating system is that the same error codes can be used or applied to multiple scenarios. And the error code that we will try to fix today is 0x80072F8F which is a similar error. This applies to multiple services and features. In every scenario, this error is caused due to some incorrect or incompatible blocking configuration, causing the block. We will be first listing the area of conflict first and depending on that; we will be listing all the possible fixes separately.

Fix 0x80072F8F error on Windows 11/10
Error 0x80072F8F is caused for the following 3 funtions on Windows 11 or Windows 10:
- Windows Update.
- Windows Activation.
- Microsoft Store.
You might see this error if the date and time for the PC are incorrect, or Windows has trouble connecting to the online services that you are trying to use or can’t verify your product key.
If you tend to create a System Restore point usually, you can try to undo any modifications on your computer, by performing System Restore. In case, you do not have a habit of creating a System Restore point; I suggest you start doing so because it is a very strong feature that will let you fix your computer in a number of scenarios.
Now, we will be listing out individual fixes as per the affected services mentioned above.
Windows Update:
- Fix Date and Time.
- Fix Proxy Settings.
- Install Root Certificate Update.
- Configure Firewall.
- Re-register DLL files for Windows Update.
Windows Activation:
- Fix Date and Time.
- Using the Registry Editor.
- Contact Microsoft Support.
Microsoft Store:
- Fix Date and Time.
- Check your Internet connection.
- Reset Microsoft Store.
- Run Microsoft Store apps Troubleshooter.
Now, finally, we will talk about these fixes in detail.
Fix 0x80072F8F Windows Update error
1] Fix Date and Time
You need to have a correct Date and Time set on your computer to access various Windows 10 services.
For this, start by hitting the WINKEY + I button combinations on the keyboard to start the Settings app.
Now, navigate to Time & Language > Date & time.
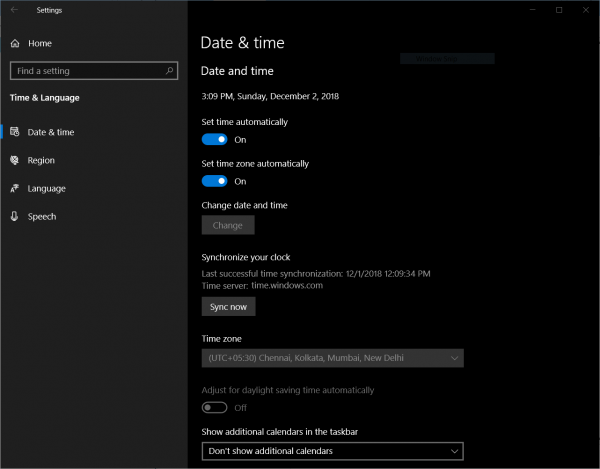
On the right side panel, turn the toggle on for Set time automatically and Set time zone automatically.
Next, click on Region & language on the left side panel.
And make sure that the Country or region on the right side panel is set to the country that you live in.
Close the Settings app and Reboot your computer for the changes to take effect.
2] Fix Proxy Settings
Search for Internet Explorer in the Cortana Search box and select the appropriate entry.
Now, hit the WINKEY + T button combination on your keyboard and click on Internet Options. Navigate to the tab named Connections.
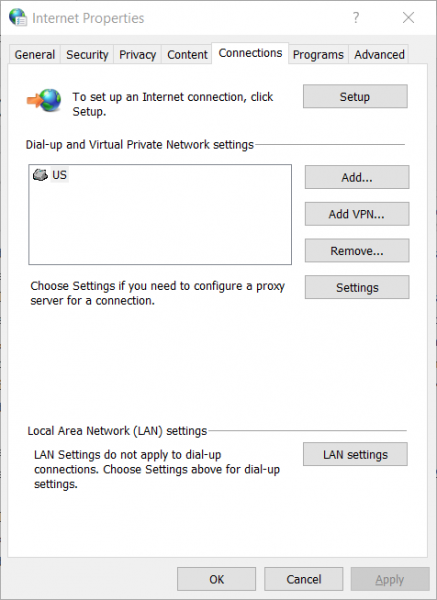
Click on LAN Settings.
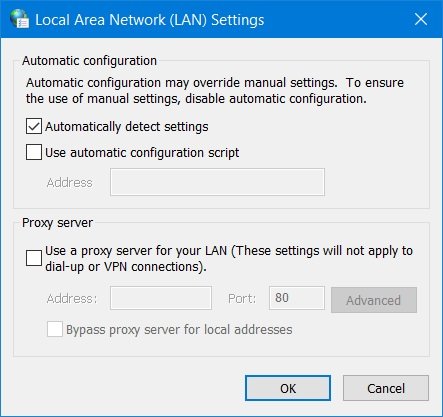
Delete all the entries in the list generated in the section called Exceptions.
In case the Advanced button is disabled because of the checkbox labeled as Use a proxy server for your LAN (These settings will not apply to the dial-up or VPN connections) is disabled, you are good to go
3] Install Root Certificate Update
This update is expected to fix all the issues related to your computer’s connection with the Windows Update server.
To download it manually, navigate to the Microsoft Update Catalog website and search for Root Certificate Update.
Get the appropriate version of your computer downloaded and install it.
4] Configure Firewall
You can also try to disable your Firewall because there might be chances that it may be blocking your connection to the Windows Update Servers intentionally or unintentionally.
5] Re-register DLL files for Windows Update
You might have to re-register some DLL or Dynamic Link Library files on your computer because some malfunctioned DLL files might become a conflict in your computer contacting the Windows Update servers. You can do this by hitting the WINKEY + R button combinations to launch the Run utility.
Now, type in the following and hit Enter:
regsvr32 <filename>
In place of filename, enter the following file names:
Wintrust.dll
Initpki.dll
Mssip32.dll
and repeat this step individually for all the 3 files listed above. Reboot your computer for the changes to take effect.
Running Fix WU is an option you may want to consider.
Similar: Fix 0x80072F8F – 0x20000 Windows Upgrade error
0x80072F8F, A security error occured during Windows Activation
1] Fix Date and Time
This is the same fix as the one for Windows Update. Please refer to the instructions given above on this page.
2] Using the Registry Editor
Hit the WINKEY + R button combination to launch the Run utility, type in regedit and hit Enter. Once Registry Editor opens, navigate to the following key-
HKEY_LOCAL_MACHINE/Software/Microsoft/Windows/CurrentVersion/Setup/OOBE
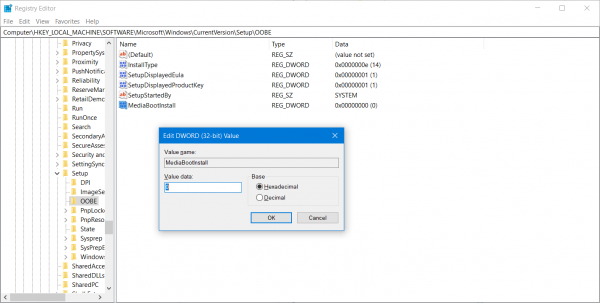
Now, double click on MediaBootInstall on the right side panel and change its value from 1 to 0.
Finally, Reboot your computer for the changes to take effect.
Now, open Command Prompt by searching for cmd in the Cortana search box or hit WINKEY+R to launch the Run utility and type cmd and hit Enter.
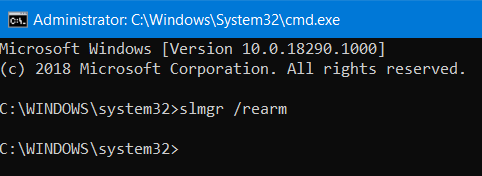
Now type in the following command.
slmgr /rearm
Reboot your computer for the changes to take effect.
3] Contact Microsoft Support
You can also try to contact Microsoft Support and get appropriate assistance for your activation related issues.
Fix 0x80072F8F Microsoft Store error
1] Fix Date and Time
This is the same fix as the one for Windows Update. Please refer to the instructions given above on this page.
2] Check your Internet Connection
It is really important for you to be connected to the Internet to make use of this service. Try and use the Network Troubleshooter and check if it finds some issues with your Internet.
3] Reset Microsoft Store
You can try to Reset Microsoft Store and check if any cached files or folders are causing a conflict to your Store being connected to the Microsoft Servers.
4] Run Microsoft Store Apps Troubleshooter
Microsoft has also released a dedicated Microsoft Store apps Troubleshooter. You need to download and run it.
Were your issues fixed with these solutions?
Similar: Fix 0x80072F8F Xbox Error Code.
Leave a Reply