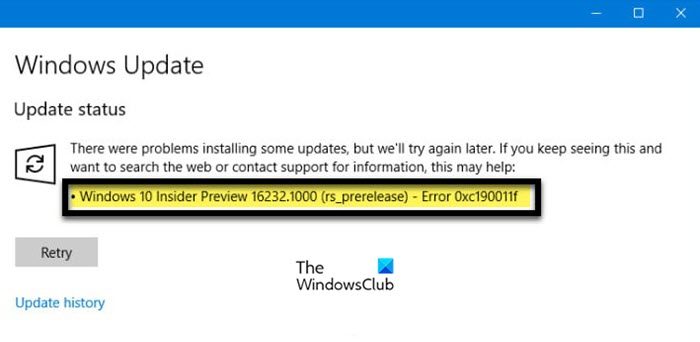
Many Windows users reported that when trying to update their Windows computers, they encountered an error code. The error code implies that either some of your update files are corrupted or WUS or related services are facing some kind of glitch. In this article, we will talk about this and see what you can do to resolve Windows Update Error Code 0xc190011f.
These were problems installing some updates, but we will try again later. If you keep seeing this and want to search the web or contact support for information, this may help: Error 0xc1900011f

Windows Upgrade Error 0xC190011f, MOSETUP_E_PROCESS_CRASHED indicates that The installation process crashed.
Fix 0xc190011f Update Error Code in Windows 11
If you get a Windows Update error, click on Retry; sometimes, the issue is nothing but a temporary glitch, and clicking on Retry can help. Restarting your PC and your Router can also do the trick. If these don’t work, follow the below solutions to resolve Windows Update Error Code 0xc190011f.
- Run the Windows Update troubleshooter
- Check Windows Update related Services status
- Install the Update in Clean Boot
- Temporarily disable your Security software, VPN or Proxy providers
- Download the update from Microsoft Update Catalog
- Use Media Creation Tool to upgrade your Windows OS
The suggestions vary a bit depending on whether you receive the error 0xc190011f while installing Updates or while upgrading your Windows to the next version, so see which one’s apply to you.
1] Run the Windows Update troubleshooter

In Windows 11/10, there is a tool called Troubleshooter, which is designed especially for fixing the update process. This troubleshooter will not necessarily resolve every single update error, but it will resolve a significant number of update issues. If you are encountering the said error while running Windows Updates, due to any reason then you can use Windows update troubleshooter to resolve this issue. Follow the prescribed steps to run the troubleshooter.
Windows 11
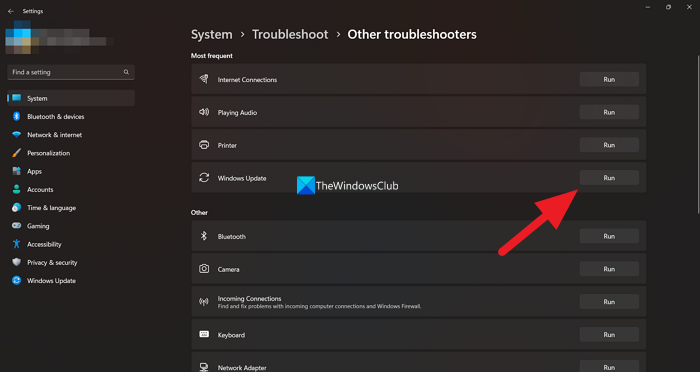
- Press Windows + I key to open the Setting app.
- Select Troubleshoot on the System tab in Settings.
- Click on Other troubleshooters to view troubleshooting tools.
- Click the Run option for the Windows Update troubleshooter.
Windows 10
- Launch Settings.
- Go to System > Update & Security > Troubleshoot.
- Click on Additional troubleshooters.
- Select Windows Update and then click on the Run the troubleshooter button.
Once it opens, the Windows update troubleshooter automatically detects the issues and resolves the issue. Hopefully, after running the Windows update troubleshooter your issue will be resolved.
2] Check Windows Update related Services status
In order to install Windows Update, we need to make sure they’re all the Windows Update services are running on our computer. These services are by default enabled on our computer, but after an update or because of some third-party application they stop working. In that case, we need to check their status with the Service Manager. To do the same, open the Services Manager from the Start Menu, just search it out, now, make sure that the following services are configured as mentioned below.
- Windows Update Service – Manual (Triggered)
- Windows Update Medic Services – Manual
- Cryptographic Services – Automatic
- Background Intelligent Transfer Service – Manual
- DCOM Server Process Launcher – Automatic
- RPC Endpoint Mapper – Automatic
- Windows Installer – Manual.
If any of the services are not configured to the default configuration, just right-click on it and select Properties. From there you can configure its properties. After making the required changes, reboot your computer and then check for updates. Hopefully, this time, you won’t get any errors.
3] Install the Update in Clean Boot

Clean Boot is a state of Windows computer nothing other than essential Microsoft services are running on a computer. This is especially useful for troubleshooting issues caused by conflicting third-party applications. In this case, we can boot our computer into the Clean Boot state, and check for updates. If you are getting 0xc190011f error due to a third-party application, you should be able to update in Clean Boot and then we can find out what’s causing the issue so that you don’t have to do Clean Boot every time just to update your system.
To do a Clean Boot on your computer, follow the prescribed steps.
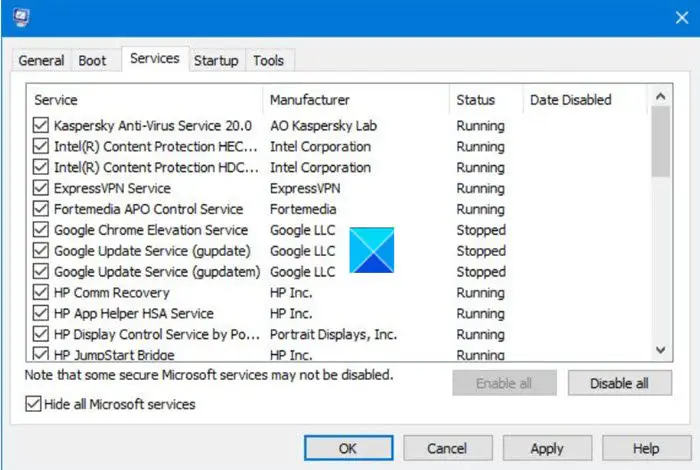
- Hit Win + R, type msconfig, and hit Enter.
- In the General tab, untick the Load Startup Items box, and make sure that Load System Services and Use Original boot configuration are ticked.
- Go to Services, untick Hide all Microsoft Services, and then click on Disable all.
- Click Apply > Ok.
Once your computer starts in Clean Boot, check if Windows Update is working. If you are able to update your system, just enable services manually to find out what’s causing the error. Once you are sure of the culprit, just keep its service, disabled, and if it is not essential, uninstall the app.
Read: Error 0x80240034, Windows Update failed to install
4] Temporarily disable your Security software, VPN or Proxy providers
Your antivirus can block genuine Windows services such as Windows as well. Even though this is not normal behavior, but the frequency of this misunderstanding can not be neglected. So, if you cannot update your system, just disable your third-party antivirus or Windows Firewall and Windows Defender temporarily and then run the Windows Update.
This problem can also occur as a result of a VPN client or proxy server that is not accepted by the Windows Update service. If you are encountering the said error while updating Windows and you are using a VPN service or proxy 3rd party client to connect to the office’s server then it might be possible that the Windows Update component is conflicting with the application and is failing to find its service. If you want to be sure, just disable the feature and then try updating. If it worked, you know what the cause was. Now, you don’t have to necessarily uninstall the app, just don’t enable it when updating the system.
5] Download the update from Microsoft Update Catalog
If nothing works, you can try a workaround; here, we are going to download the update and install it on your computer manually. To do the same, go to Microsoft Update Catalog, search for the Update version and then install it. This will defiantly do the trick for you.
6] Use Media Creation Tool to upgrade your Windows OS
If you get an error when upgrading your OS, just use the Media Creation tool to upgrade your Windows OS. All you need is a USB stick and a good enough Internet Connection to download the required files. So, go ahead and use Media Creation Tool to upgrade your Operating System.
Hopefully, you will be able to resolve the issue using the solutions mentioned in this post.
Also Read: Windows Update keeps disabling itself automatically.
Leave a Reply