While installing an Adobe product, if you are getting Adobe Genuine Software Verification Failure error message, here is how you can fix the issue within moments. There are mainly two reasons you may get this problem on your computer, and both are mentioned here with solutions.

The entire message says something like this:
Installation Failed
Adobe Genuine Software Verification Failure
The product you are trying to install is not an Adobe Genuine Software and appears to be counterfeit. Please report piracy or contact customer support for assistance.
What causes Adobe Genuine Software Verification Failure error
As mentioned earlier, there are two primary reasons why you might get this problem on your computer while trying to install an Adobe product.
- Pirated copy of the Adobe software: It is the primary reason why you are getting this problem on your computer. As Adobe products are pretty expensive, many people tend to use a pirated copy of Photoshop, Illustrator, After Effects, Premiere Pro, etc. If you have bought a used PC and got this error on that computer, chances are the previous owner used a pirated copy and didn’t remove all the leftovers while uninstalling the software.
- Corrupted installer: If you have purchased an Adobe tool, you might know that users need to download the executable file from the official website of Creative Cloud. It doesn’t download the full copy of your software; and instead, it downloads an installer. This installer requires a valid internet connection to download a copy of Photoshop, Illustrator, or anything else. If you get an internet problem while downloading a copy of your software, you might get the same issue.
Either way, you can fix this issue on your Windows 11/10 computer within moments.
Fix Adobe Genuine Software Verification Failure
To fix Adobe Genuine Software Verification Failure error, follow these steps:
- Delete all leftovers
- Remove existing installation
- End AGSService.exe task
- Download installer from Creative Cloud website
- Disable Adobe Genuine Software Integrity Service
To learn more about these steps, continue reading.
1] Delete all leftovers
Deleting all leftovers is probably the most working solution you can follow before heading to other steps. When the installer detects a pirated copy while installing Photoshop or any other Adobe tool, it displays such a message. Therefore, if you are using a genuine copy and still detecting the previous pirated copy, you have to delete all leftovers. For that, you can use any junk file remover such as CCleaner, RegSeeker, etc. You can also use the Kaspersky Cleaner to get the job done.
2] Remove existing installation
If you can find an older version of any Adobe product on your computer, it is recommended to remove that installation before installing the newer version. Even if you already have Photoshop, but you are installing Lightroom, you should remove the existing installation of any software and then try to install the new Adobe product. While doing so, don’t forget to remove the leftovers.
3] End AGSService.exe task
AGSService or Adobe Genuine Software Integrity Service is responsible for detecting the genuineness of the downloaded installer of Adobe products. However, if there are some internal issues, which are causing this problem even when you are using a genuine version, you may end this task using Task Manager and go forward with your installation. For that, open the Task Manager on your computer, find out the AGSService.exe in the Processes tab, and click the End task button.
4] Download installer from Creative Cloud website
It is highly recommended to download the installer only from the official website of Creative Cloud. Many scammers often replicate such websites and allow you to download a pirated copy of your desired software. It is not recommended to download any purchased product from anywhere other than the official website.
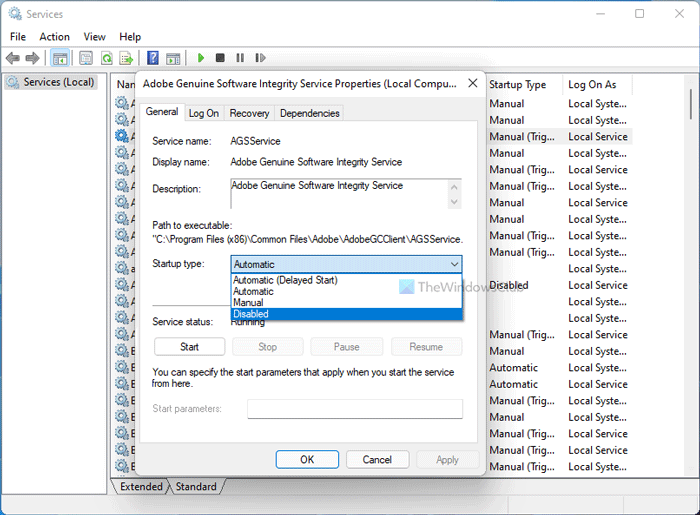
5] Disable Adobe Genuine Software Integrity Service

If something is working, you can disable the Adobe Genuine Software Integrity Service from the Services panel in Windows 11/10. For that, do the following:
- Press Win+S and type services.
- Click on the corresponding search result.
- Find out Adobe Genuine Software Integrity Service and double-click on it.
- Select the Disable option from the drop-down list.
- Click the OK button.
Now check if you can bypass the error or not.
How do I fix Adobe Genuine Software Verification Failure?
To fix Adobe Genuine Software Verification Failure, you need to delete all previously installer products’ leftovers, remove the existing installation, end the AGSService.exe task, and disable Adobe Genuine Software Integrity Service. Also, never download the installer from anywhere else other than the official website of Creative Cloud.
How do I get rid of Adobe Genuine Software Integrity Service?
As long as you use a genuine copy of any Adobe product, you cannot get rid of Adobe Genuine Software Integrity Service. It runs in the background to validate whether your copy of Adobe product is genuine or pirated. However, you can disable this service from the Services panel using the aforementioned guide.
What is Adobe genuine validator?
There is no particular service or tool called Adobe genuine validator because it is a generic name. When you try to install an Adobe product, the installer detects your license and tells you whether your version is genuine or not. This process is called Adobe genuine validator.
That’s all! Hope these solutions helped you fix the Adobe Genuine Software Verification Failure error.