Does BlueStacks keep showing a white blank screen on your Windows PC? BlueStacks is undoubtedly one of the best free Android emulators for PC. It enables you to run your favorite Android apps and games on a Windows computer without any hassle. However, a lot of users have reported experiencing a white screen issue in BlueStacks on a PC. The issue appears generally while using the app making it unusable. Some users also reported that they have encountered this issue when opening certain apps on BlueStacks.

A lot of factors can be responsible for this issue. Mostly, it is caused if your graphics driver is out-of-date. Or, it might also be the case that your drivers are corrupted which is why you are getting a white screen issue in BlueStacks. If the issue arises with particular apps, there might be an issue with the installation of those apps. Certain graphics settings can also trigger this issue. Apart from that, you are likely to experience this issue if you are using an outdated version of BlueStacks or a corrupted installation of the app.
Now, if you are also facing this issue, this post is all that you are looking for. Here, we will be mentioning fixes using which you can resolve the BlueStacks white screen problem. So, follow this guide.
BlueStacks White Screen problem on Windows PC
If you are getting a white screen issue in BlueStacks on your PC, try restarting the app or your PC and see if the problem is gone. In case it does not, you can use the below fixes to resolve this problem:
- Make sure your GPU driver is updated.
- Reinstall your graphics driver.
- Run Bluestacks with the integrated graphics card.
- Check if the problem is with a specific app.
- Disable Threaded optimization.
- Change your power plan.
- Update BlueStacks.
- Reinstall BlueStacks.
- Switch to a different Android Emulator.
1] Make sure your GPU driver is updated
The white screen issues are often caused due to outdated graphics drivers. So, if you keep experiencing a white screen in BlueStacks, it might be because of an out-of-date GPU card driver installed on your PC. Hence, if the scenario is applicable, update your graphics driver to its latest version. It should fix the problem for you. You can update your graphics driver via Windows Settings. Here’s how:
- First, launch the Settings app using Win+I and navigate to the Windows Update tab.
- Now, click on the Advanced options > Optional Updates option.
- It will show you all the pending device driver updates; simply download and install graphics driver updates.
- When finished, reopen BlueStacks and then see if the problem is resolved.
Besides that, you can also download graphics drivers from the official Intel, NVIDIA, or AMD website as per your device manufacturer. Or, use the Device Manager app to update the graphics driver. There are some free third-party driver update software specially designed to update device drivers. Use Winzip Driver Installer, IObit Driver Booster Free, or some other driver updater to do that.
Read: How to fix Black Screen on BlueStacks on Windows
2] Reinstall your graphics driver

If the problem remains the same even after updating the graphics driver, there are chances that your graphics driver is corrupted or faulty. So, in that case, you will need to uninstall and then reinstall a fresh copy of your graphics driver to fix the issue. Here are the steps to do that:
- First, press Win+X to open the shortcut menu and select Device Manager.
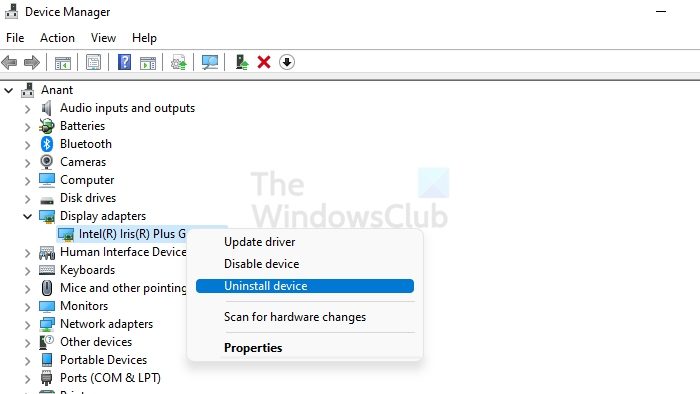
- Now, expand the Device adapters category and right-click on your graphics driver.
- Next, select the Uninstall device option from the appeared context menu.
- After that, follow the prompted instructions to complete the process.
- Once done, go to the Action menu and select the Scan for hardware changes option.
- Windows will now start installing missing drivers.
- When done, reboot your computer and open BlueStacks to check whether the problem is resolved.
See: BlueStacks stuck on Initializing screen on Windows.
3] Run Bluestacks with the integrated graphics card
If you have two graphics cards, integrated and dedicated, try running BlueStacks with the integrated graphics card. To do that, right-click on the BlueStacks shortcut on your desktop and then select the Run with graphics processor > Integrated graphics option. See if the problem is resolved or not.
If the problem is resolved, you can set up BlueStacks with your integrated graphics permanently. Open Nvidia Control Panel, go to the Program Settings tab and choose the BlueStacks program. If it is not listed, click on the Add button and browse and select the main executable of BlueStacks. After that, set the preferred graphics processor to your Integrated graphics card. Similarly, you can set up these configurations for other graphics cards too.
4] Check if the problem is with a specific app
Analyze if the white screen issue is occurring with a specific app on BlueStacks. It might be the case that whenever you launch a particular app on BlueStacks, you start seeing a white screen. So, the problem might be with that specific apps. It might be corrupted or there might be some other issue with the app. Hence, in that case, you can uninstall and then reinstall the problematic app on BlueStacks.
if this doesn’t help, move on to the next fix.
TIP: How to uninstall a game or an app in Bluestacks?
5] Disable Threaded optimization

Your graphics card settings can also cause the issue at hand. Try disabling the Threaded optimization option in your graphics card settings and then see if the problem is fixed. If you have an Nvidia graphics card, here’s how to do that:
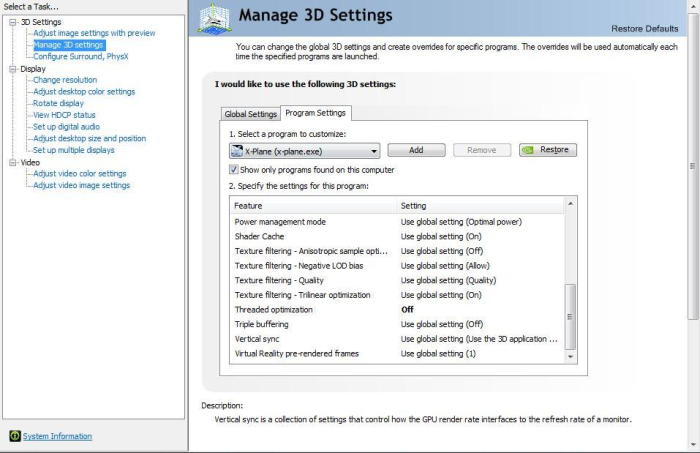
- Firstly, launch the Nvidia Control Panel window and select the 3D Settings > Manage 3D Settings option from the left side pane.
- Now, navigate to the Program Settings tab and select the BlueStacks program from the list. If the app is not listed, click Add and browse and choose the BlueStacks program.
- Under the settings options, scroll down to the Threaded optimization feature and set its value to OFF.
- Next, press the Apply button and close the window.
- Lastly, reopen BlueStacks and see if the white screen has stopped appearing or not.
If the problem still persists, move on to the next solution.
6] Change your power plan
If this problem is caused when you wake up your PC from sleep or after a period of inactivity, or when Bluestacks goes to sleep, modify your power plan. The default power mode is set to save power. Hence, change it and see if the issue is resolved. Here’s how you can do that:
- First, open Control Panel and go to Power Options.
- Now, click on the Create a power plan option, select High performance, name it accordingly, and press the Next button.
- Next, make sure the Put the computer to sleep option is set to Never.
- Once done, reopen BlueStacks and see if the white screen issue is fixed or not.
RELATED: How to speed up BlueStacks for faster Android emulation?
7] Update BlueStacks
This white screen issue in BlueStacks might be caused due to using an outdated version of the emulator. Hence, make sure you are running the most recent version of BlueStacks and have installed all its latest updates. To do that, open BlueStacks and press the Settings icon from the right-side section. After that, go to the “About” tab and press the “Check for updates” button, and then click on the Download Updates button. Follow the prompted instructions to update BlueStacks.
8] Reinstall BlueStacks
If updating doesn’t work, you might be dealing with a faulty or corrupted installation of BlueStacks. Hence, if that is the case, reinstall a fresh copy of the app on your PC and then see if the problem is fixed or not.
Firstly, remove BlueStacks completely from your computer. For that, open the Settings app using Win+I and go to Apps > Installed apps. After that, choose BlueStacks, click on the three-dot menu button, and press the Uninstall option. Once done, download the latest version of BlueStacks from its official website and then install it. Try running BlueStacks now and see if it works fine or not.
Read: BlueStacks keeps crashing or freezing on Windows PC.
9] Switch to a different Android Emulator
If the problem is still not resolved, you can try using a different Android emulator to run Android apps on your Windows PC. There are a lot of good free Android emulators that you can use in place of BlueStacks. Andy Android Emulator, Droid4x, Windroy, Nox player, and LDPlayer Emulator are some good examples. Download and install any of these alternative Android emulators and run your Android apps on a PC.
See: BlueStacks Failed to install on PC.
Why does BlueStacks get stuck on loading screen?
If your BlueStacks app is not launching or is stuck on the loading screen, it might be the case that your PC doesn’t meet the system requirement for BlueStacks. And thus, the emulator is not able to perform well and load games. Hence, make sure your computer meets the minimum/ recommended system requirements of BlueStacks. Besides that, this issue might happen if Virtualization is disabled, so enable the Virtualization in your BIOS settings.
How do I fix BlueStacks from crashing?
To prevent BlueStacks from crashing on your PC, customize BlueStacks settings and optimize them accordingly. Other than that, ensure that your display drivers are up-to-date, Virtualization is enabled in BIOS, and Hyper-V is enabled. Also, make sure to close all CPU-hogging programs and check for antivirus interference.
Leave a Reply