Some users are facing Chunk Errors in Minecraft, where some part of the game is either broken or not visible at all. The error in question can be easily resolved by reloading Minecraft, closing the app correctly, and by some other methods mentioned hereinafter. In this article, we are going to talk about Chunk Errors in Minecraft and what we can do to resolve the issue.

Chunk Errors in Minecraft on Windows PC
If you see Chunk Errors In Minecraft on your computer, follow the solutions given below.
- Reload Minecraft
- Correctly close the app
- Uninstall extra mods
- Delete or rename the world with the same names
- Reset Minecraft
- Tweak Graphics settings
- Contact Minecraft support
- Reinstall Minecraft
Let us talk about them in detail.
1] Reload Minecraft
The chunk error could be due to server issues or some glitches. The best thing to do in such a scenario is to log out of Minecraft. Close the application and then launch Minecraft again, this will automatically load chunk after you sign in again. Now, see if the issue persists or not.
2] Correctly close the app
If you are just shutting the game without saving the World files then this can be one of the reasons why chunk error occurs. To avoid this from happening, make sure that you have saved the level or World in Minecraft by clicking on Esc and then the Save & Quit button.
3] Uninstall the extra mods
Minecraft modification or mod for short is customizing files. It allows gamers to customize the game according to their choice, World’s theme, designs, and new characters, you name it and you’ll get it. However, these customizing features put a toll on your game and can cause the error in question. To resolve the issue you can uninstall unnecessary mods and follow the prescribed steps to do the same:
- Click Win+R to open the Run dialog box.
- Type the following and then select the Enter key:
%appdata%\.minecraft\
- Find the Version folder and double-click on it.
- Right-click on the mods version folder and click on the Delete button.
Now, relaunch Minecraft and see if there’s still an issue with chunks.
4] Delete or rename the world with the same names
Sometimes, different Worlds may have similar names due to whatever reasons. This might not seem a big deal, however, your system can get confused between the two and this can be the reason why you are seeing chunks in the game. This can be simply resolved in a few steps, launch Minecraft, click on the Play button, and then go to the World’s title and select the Pencil Icon. Go to the bottom and click on the Delete World button. If you don’t want to delete the world, you can simply rename it as this can also solve the problem.
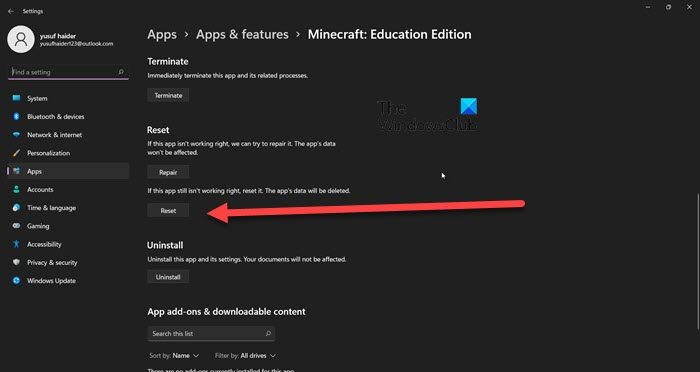
5] Reset Minecraft

Your configured settings may be taxing on your PC and it is better that you change the settings and revert it back to default features. Follow the prescribed steps to do the same:
- Open Settings.
- Go to Apps > Installed Apps or Apps & Features.
- Search for Minecraft,
For Windows 11: click on the three vertical dots and select the Advance option.
For Windows 10: click on the app and then select the Advance option. - Click on the Reset button.
Now, launch Minecraft and if the issue is still unresolved, try the next solution.
6] Tweak Graphics settings
Your Graphics settings may be not compatible with the game or what the game wants. If this is the case then just switch the settings to High Performance. To do the same follow the steps mentioned below:
- Open Settings.
- Go to the System option.
- Click on the Display tab and then select Graphics Settings.
- In Choose options for apps or Choose an app to set preference drop-down menu, select Microsoft Store App.
- Click on Minecraft > Options.
- Click on High Performance and then select the Save button.
Finally, reboot your computer, relaunch Minecraft and check if the issue is resolved.
7] Reinstall Minecraft
Two of the most common reasons why a Chunk error occurs are either because of corrupted chunk files or no files at all. It could also be due to many reasons corrupted installation being one of them. You should reinstall Minecraft and then install it again if this is the reason behind the error.
8] Contact Minecraft support
If none of the above-mentioned solutions work for you, contact Minecraft Support and brief them about the error that you are facing. They will see the error and guide you through the solutions to resolve the issue.
Leave a Reply