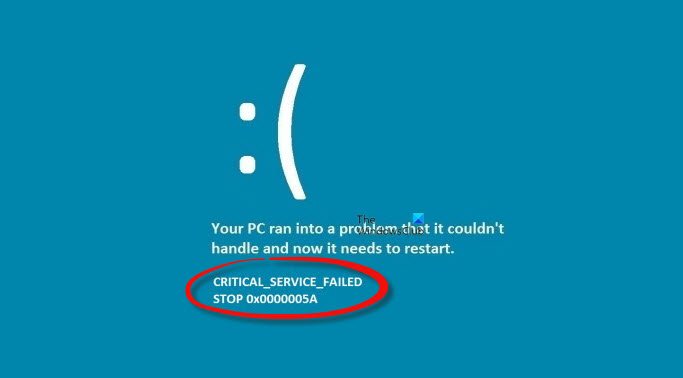
Here is a full guide to fix the CRITICAL SERVICE FAILED Blue Screen error on Windows 11/10. A lot of users have complained about experiencing this error. The users get a Blue Screen of Death (BSoD) with an error message that says “CRITICAL_SERVICE_FAILED”. This error keeps them stuck and prevents them from entering their login screen and accessing Windows. This BSOD error is identified with the “0x0000005A” code.

In case you are one of those encountering the same error and it is frustrating you, we got you covered. This guide is for you if you are clueless about how to fix it up. Here, we are going to discuss all the working fixes that will help you get rid of the CRITICAL SERVICE FAILED error permanently. All these fixes require you to boot Windows into Advanced Recovery mode. Let us check out the fixes and steps to easily resolve this issue.
Before discussing the solutions, let us try to understand the exact reasons behind this error.
What causes CRITICAL SERVICE FAILED in Windows?
Here are the main causes that may trigger CRITICAL SERVICE FAILED BSOD error in Windows 11/10:
- It can be caused due to a missing or corrupted device driver on your system.
- It can also be triggered if there are some incompatibility issues with a newly installed hardware or driver.
- Corrupted system files can also result in this blue screen error in Windows.
Now, we have curated a list of solutions that will enable you to get rid of this error permanently.
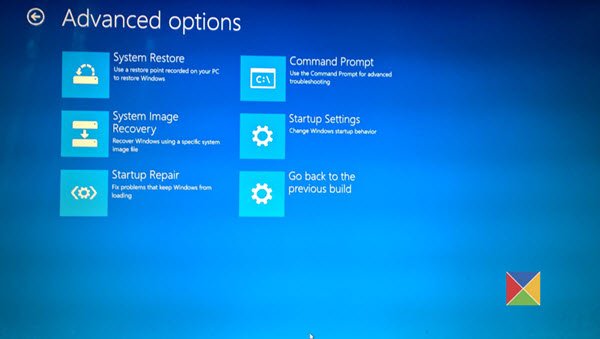
Since you cannot access the desktop you will have to either boot Windows in Safe Mode and do the needful or boot Windows to the Advanced Startup Options screen, and then access the system tools like Command Prompt, etc, to carry out these fixes.

Fix CRITICAL SERVICE FAILED Blue Screen on Windows 11/10
Here are the methods to fix BSOD error with the CRITICAL_SERVICE_FAILED message on Windows 11/10:
- Disable Driver Signature Enforcement.
- Run Offline SFC scan.
- Rebuild BCD and MBR.
- Update your device drivers.
- Run System Restore.
- Run Startup Repair.
- Repair Windows Installation using ISO.
Let us discuss the above methods in detail now!
1] Disable Driver Signature Enforcement
You can fix this error by using the Disable Driver Signature Enforcement option at the Advanced Startup Options screen. Doing so will enable you to install and use drivers not officially signed and might help you bypass this error.
Here are the steps to enable the “Disable Driver Signature Enforcement” option:
- Firstly, start your PC and when Windows is loading, turn it off instantly. Repeat this until you see a Preparing Automatic Repair message on the screen.
- Now, from the appeared Options menu, tap on the Troubleshoot option.
- On the next screen, you need to tap on Advanced options and then press the Startup Settings option.
- After that, simply click on the Restart button on the next screen.
- Then, you will see a screen with several options with numbers. To activate the Disable Driver Signature Enforcement option, you need to press the 7 or F7 key on your keyboard. Just press 7 and your PC will restart with driver signature enforcement disabled.
This should resolve this blue screen error for you. However, it may occur again after you reboot your PC. In that case, try the below solutions to fix it permanently.
Read: Fix dxgmms2.sys BSOD error.
2] Run Offline SFC scan
This error can be a result of corrupted system files. In that case, running a System File Checker (SFC) scan will help you get rid of this error. It will verify all your system files and attempt to repair them. When the system is restored to a healthy state, you might not encounter this error again.
You can perform an offline SFC scan by using the following steps:
- First, turn on, then turn off the PC when Windows is loading. Do this until you see the Preparing Automatic Repair screen.
- Now, click on the Troubleshoot option and then select Advanced options.
- Next, you have to choose the Command Prompt option on the next screen.
- Then, select your user account and enter and confirm your password.
- After that, just click on the Continue button to launch Command Prompt.
- Now, to run offline SFC scan, you need to enter the below simple command:
sfc /scannow /offbootdir=C:\ /offwindir=C:\Windows
- Finally, let the command execute completely and then restart your PC normally.
Check if the CRITICAL SERVICE FAILED BSOD error is fixed now and you are able to use your system.
See: Fix REFS_FILE_SYSTEM Blue Screen error.
3] Rebuild BCD and MBR
BCD stands for Boot Configuration Data that stores the boot configuration parameters to start Windows. In case the configuration file is corrupted and causing this error, you can try rebuilding BCD to fix the error. For that, you can follow the below procedure:
Firstly, simply boot into Advanced Recovery Mode and then launch the Command Prompt using the same steps as method (2). Now, type and enter the bootrec /rebuildbcd command in the CMD and then select the OS to add to BCD. Alternately, you can also use the BCDboot tool for the same. See if rebuilding BCD helps you fix the error.
You can also try rebuilding Master Boot Record (MBR) if the MBR is corrupted and leading to the CRITICAL SERVICE FAILED BSoD error. You need to launch the Command Prompt from Advanced Startup options (refer to the method (2)) and then enter the following command one by one:
bootrec /RebuildBcd
bootrec /fixMbr
bootrec /fixboot
When the commands are executed fully, exit the Command Prompt and reboot your PC. Hopefully, you won’t see the CRITICAL SERVICE FAILED error anymore on your screen.
See: Fix EXFAT FILE SYSTEM (volmgr.sys) BSOD error.
4] Update your device drivers
As this error is mainly associated with bad or incompatible drivers, you can try updating your device drivers and then see if the error is fixed for you. To update your device drivers when you are unable to access your PC, you can use the Advanced Recovery mode. Here are the steps to do that:
- First, enter the Advanced Recovery mode using the steps in method (1).
- Now, click on Advanced Options on the Automatic Repair screen.
- Next, press the Troubleshoot option and then choose Advanced options.
- After that, click on the Startup Settings option, and then on the next screen, tap on the Restart button.
- Then, press 5 on your keyboard to activate the Enable Safe Mode with Networking option.
- You can now update your device drivers.
You can update the device driver manually by going to Settings > Updates & security > Windows update and then clicking on the Optional updates option. There you will see updates for all your drivers. Simply select the drivers you want to update and then click on the Download and install button to install driver updates. Alternately, there are some driver update software as well that can automatically update drivers on your PC.
Reboot your PC normally and check whether or not the error is fixed after update device drivers.
Read: Fix CLOCK_WATCHDOG_TIMEOUT Blue Screen Error on Windows
5] Run System Restore
System restore is another fix that you can try to resolve the error. This will revert your PC to a healthier state when you were not receiving this error message. It is effective in a lot of cases and might just fix the error for you as well. Here are the steps to perform a system restore:
- First, boot into Advanced Recovery mode using method (1).
- Now, on the Automatic Repair screen, tap on Advanced options.
- Then, click on Troubleshoot > Advanced Options.
- Next, select the System Restore option.
- After that, you can follow the onscreen guide to run the system restore and check if the error is fixed.
Read: Fix HYPERVISOR_ERROR Blue Screen.
6] Run Startup Repair
If the above fixes don’t work for you, you can try running Start repair to fix this error. To run startup repair, you can boot into Advanced Startup Options, and then on the Choose an option screen, click on the Troubleshoot option. Then, go to the Advanced Options > Automatic/Startup Repair option. You will be asked to choose your account name and enter your password. Do that and click on Continue. This will run Startup Repair and try to fix the problems.
7] Repair Windows Installation using ISO
If you are still unable to fix the CRITICAL SERVICE FAILED blue screen error even after trying all the above methods, repairing Windows installation is the last resort. It will repair the corrupted Windows and will help you get rid of CRITICAL SERVICE FAILED Blue Screen error permanently. You can download Windows ISO and then repair your Windows computer using bootable Installation USB.
How do I permanently fix the Blue Screen of Death in Windows?
There are some fixes to fix the Blue Screen of Death in Windows permanently. You can try updating your Drivers and cleaning up malware. Also, make sure your system files are not corrupted; if so, running an SFC scan is recommended. Or, you can also try running Startup repair. Other than that, you can diagnose your computer’s memory problems and fix them up.
That’s it!
Leave a Reply