Some Windows 11 users fail to connect to the wireless network as an incorrect PSK is provided for network SSID on their computer. This may usually happen after the password of the wireless router is reset, and the PSK (Pre-Shared Key) is changed. Even though the provided password is correct, the device fails to identify the provided PSK.

What is PSK when connecting to Wi-Fi?
PSK stands for Pre Shared Key and is nothing but an encrypted key that is used to identify your password. It is used as a security system to protect your router from hackers trying to access your network device. However, when you want to connect to any network, you just have to enter the password that you set when configuring the device.
Fix Incorrect PSK provided for network SSID
When we are trying to connect a new wireless router, Windows will automatically create a new profile and it contains the network name (SSID), Pre-Shared Key (PSK), and other important information which will be used to connect to the wireless network. Although, there are situations where this automatic method occasionally fails and make connection problems such as the Incorrect PSK provided for network SSID. If the users are facing the same problem, then we can fix this error by using my given solution.
- Restart your Modem/Router.
- Delete the Existing Wireless Network Profile.
- Connect to the Wireless Network Manually.
- Install the latest driver for your Network
- Connect to your network after opening Command Prompt as an administrator
Let’s begin to use these solutions.
1] Restart your Modem/Router.
When you restart the network devices, it flushes out the cache and resolves network glitches. Follow the prescribed steps to restart your modem or router the right way.
- Turn off your modem/router.
- Disconnect all cables and wait for a minute or two.
- Now, turn on the device and wait for it to connect.
The internet connection is refreshed when you restart your wireless device. Hopefully, this could fix the error.
2] Delete the Existing Wireless Network Profile

As mentioned earlier, when you connect to a network, the information about the network is stored on your computer for automatic connection. If our computer is unable to verify the PSK, we can unlink the network and then connect it again. Here’s how to do it:
- Press Windows + I key to open the Setting app.
- Click on Network and internet option.
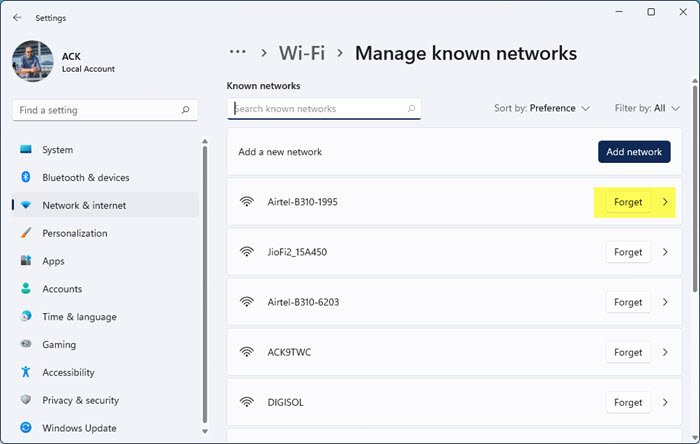
- Now, click on the Wi-Fi option and select Manage known networks.
- Locate the troublesome network that needs to remove, click on it, and then click on Forget.
- Finally, reconnect to the network again and check if the connection problem has been solved or not.
Hopefully, this will resolve the issue for you.
3] Connect to the Wireless Network Manually

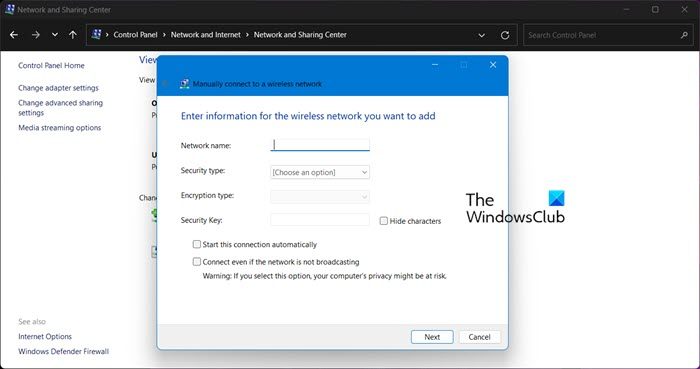
If deleting the wireless network profile didn’t force the computer to identify PSK, let’s fix this problem manually. We can create a new wireless network manually from the Network and Sharing Center. Follow the prescribed steps to resolve network connections problem.
- Open Search using Win + S.
- Type Control Panel and press the Enter button.
- Now, click on Network and Sharing Center.
- Inside the Network and Sharing Center window, click on Set up a new connection or network.
- Click on Manually connect to a wireless network and press the Next button.
- Enter the correct network name and click on the Next button.
- Set the Security type as WPA2-Personal and the Encryption type as AES protocol.
- Enter the appropriate Security Key that you are currently using for other devices and click the Next button and select Use the existing network.
Open a website to see if your network issue has been fixed.
4] Install the latest driver for your Network
Windows will be unable to detect the PSK of the network device if the drivers are not up-to-date. When talking about the importance of updates, we usually consider the presence of bugs in the driver, whilst it is one of the reasons why we recommend keeping the driver up to date, the other upside of doing the same is that your driver and the device become compatible with each other. So, to resolve this issue, follow any of the methods mentioned below to update Network Driver.
- Update Network Drivers from Device Manager.
- Install the latest version of the driver from the manufacturer’s website.
Hopefully, this will do the job for you.
5] Connect to your network after opening Command Prompt as an administrator
If nothing worked, you should connect to the network in Command Prompt. This is not a solution but a workaround which is why it is so down on the list. In order to do the same, open Command Prompt as an administrator and then execute the below commands.
- Execute the following command to know all the available Network names.
netsh wlan show profiles
- Execute the following command to Connect to the network.
netsh wlan connect name= <Network-Profile-Name>
Replace <Network-Profile-Name> with the name of the network you want to connect to.
Hopefully, you will be able to resolve the issue using the solutions mentioned in this article.
Also read: WiFi Adapter disabled or hidden in Device Manager.
Leave a Reply