Mapped Network Drives are very useful when you need to connect to a drive that is on a different computer, or on external storage. It makes accessing files easy. However, if your mapped network drives don’t work in Windows 11/10, then it’s definitely an annoyance.
There are many ways Windows notifies about its unavailability. It could be a red X that appears on the network drives or says unavailable when used from the command prompt or through a notification. It may so happen that the network drive takes more than usual to connect, so we would recommend you run a few scripts when you log in to your computer.
Mapped Network Drive not opening, connecting, syncing or working
Before we go ahead with the workarounds, you should know that some workout works under certain scenarios. One might need network access at logon, while others may need access to group policy settings. So choose what works for you.
If Mapped network drives are not showing, connecting or working in Windows once you log on to the computer, you can try these workarounds which use scripts to make sure you are connected to them as soon as you start using your computer.
Create Scripts
There are two scripts here. MapDrives.ps1 which are executed by MapDrives.cmd, and its done at a regular (non-elevated) command prompt.
Create a script file named MapDrives.cmd, and then save it on a place where the files will be safe.
PowerShell -Command "Set-ExecutionPolicy -Scope CurrentUser Unrestricted" >> "%TEMP%\StartupLog.txt" 2>&1
PowerShell -File "%SystemDrive%\Scripts\MapDrives.ps1" >> "%TEMP%\StartupLog.txt" 2>&1
Similarly, create a script file named MapDrives.ps1 with the below content. Keep both the scripts in the same folder.
$i=3
while($True){
    $error.clear()
    $MappedDrives = Get-SmbMapping |where -property Status -Value Unavailable -EQ | select LocalPath,RemotePath
    foreach( $MappedDrive in $MappedDrives)
    {
        try {
            New-SmbMapping -LocalPath $MappedDrive.LocalPath -RemotePath $MappedDrive.RemotePath -Persistent $True
        } catch {
            Write-Host "There was an error mapping $MappedDrive.RemotePath to $MappedDrive.LocalPath"
        }
    }
    $i = $i - 1
    if($error.Count -eq 0 -Or $i -eq 0) {break}

    Start-Sleep -Seconds 30

}
Possible ways to execute the script to connect to mapped network drive
1] Create a startup item
This works only for the devices that have network access at login. If it’s not there, the script will fail to automatically reconnect the network drivers.
- Open Startup folder located at %ProgramData%\Microsoft\Windows\Start Menu\Programs\StartUp and copy-paste MapDrives.cmd inside it.
- Open Scripts folder located at and %SystemDrive%\Scripts\ copy-paste MapDrives.ps1 in that folder.
This will create a log file named as StartupLog.txt in the %TEMP% folder. Next, log out of the machine, and then re-login. This will make sure the mapped drives open.
2] Create a scheduled task

It is possible to create a scheduled task which runs as soon as the user logs-in to the computer. First copy the script file MapDrives.ps1 to the scripts folder of Windows at %SystemDrive%\Scripts\. Next launch the Task Scheduler. You can search for in the search box, and it will appear.
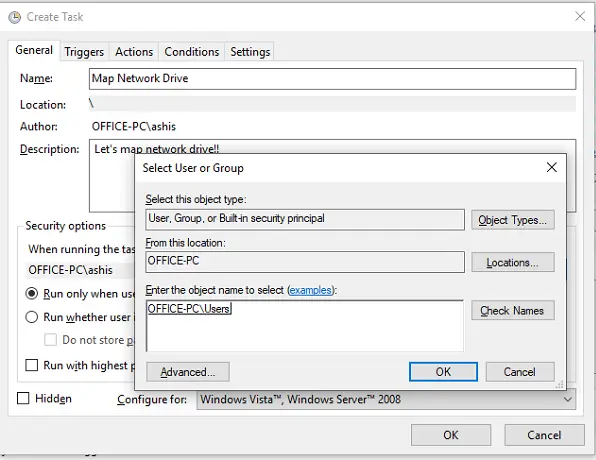
- Select Action > Create Task and in the General tab type a name and description of the task.
- Next, click on the Change User or Group button, and select a local user or group. Then select OK.
- Check the box which says “Run with highest privileges”
- Switch to Triggers Tab, and create a new trigger with the option “At Logon” in the Begin the task drop-down. Click ok.
- Next, switch to the Actions tab
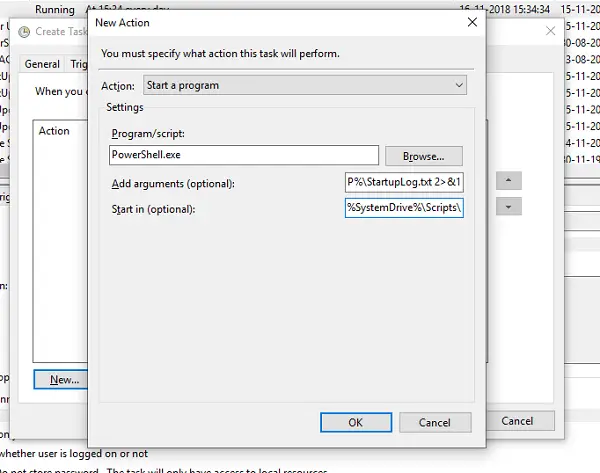
- Create a new action, and choose to Start a program.
- In the Program/Script field type Powershell.exe.
- In the Add arguments (optional) field, type the following:
-windowsstyle hidden -command .\MapDrives.ps1 >> %TEMP%\StartupLog.txt 2>&1 - In the Start in (optional) field, type the location (%SystemDrive%\Scripts\) of the script file.
- On the Conditions tab, select the Start only if the following network connection is an available option, select Any connection, and then select OK.

Reboot or Log off from your account, and log back in so the task can execute.
Read: Mapped Network Drive not showing in Windows 11
3] Group Policy settings
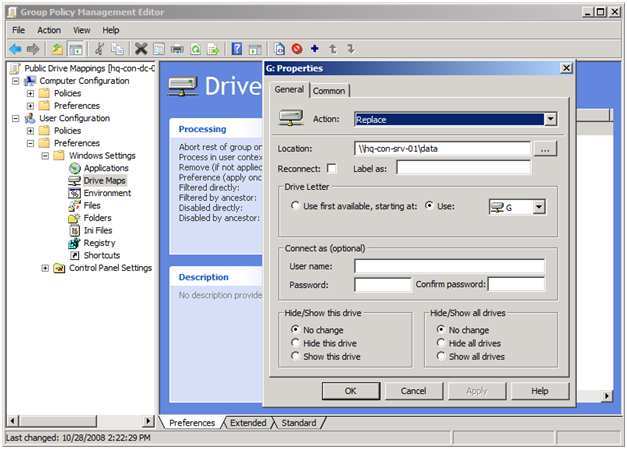
This is needed if the If the mapped drives are defined through the Group Policy settings. You will need to update the action of the drive maps to Replace.

In turn, it will delete the existing mapped drive and create the mapping again on each logon. However, any settings on the mapped drive that are changed from the Group Policy settings will be lost on each logon. If the changes do not work, run the gpupdate command with the /force parameter to refresh the Group Policy setting right away.
One of these solutions suggested by Microsoft should help you fix your problem with Mapped network drives that don’t work in Windows 11/10.
Why is my network drive mapped but not showing Windows?
A few things could be responsible for this error on Windows 11/10 PC. For example, if you need network access at logon and you do not provide that, you cannot access your network drive. On the other hand, if you have changed the Group Policy settings incorrectly, you might not be able to access your network drive. Similarly, Registry Editor could also cause the same problem on your computer.
Related: The mapped network drive could not be created
How do I enable mapped drives in Windows 11?
To enable mapped drives in Windows 11, you need to open File Explorer, click on the three-dotted icon, and select the Map network drive option. Next, choose the network drive by clicking the Browse button. Next, you can go through the screen instructions and click on the Finish button.
Let us know which one worked for you.
Leave a Reply