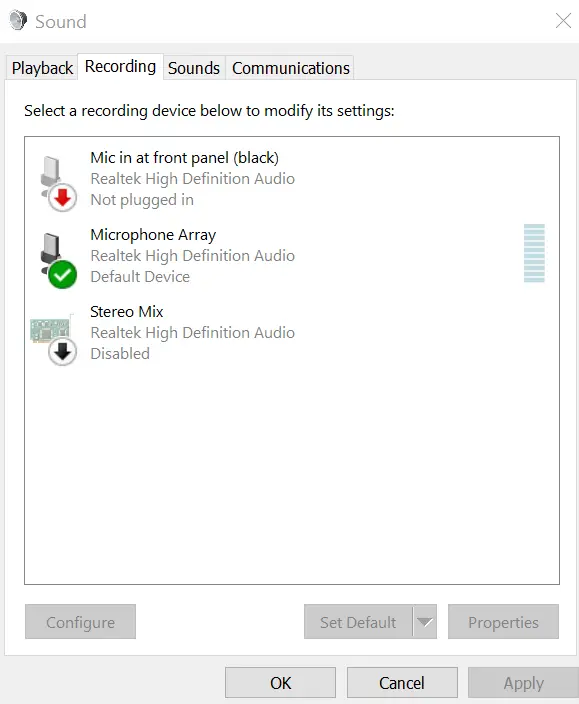
Most external microphones are plug-and-play devices. They don’t need any specific software/driver installation and mostly work with the regular audio drivers. However, if while trying to do the same, the audio recording/input doesn’t work and the Sound settings show “Not plugged in” corresponding to the Microphone, then read this article for the resolution.
Mic or Microphone not plugged in Windows11/10

To fix this problem, try the following solutions sequentially:
- Run the Recording audio troubleshooter
- Update the Audio drivers for your windows system
- Disconnect other peripherals
- Allow apps to access the microphone
- Enable your microphone if disabled
1] Run the Recording audio troubleshooter

The Recording audio troubleshooter is an excellent tool to check for issues with the system microphone. The procedure to run the Recording audio troubleshooter for Windows 10 is as follows:
- Click on the Start button and go to Settings >> Updates & Security >> Troubleshoot >> Additional troubleshooter.
- Then, select the Recording audio troubleshooter from the list and run it.
- The procedure to run the Recording audio troubleshooter for Windows 11 is as follows:
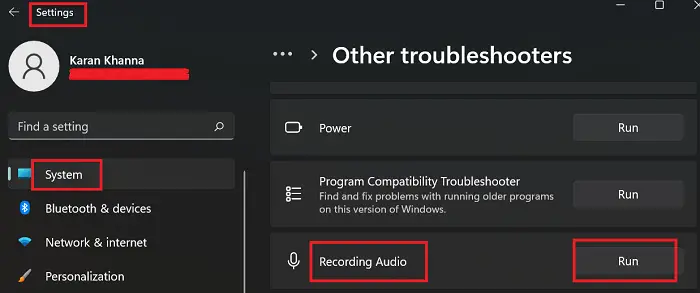
- Right-click on the Start button and go to Settings >> System >> Troubleshoot >> Other troubleshooters.
- Select Run corresponding to the Recording audio troubleshooter.
2] Update the Audio drivers for your windows system
If the microphone jack is plugged in and yet you encounter the error “Microphone not plugged” then there’s a possibility that the system is unable to read it because the drivers are obsolete or corrupt. To solve this problem, you can download the latest driver for your mic and install it.
Related: NVIDIA, AMD, Realtek drivers won’t install.
3] Disconnect other peripherals
At times, USB devices could interfere with the detection of the microphone. In this case, you can consider disconnecting peripherals connected to the USB ports and check if it now helps in detecting the microphone on your system.
Read: USB microphone not working
4] Allow apps to access the microphone

At times, the switch which is supposed to allow apps to access the microphone is switched OFF.
In Windows 10, you can turn the switch to access the microphone ON as follows:
- Click on the Start button and go to Settings >> Privacy >> Microphone.
- Turn ON the switch associated with Allow apps to access your Microphone.
- In Windows 11, you can turn the switch to access the microphone ON as follows:
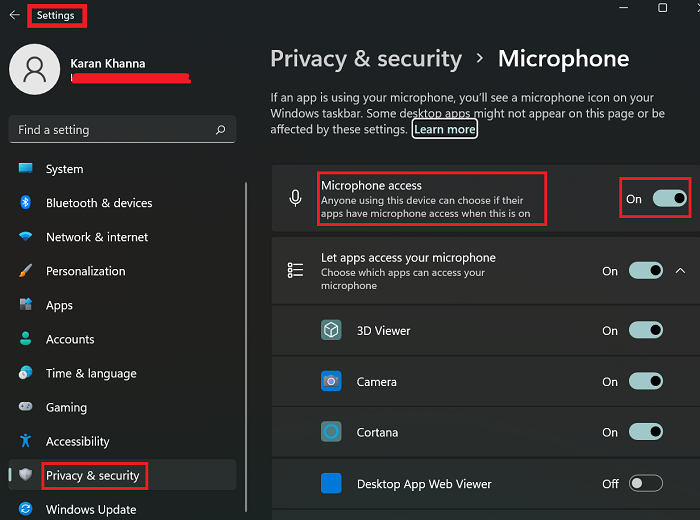
- Right-click on the Start button and go to Settings >> Privacy & security >> Microphone.
- Turn the switch for Microphone access ON.
5] Enable your microphone if disabled

The procedure to enable your microphone is as follows:
- Press Win+R to open the Run window and type the command control panel. Hit Enter to open the Control Panel window.
- Go to Sounds to open the Sound properties window.
- In this window, go to the Recording tab.
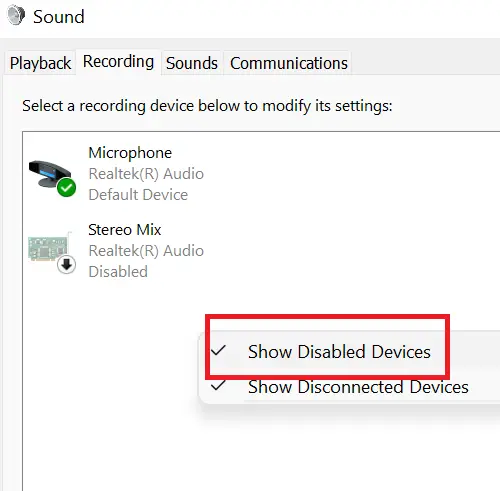
- Right-click on the open space and select Show Disabled Devices.
- If your microphone is disabled, enable it.
Why is my computer not detecting the microphone?
The problem might either be with the drivers or access to the applications. The resolution to both these cases has been explained in this article. Additionally, you can consider running the Recording audio troubleshooter.
In some cases, the Realtek Audio software might be required to detect the microphone, however, such situations are rare.
How do I connect my headset to PC with one jack?
Newer systems have a single slot for both audio input and output. In this case, you can use audio adapters to solve your problem. They help in combining the audio input and output signals into one.
Leave a Reply