In this article, we will discuss what you should do if you find that the Microsoft XPS Document writer is not working on your Windows 11/10 device. Microsoft XPS Document Writer is a print-to-file driver that is used to create XPS (XML Paper Specification) files on a Windows PC. You can print your documents by using the Microsoft XPS Document Writer in a particular app.
Fix Microsoft XPS Document Writer not working
If the Microsoft XPS Document Writer has stopped working on your Windows 11/10 device, you can try the fixes mentioned below to get the problem resolved.
- Remove and add Microsoft XPS Document Writer again
- Uninstall and reinstall Microsoft XPS Document Writer via Windows Features
- Troubleshoot in a Clean Boot state
Let’s see all these solutions in detail.
1] Remove and add Microsoft XPS Document Writer again
If Microsoft XPS Document Writer is not working properly, remove it from your Windows 11/10 device and add it again. Due to the change in UI, the steps to remove Microsoft XPS Document Writer are different for Windows 11 and Windows 10 users.
Remove Microsoft XPS Document Writer in Windows 11
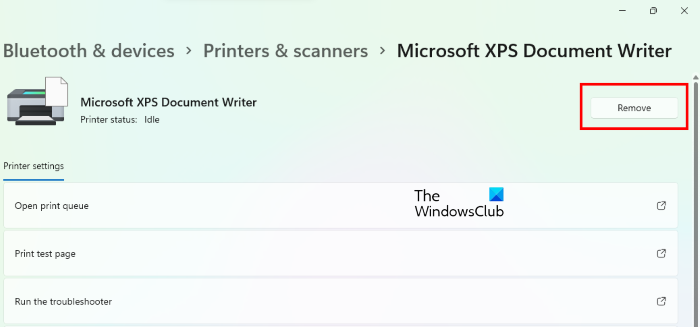
- Press Win + I keys to launch the Windows 11 Settings app.
- Go to “Bluetooth & devices > Printers & scanners.”
- Select Microsoft XPS Document Writer and click on the Remove button.
- Click Yes to confirm.
Remove Microsoft XPS Document Writer in Windows 10
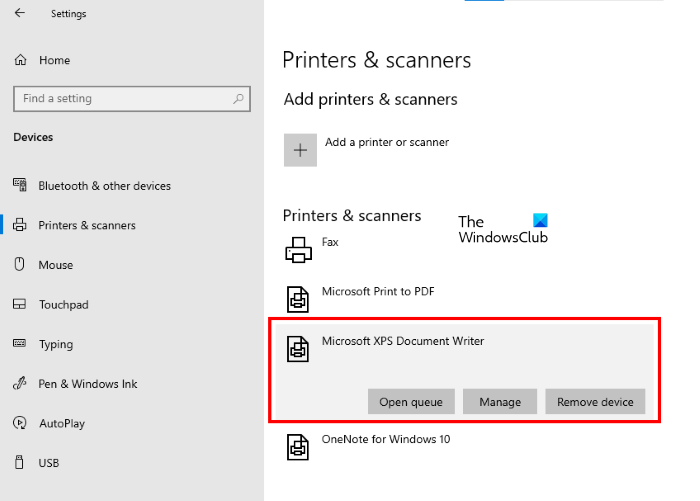
- Right-click on Start and select Settings.
- Go to “Devices > Printers & scanners.”
- You will find the Microsoft XPS Document Writer in the Printers & scanners list. Select it and then click on the Remove device button.
- Click Yes to confirm.
After removing the Microsoft XPS Document Writer from your Windows 11/10 device, restart your computer and go through the following steps to add it again.
- Open the Printers & scanners page in your Windows 11/10 Settings app.
- Click on the Add a printer or scanner button in Windows 10 and Add device button in Windows 11.
- Let Windows search for the printer. After the search is completed, you will see a message “The printer that I want isn’t listed.” Click on Add manually link.
- Select the Add a local printer or network printer with manual settings option and click Next.
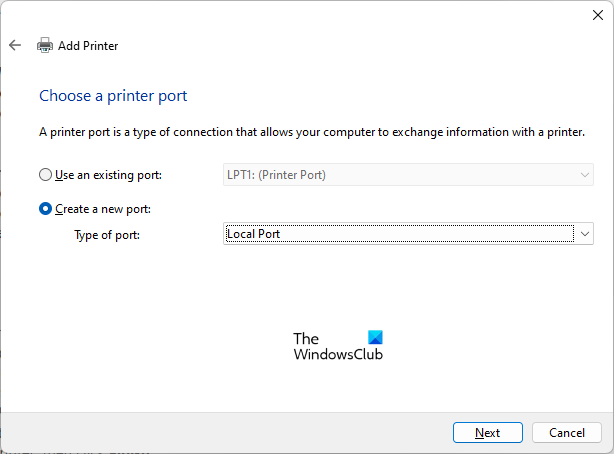
- Select the Use an existing port option, then click on the drop-down next to it and select XPS Port (Local Port), and click Next. If the XPS Port (Local Port) option is not available, select the Create a new port option and select Local Port in the drop-down. When you click Next, you have to enter the port name. Write XPS Port in the Port Name field click OK.
- Select Microsoft in the Manufacturer list and select the latest version of the XPS Document Writer from the right side. Click Next.
- Now, select Use the driver that is currently installed and click Next.
- Select the Do not share this printer option and click Next.
- Uncheck the Set as default printer box if you do not want the Microsoft XPS Document Writer to set as default.
- Now, click Finish.
Restart your computer and check if the problem is fixed.
2] Uninstall and reinstall Microsoft XPS Document Writer via Windows Features
If the above solutions did not work, uninstall and reinstall the Microsoft XPS Document Writer via Windows Features and see if it works. The steps to do this are as follows:
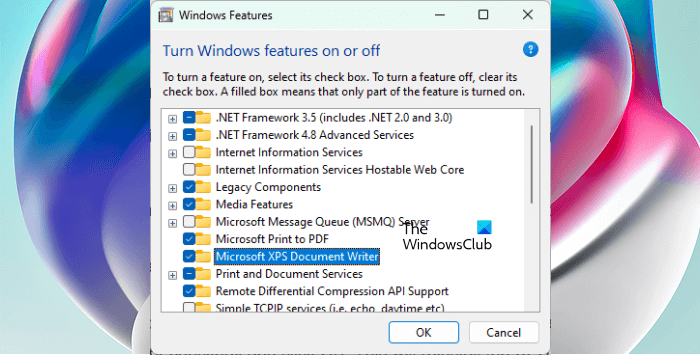
- Click on Windows Search and type Turn Windows Features on or off. Select the Windows Features app from the Search Results.
- Uncheck the Microsoft XPS Document Writer checkbox and click OK. This will uninstall it from your computer. The process will take some time.
- After the uninstallation process gets completed, restart your computer and open the Windows Features again.
- Now, select the Microsoft XPS Document Writer checkbox and click OK. This will install it again.
- After installation gets completed, check if the issue is fixed.
3] Troubleshoot in a Clean Boot state
There might be some problematic app causing the problem. To check this, you have to perform a Clean Boot. In the Clean Boot state, all the extra applications and services remain disabled. Print your document via the Microsoft XPS Document Writer after starting your computer in Clean Boot. If you are able to do so, one of the disabled apps is the culprit. Now, enable some of the disabled apps and restart your computer in a normal state. After booting your computer in the normal state, if the problem persists, one of the apps that you have just enabled is causing the problem. Now, disable one of the enabled apps and check if the problem disappears. If yes, that app is the culprit. Uninstall that app so that the issue will not appear again.
Read: How to print to the Microsoft XPS Document Writer
How do I enable Microsoft XPS Document Writer in Windows 11/10?
In Windows 11/10, Microsoft XPS Document Writer is added as an optional feature. This means if you do not require it, you can disable it. If it is already disabled, you will not find it in Printers & scanners in Windows 11/10 Settings. To enable it, open Windows Features, select the Microsoft XPS Document Writer checkbox and click OK.
Where is Microsoft XPS Document Writer?
You will find the Microsoft XPS Document Writer on the Printers & scanners page in WIndows 11/10 Settings. If it is not there, you have to enable it using Windows Optional Features.
Hope this helps.
Read next: Print to PDF not working in Windows 11/10.
Leave a Reply