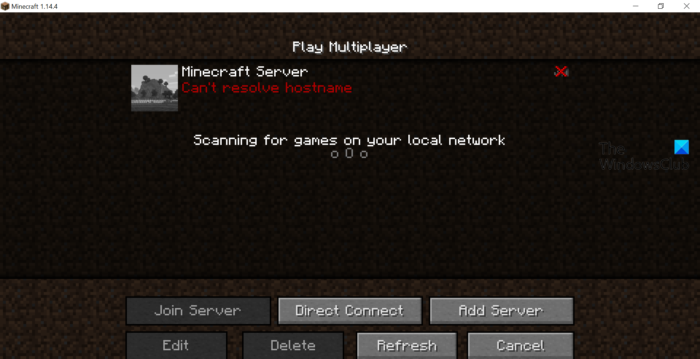
In this post, we will talk about how to fix Minecraft Can’t resolve hostname problem. When a user tries to connect to its friend’s server or even join a new server, the problem occurs. The error indicates that Minecraft cannot connect to the hostname as the IP address cannot be found. Thankfully, like any other Minecraft issue, this can also be resolved quickly. Just try the solutions mentioned in this post to fix the problem.

What causes Minecraft Can’t resolve hostname problem?
There can be multiple reasons behind Minecraft Can’t resolve hostname problem. But among all, below are the most common ones causing the issue.
- If the IP address is misspelt, you will face the error message.
- The problem will occur if the Windows Firewall is blocking Minecraft.
- If the DNS range is poorly assigned, you are most likely to face the error message in the game.
Now that you are aware of different reasons causing the issue let’s check out how to fix them.
Minecraft can’t resolve hostname
Below is the list of all the effective solutions you can try to fix Minecraft can’t resolve hostname.
- Type the hostname correctly
- Connect to the correct IP address
- Clear DNS cache
- Check for server problem
- Allow Minecraft from Windows Firewall
Let’s take a look at all these solutions in detail.
1] Type the hostname correctly
Before trying any of the following technical solutions, the first thing that you should make sure of is that you have correctly written the hostname. Also, check whether the server’s IP address is written correctly or not. As it turns out, even one extra space, symbol or space can be the reason causing the issue.
Try connecting to the server again after correcting the hostname and server’s IP address. If the problem is solved, you are good to go. But in case it continues, try the next solution on the list.
2] Connect to the correct IP address
One of the best solutions by which you can fix Minecraft can’t resolve hostname problem is to connect to the correct IP address. To do so, follow The below steps.
- To begin with, press the Windows key to open the start menu.
- Type Command Prompt, and from the result, choose the Run as administrator option.
- In the Command Prompt window, type nslookup <name of the hostname>, and press the enter key. Suppose, if the hostname is play.TheWindowsClub.org, then type nslookup play.TheWindowsClub.org.
- Under the Non-authoritative answer section, you will find the actual IP address of the server. Copy it.
- Paste the copied IP address of the server into the Minecraft.
Now, check if the problem is fixed or not. If not, try the next solution.
See: Fix Minecraft game has crashed with Exit Code 0
3] Clear DNS cache

A large amount of DNS cache data can be another significant reason behind the mentioned issue. You will have to clear the DNS cache data to solve the problem. Here are the steps you need to follow to get the work done.
- Open Command Prompt in the administrator window.
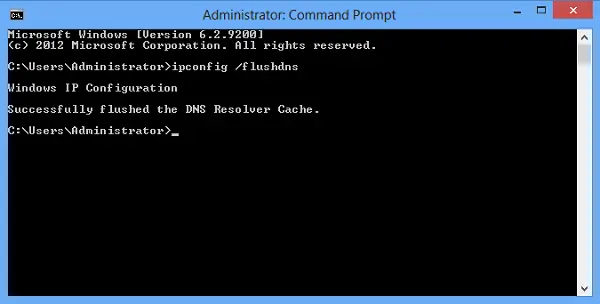
- Type ipconfig/flushdns and press the enter key.
- Once the command is executed, you will see – Windows IP Configuration. Successfully flushed the DNS Resolver Cache.
- Now, close the Command Prompt window.
That’s it. Your DNS cache should have been reset by now. Check if the problem is fixed or not.
See: Fix Minecraft Launcher Error 0x803f8001 on Windows PC
4] Check for server problem
If you are still facing the problem, the possibility is high that a server problem causes the issue. In this case, the best thing you can try is to check the server outside Minecraft. Here’s how it’s done.
- Open the Command Prompt in administrator mode.
- In the space provided, type ping <IP address of the server> and press the enter key.
- If you see the message Request timed out, then it points out you can’t connect with the server. Whereas, if the command gets executed without showing any issue, then it indicates that the Windows Firewall setting is mainly causing the mentioned Minecraft problem.
5] Allow Minecraft from Windows Firewall
If Minecraft is blocked under the Windows Firewall settings, you will face the mentioned error message. You will have to whitelist Minecraft from Windows Firewall to solve the problem. Go through the process, and check if it makes any difference.
Read: Fix Minecraft Drivers Outdated error message on Windows PC
How do I fix failed to resolve hostname?
If the application is failing to resolve the hostname, you can try these fixes: first, make sure you are entering the correct information, check if the server is running or not, and allow application through Windows Firewall settings. Resetting the DNS cache can prove to be another effective solution in the situation.
Why does it say Cannot resolve hostname?
The Cannot resolve hostname problem mainly occurs when you have entered the wrong hostname of the server. To solve the problem, double-check the hostname, and remove any extra spaces or characters that is causing the issue.
Read Next: Minecraft not installing on Windows 11/10 PC
Leave a Reply