In this post, we’ll see what to do if you come across the PDF Printer error invalidfont while printing PDF documents. Adobe PDF Reader is the go-to option to view and print PDF files. It comes with tons of exciting features to enhance the user’s productivity. But while using the application on Windows PC, users have reported coming across invalidfont errror. The problem occurs while printing the PDF files. So, if you are also struggling with the same problem, consider trying the solutions below.

Fix PDF Printer Error invalidfont when printing
Here are all the effective solutions you can try to fix PDF Printer Error invalidfont error when printing documents on Windows PC.
- Restart Adobe PDF Reader
- Update the application
- Use the Repair Installation feature
- Reset Adobe PDF Reader Preferences
- Disable Rely on system font only
- Print as Image
Now, let’s check out all the solutions in detail.
1] Restart Adobe PDF Reader
The first solution is pretty simple – Restart. The problem can occur due to a temporary glitch in the application. And if this is the case, restarting the app is the best thing you can try.
So, restart the application and try to print the document. Check if it fixes the issue. If yes, you are good to go. But in case the problem continues, try the next solution on the list.
2] Update the application

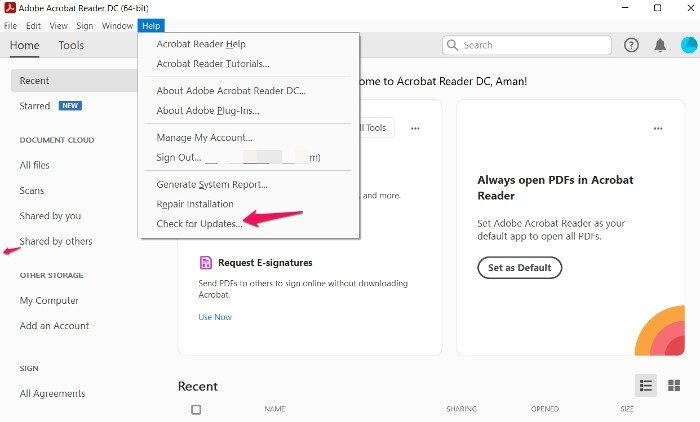
Like any other application, Adobe Reader rolls out updates at regular intervals. Each update comes with performance improvement and minor/ major bug fixes. And from what it looks like, the problem in the question can result from a temporary bug in the application. If this is the case, updating the application is your best bet. Below are the steps you need to follow to download the latest Adobe PDF Reader update.
- Open Adobe PDF Reader on your Windows PC.
- Click on Help present at the top of the window.
- From the context menu, choose Check for Updates.
Adobe PDF Reader will check for pending updates and start downloading them if available. If no pending update is found, you will see a “No updates available” message.
After updating the application, relaunch it and check if the problem is fixed. If not, continue with the troubleshooting guide.
See: How to use Stamps and Custom Stamps in Adobe Acrobat Reader DC
3] Use the Repair Installation feature

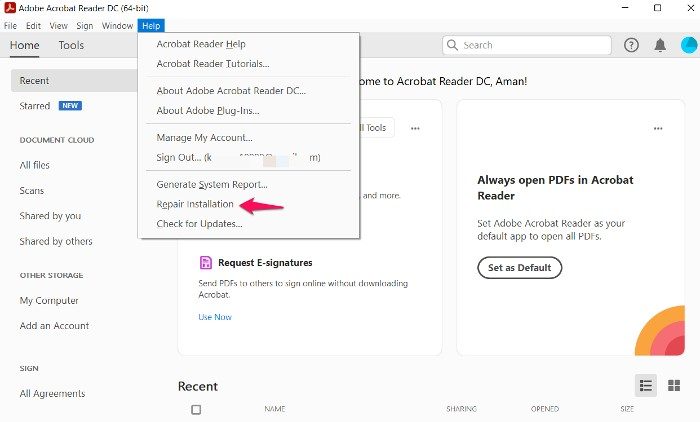
Adobe PDF Reader comes with a repair installation feature. You can use it to eliminate any minor bug or glitch associated with the application. You can use the Adobe PDF Reader repair installation feature by following the below steps.
- Launch Adobe PDF Reader on your Windows PC.
- Click on the Help option present in the toolbar.
- Choose Repair Installation from the context menu.
- Click Yes to the prompt that pops up.
Wait until the repair process is complete. Once done, relaunch the application and check for the issue. If it continues, try the next solution on the list.
See: Adobe Acrobat Reader DC not showing bookmarks in Windows PC
4] Reset Adobe PDF Reader Preferences
The next thing you can try is to reset Adobe PDF Reader preferences. This solution has helped many fix the issue; hopefully, it will be helpful for you as well. To do so, follow the below steps.
- Open the File Explorer by pressing the Windows + E shortcut key.
- Head towards the following location.
C:\Users\username\AppData\Roaming\Adobe\Acrobat\DC
- In the resulted window, rename the following folders.
JSCache
Security
- Once done, close the window and launch Adobe PDF Reader.
Check to see if the problem is fixed. If it persists, try the next solution on the list.
5] Disable Rely on system font only
You can disable rely on the system font only option to fix the issue. Here are the steps you need to follow to get the work done.
- To begin with, go to the place where you have saved the PDF document.
- Right-click on the PDF file and choose the open with Adobe PDF Reader option.
- In the following window, select File > Print.
- Choose the Printer and tap on the Properties option.
- Open the Adobe PDF settings.
- Uncheck the option that says, Rely on system font only; do not use document fonts.
- Choose OK to save the changes.
That’s it. Try to print the document again and check if you’re still facing the problem.
Read: Fix Adobe Reader error 109 when opening, reading or saving PDF
6] Print as Image
This is not an official solution, but you can use this method as a workaround to the problem. Here’s what you need to do.
- Open the document you want to print in the Adobe PDF Reader.
- Choose File from the Toolbar and select Print from the context menu.
- Choose the Advanced option.
- Checkmark the Print As Image option, and click on OK.
Check if the problem is fixed.
How do I fix a PDF printer error?
Most PDF Printer errors can be fixed by updating the application. You can update Adobe PDF Reader by following the below steps.
- Open the PDF reader.
- Click on Help > Check for updates.
The application will check for any pending update and install it automatically if available.
Why won’t my printer let me print a PDF?
If the printer is not allowing you to print the PDF file, the file may not have been completely downloaded on your system. Check if the file has been downloaded properly. Additionally, you can download the latest printer driver update to fix the issue.
Read Next: Adobe Reader not working in Windows 11.
Leave a Reply