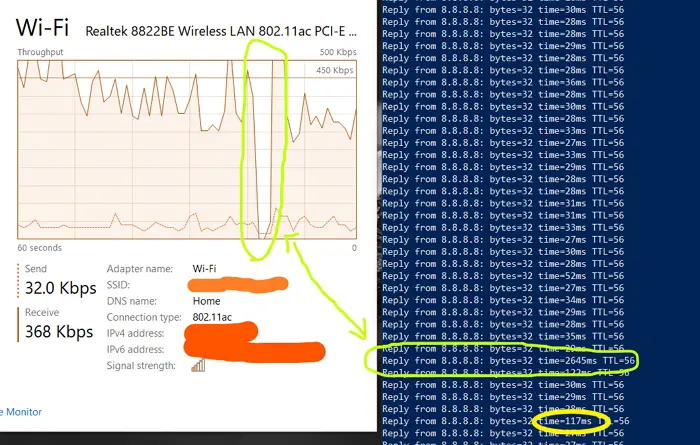
If the internet seems to be slow when playing a game or downloading a file even at high speed, then there can be an issue with the ping. Ping Spikes often cause sudden lag and route congestion through which your data travels from your personal computer to the server and back. In this guide, we will discuss the causes and fixed to resolve ping spikes in WiFi or Ethernet on your Windows 11/10 computer.
What Are Ping Spikes?

Ping Rate or Ping is the latency or lag, or reaction of the internet connection to send a packet and bring it back. Ping Spike happens when your consistent ping quadruples for some time to settle back to normal later on.
What causes WiFi Or Ethernet Ping Spikes?
WiFi or Ethernet Ping spiking on any windows computer can be because of several issues such as slow or unreliable internet connection, outdated drivers, network congestion, firewall configurations, limited bandwidth, apps, etc.
Quick Fixes
- Place your computer closer to the router or use an Ethernet cable to connect your device to your router.
- Switch off other multiple devices that are connected to the same network.
- Restart your router.
This applies to both Windows 11 and Windows 10.
How To Fix Ping Spikes On WiFi Or Ethernet Connections?
You can fix the Ping Spiking on WiFi or Ethernet by changing your DNS settings. You can also fix ping spikes by removing bandwidth logs in Task Manager. Additionally, updating VPN drivers and software may help some users cope with spikes in network resources when monitoring resources.
- Use A VPN
- Disable Or Turn Off Your Security Software
- Update Network Drivers
- Remove Or Turn Off Other Network Devices
- Choosing WPA2-PSK [AES] Option
- Shift To Google DNS
- Update Windows
- Close Bandwidth hogging programs
- Reset Windows 11/10’s Network Settings
- Don’t Use Crossover Ethernet Cables
Your PC’s ping spikes can get affected if it is not connected reliably to your router. Make sure there is no problem with the physical or connection over WiFi. By following any of these steps, you can fix high ping spikes and resolve the issue.
Fix Task Manager Ethernet or WiFi spikes
1] Use A VPN
Although VPN slows down the internet speed, it can also help make the connection clear. Using VPN can be useful if your ISP bottlenecks your internet connection or rerouting you through congested networks.
You can start using a VPN by signing up for a VPN service provider and installing the suitable software for that, or you can buy access to VPN proxies, which can then be added to your computer by heading to VPN settings in the network and sharing settings on your Windows PC.
2] Disable Or Turn Off Your Security Software
To check if a firewall is causing the ping spikes, you need to turn off or disable the Windows firewall or firewall offered by third-party security software.
If the ping spikes drop, you need to figure out the rule or any feature responsible for monitoring web traffic. If you face high ping spikes while working on some important task or application, check if there is an application-based rule.

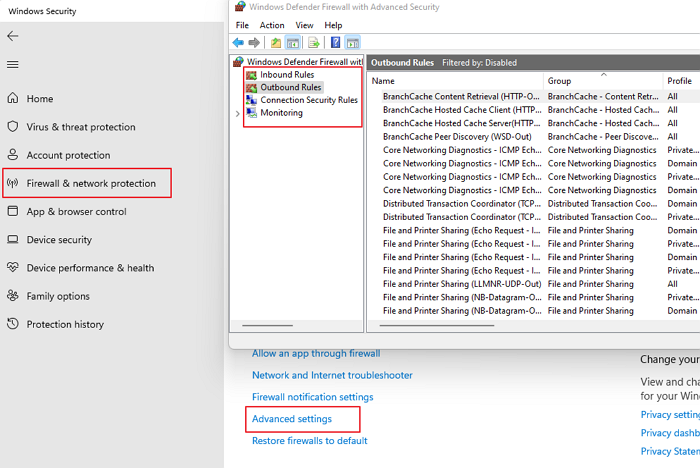
- Open Settings (Win + I) and go to the Privacy and Security option
- Select Windows Security and click on Firewall and network protection
- Try the following options
- Allow an app through firewall
- Click on Advanced settings to open the Windows Defender Firewall window
- Under the Outbound and Inbound rule, look for the blocked section and if it is related to your scenario.
- Once you figure it out, choose to disable the rule or modify it.
3] Update Network Drivers
It is always a good idea to have the latest network driver that works with your current version of Windows. While you can use any third-party driver updater software, the first step should be to check with the Windows Update or directly from the OEM.
- Open Settings > Windows Update > Advanced Options
- Click on Optional Updates and check if there is a network driver update available.
- If yes, then update it and restart the PC.
If there is no update available with Windows, you need to check with the OEM. Usually, the drivers are listed on their website, and you can download and install based on the version.
5] Remove Or Turn Off Other Network Devices
You should turn off or remove bandwidth-hogging devices connected to your network while utilizing your desktop or laptop. Other devices like tablets, phones, TVs, or other PCs you have on the same network should be turned off as they will end up consuming your additional bandwidth.
Now that we have faster internet and so many video streaming platforms, everyone consumes substantial data. If that is not the case, you can turn them off one by one and then check which device is creating the problem. In this case, a device might be stuck and continuously try to download something and failing.
5] Choosing WPA2-PSK [AES] Option in Router Settings
AES is better technology that provides faster router speed, secured browsing, and an algorithm on which we can rely to make it a must-use in terms of offered options on your Wi-Fi network.
- Type in the Admin page URL of the router in the browser and press the Enter key.
- In the Network Security section, make sure to choose Security Type as WPA2 or WPA2-PSK [AES] option.
- Save the changes and exit.
The settings may change depending on the router model. If you cannot find it, check with the router manual.
6] Shift To Google DNS
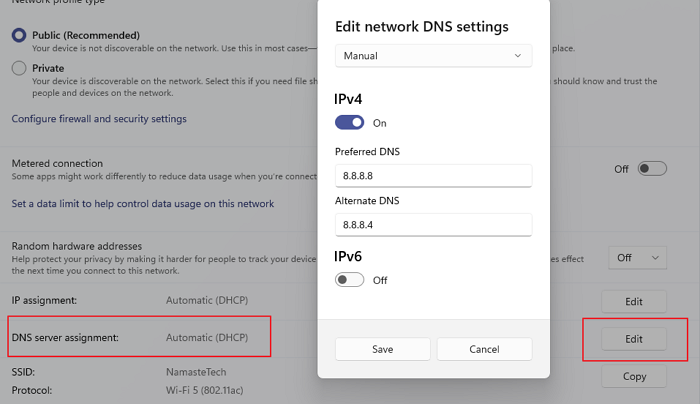
Instead of your default DNS provider, shifting to Google DNS is faster for regular users. It is the best way for malware protection also. Please follow the below steps for this:

- Open Settings using Win + I
- Navigate to Network & internet and select Wifi or Ethernet
- Look for DNS Server assignment or settings, and then click on the Edit button
- Change from Automatic to Manual, and toggle on IPv4 or IPv6 settings
- Here you can enter the Google DNS
- Preferred 8.8.8.8
- Alternate: 8.8.4.4
- Save the changes, and you are done.
7] Update Windows Or Rollback last update
Rare, but it can happen. An available update may fix the ping spike issues, or a recent update may have started it. You can either choose to update Windows and related drivers or rollback a recent update.
8] Close Unwanted Bandwidth-Hogging Background Programs
It’s better to close background applications running on your PC that may be hogging your network resources. Insufficient bandwidth can affect the time consumed for data to be sent out and then back, resulting in high ping.
- USe Ctrl + Shift + Esc to open Task Manager
- Click on the Network column to sort it based on bandwidth or network utilization.
- If there is an app consuming a lot of bandwidth and running in the background, right-click on it and choose End task.
- Check if the Ping spike issue is resolved.
9] Reset Windows 11/10’s Network Settings
Windows offers a built-in troubleshooter that can fix Network issues by running tools internally. You can find the Network Troubleshooter by going to Settings > System > Troubleshoot > Other Troubleshooters, and run the Internet Connections and Network Adapter troubleshooters.
Once the wizards complete their methods, try running the ping command, and see if the issue persists.
10] Don’t Use Crossover Ethernet Cables
If you use a crossover cable to connect to the Internet, you should replace it with a suitable Ethernet cable, such as a CAT5 or CAT6 Ethernet cable.
How to Lower Ping in Windows 11/10?
There is no shortcut to this. First, you need a faster internet connection, and second, you need to make sure there is no major lag when a PC or Laptop is connected to the router over WiFi.
Can a Damaged Ethernet Cable Reduce Internet Speed?
Because of physical damage or electric signal interference, your Ethernet cable can cause poor internet speed. The cable may be damaged at the connector or somewhere in between, causing a lot of failures.
These are some of the best ways to control ping spiking for WiFi or Ethernet connections on your Windows PC. If your WiFi or Ethernet ping spiking is extremely severe, please consider contacting your ISP for resolution. ISP can check network issues responsible for causing the ping spikes and guide you in improving your connection quality.
Leave a Reply