Windows Safe Mode is one option that is very useful when you need to carry out some troubleshooting. If you find that Safe Mode is not working, and you are unable to boot your Windows 11/10 computer in Safe Mode, this post suggests some steps you may use to fix the problem.

In Windows 7 and earlier, one needs to repeatedly press the ‘F8’ key right after the computer is powered on and before the Windows logo appears to boot into Safe Mode. In Windows 11/10, the F8 method is often disabled by default and the process to boot into Safe Mode is a bit different.
Cannot boot in Safe Mode in Windows 11/10
But you may at times you are even unable to boot into Safe Mode. Here are some troubleshooting steps you may want to try to fix your safe mode. Since you can boot normally, you can use these methods:
- Run System Restore
- Run System File Checker
- Reset Windows OS
- Troubleshoot in Clean Boot State
- Use a desktop shortcut
1] Run System Restore
Try a System Restore to a prior good point when Safe Mode was working and see if it helps. Go to Advanced Startup options and select System Restore.
2] Run System File Checker

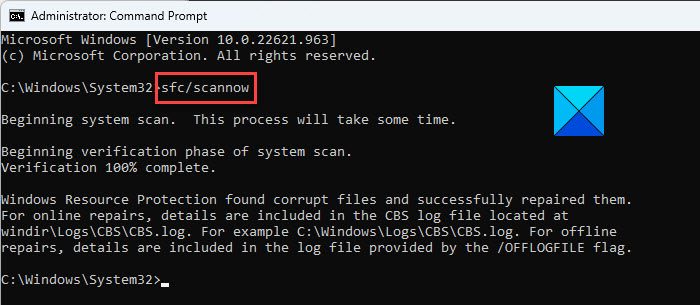
Type sfc /scannow in an administrative command prompt and hit Enter to run your System File Checker. It may take a while. Go get a coffee or something till it runs the scan. Once complete, reboot, try again, and see if it has helped.
3] Reset Windows OS
Windows 11/10 users may use the Reset This PC option or run DISM.
Related: Windows Safe Mode stuck; Booting hangs or goes in a loop.
4] Troubleshoot in Clean Boot State
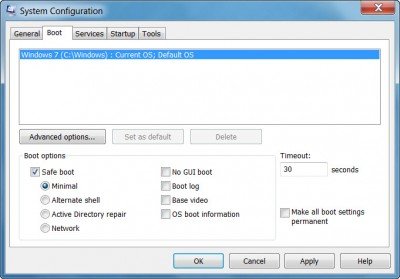
Type MSConfig in the Start search and hit Enter to open the System Configuration utility. Here, under Boot tab > Boot options, check Safe boot and select Minimal. Click Apply/OK. Restart.
When you’re done working in Safe Mode, go back to msconfig and remove the checkmark from Safe Boot.
Do note that this sort of, forces your computer to boot in Safe Mode – your computer could therefore possibly go in a loop if it is still unable to boot into Safe Mode. So use this as a last option and use it only if you know what you are doing. See this post if your PC is stuck and cannot exit Safe Mode.
5] Use a desktop shortcut
Create a desktop shortcut to reboot your PC in Safe Mode. Right-click on your desktop, and select New > Shortcut. In the Location field, copy-paste the following path:
C:\Windows\System32\msconfig.exe -2
Click ‘Next’ and name the shortcut as, say, ‘Restart Options’.
The shortcut will open the System Configuration utility (msconfig) on your Windows 11/10 PC and directly navigate you to the Boot tab, from where you may adjust the boot settings.
Windows Safe Mode not working
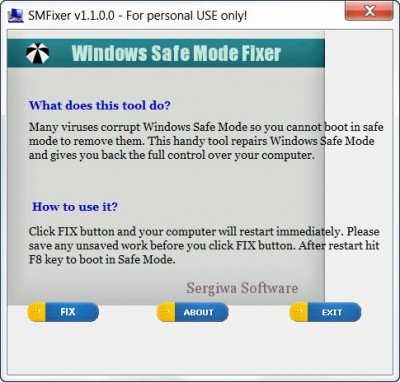
There is also a free software called Safe Mode Fixer that promises to fix your broken safe mode.
While I have not tried it, you may want to create a system restore point first and then download it out and take a considered call on it.
I hope something helps you.
How do I manually boot into Safe Mode?
To manually boot your PC into Safe Mode, open the Settings app and navigate to System > Recovery. Click the Restart now button next to Advanced startup. After the PC restarts to the Choose an option screen, select Troubleshoot > Advanced options > Startup Settings > Restart. After your PC restarts, you’ll see a list of options. Press 4 or F4 to start in Safe Mode, 5 or F5 to start in Safe Mode with Networking, or 6 or F6 to start in Safe Mode with Command Prompt.
Why won’t my Windows 11 start in Safe Mode?
If your Windows 11 PC won’t start in Safe Mode, it could be due to corrupt or missing system files, incompatible or outdated drivers, misconfigured settings in the Boot Configuration Data, incorrect UEFI or BIOS Settings, or hardware issues. Certain third-party software, especially security software, might also interfere with the Safe Mode boot process, preventing it from starting. To troubleshoot the issue, run SFC and DISM, update or roll back drivers, and ensure Secure Boot and Fast Boot are properly configured in BIOS/UEFI.
These links too are sure to interest you:


doesnt werk prim8
I have windows 10 having error while booting stop code memory management
Also I am unable to boot in safe mode(after automatic repair option directly showing blue screen)
Also unable to reinstall windows(after boot from CD option,blue screen appears)
What should I do?
Please help