You can connect an external monitor to your desktop computer or laptop through an HDMI or a VGA cable. Depending on the number of HDMI and VGA ports your system has, you can connect multiple monitors to it. After connecting an external monitor to your desktop computer or laptop, you can play games, watch movies, and do your work on a screen larger than your laptop’s built-in display. Windows also lets you set different screen resolutions and scaling levels for different monitors or displays. Sometimes the screen resolution settings do not work as expected when you connect an external monitor. Such screen resolution problems in Windows 11/10 devices ruin the users’ experience. It is not necessary that the screen resolution problem occurs only on the external display, you may also experience the same on the built-in display of your laptop. In this article, we will see how to fix screen resolution problems in Windows 11/10.
Some common causes of Screen Resolution issues in Windows 11/10
Before talking about the solutions to fix screen resolution problems in Windows 11/10, let’s see some common causes of screen resolution issues on WIndows 11/10 devices.
- Incorrect settings: Incorrect display resolution and scaling settings are the primary cause of screen resolution problems. After connecting an external display or monitor, it is necessary to configure its settings properly. If you have made any mistakes while configuring your display resolution and scaling settings, you will not get the desired resolution on your display.
- Windows Update: Sometimes, the latest Windows Update causes problems on a Windows device. If you are experiencing screen resolution issues after updating your system, it is possible that the latest update might have disturbed your screen resolution settings. In such cases, rolling back to the previous version of Windows can fix the issue.
- Corrupted or outdated driver: Every hardware device that we connect to our computer requires a dedicated driver to function properly. Outdated and corrupted display drivers can also cause screen resolution problems on a Windows device.
- Hardware issues: If you have an old display, you should check whether it is working properly. For this, connect it to another computer. This will let you know if the problem is associated with hardware or software.
How to fix Screen Resolution problems in Windows 11/10
If you are experiencing screen resolution problems in Windows 11/10, here are some suggestions that may help you get rid of this issue.
- Check for Windows Update
- Update or reinstall your Display driver
- Install the display driver in compatibility mode
- Select the recommended Display resolution
- Run Hardware and Devices troubleshooter
- Roll Back the display driver or uninstall the latest Windows Update
- Adjust the display scaling
- Check your Multiple Displays setting
- Adjust the screen resolution and scaling using your graphics card’s control panel
- Change your TV’s aspect ratio and resolution (if you have connected your TV to your PC)
Let’s see all these fixes in detail.
1] Check for Windows Update
The first thing that you should do to fix the display resolution problems on your Windows 11/10 device is to install the latest Windows Updates (if available). Open the Windows Update page on your Windows device and see if any Windows update is available. If no update is shown there, you can check for Windows Updates manually. If an update is available, install it and see if this fixes the problem.
2] Update or reinstall your display driver
As we have described above, a corrupted or outdated display driver is one of the causes of display resolution problems in Window 11/10. Therefore, you should also try updating your display driver. If an update is available for your display driver, it will be shown on the Windows Optional Updates page. Open the Windows Optional Updates page in Windows 11/10 Settings and update your display driver (if any update is available).
If updating the display driver does not fix the issue, uninstall the display driver from the Device Manager. Don’t worry, you will not lose your display. After uninstalling the display driver, Windows will use the standard VGA driver or another default display driver. Now, restart your computer. After restarting your device, Windows will detect the hardware changes and install the latest version of your display driver automatically. Now, check if the issue persists.
If the issue still persists, visit the official website of your display manufacturer and download the latest version of your display driver. If the driver is downloaded in the zip format, extract the folder and then run the installer file to install the driver manually. Before you install the driver, it is important that you uninstall the currently installed display driver.
3] Install the display driver in compatibility mode
If the above solution did not fix your problem, install the downloaded display driver in compatibility mode and see if it brings any changes. The steps to do this are as follows:
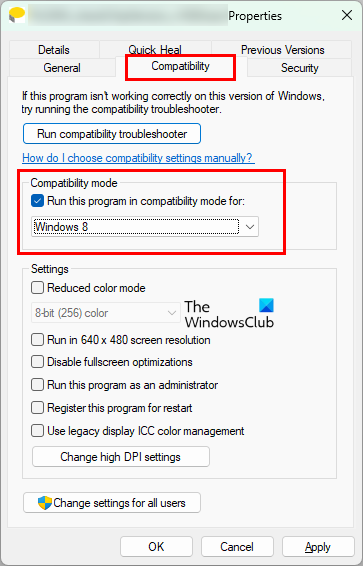
- Right-click on the driver installer file and select Properties.
- Click on the Compatibility tab.
- Under Compatibility mode, select the “Run this program in compatibility mode for” checkbox.
- Select Windows 8 in the drop-down.
- Click Apply and then click OK.
Now, run the installer file and follow the on-screen wizard to install the driver under compatibility mode.
4] Select the recommended display resolution
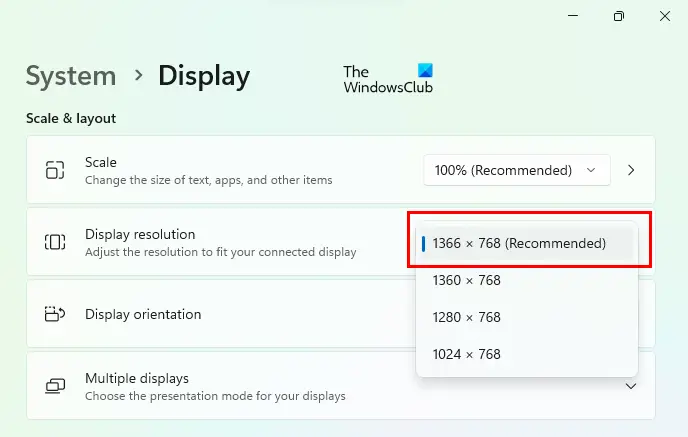
One of the display resolution problems that users have experienced on their display is automatically switching to the wrong resolution. Some of the causes of this problem are incorrect power settings and malfunctioned display or graphics card driver. If such a problem occurs on your computer, open the Display settings and select the recommended display resolution. The steps to do this are written below:
-
- Open Windows 11/10 Settings.
- Go to “System > Display.”
- Click on Display Resolution and select the recommended resolution.
If this does not fix the problem, you can try running the appropriate troubleshooter or rolling back the Windows update. These methods are described below.
5] Run Hardware and Devices troubleshooter
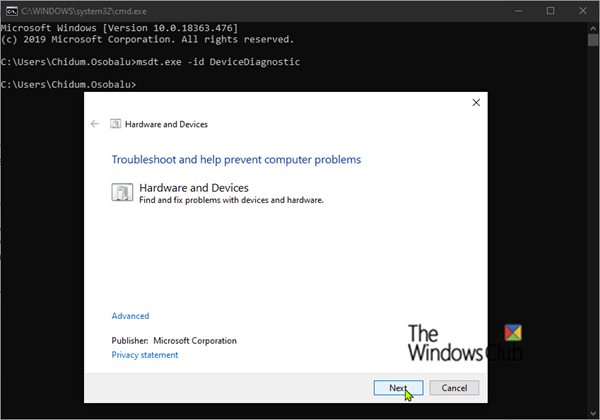
Previously, there was a tool named Display Quality Troubleshooter on Windows computers. Microsoft developed it to troubleshoot display-related issues. But later, Microsoft deprecated it. Now, you can run the Hardware and Devices troubleshooter to fix the display-related problems. You can run the Hardware and Devices troubleshooter from the elevated command prompt by executing the following command:
msdt.exe -id DeviceDiagnostic
6] Roll Back the display driver or uninstall the latest Windows Update
If the screen resolution problems started occurring after installing a certain Windows Update, we suggest you roll back your display driver. Follow the steps below:

- Open the Device Manager.
- Right-click on your display driver and select Properties.
- Select the Driver tab.
- See if the Roll Back Driver button is clickable. If yes, click on it.
The above process will install the previous version of your display driver. This should fix the problem. If not, we suggest you uninstall the latest Windows Update.
Read: Fix Resolution not supported Monitor error on Windows PC.
7] Adjust the display scaling
Sometimes, you may experience a zoom-in effect on your external monitor. This stretches the entire display due to which the icons appear larger and images appear distorted. This usually occurs if you have selected the incorrect scaling for your display. According to the users, the 125% scaling level caused this problem.
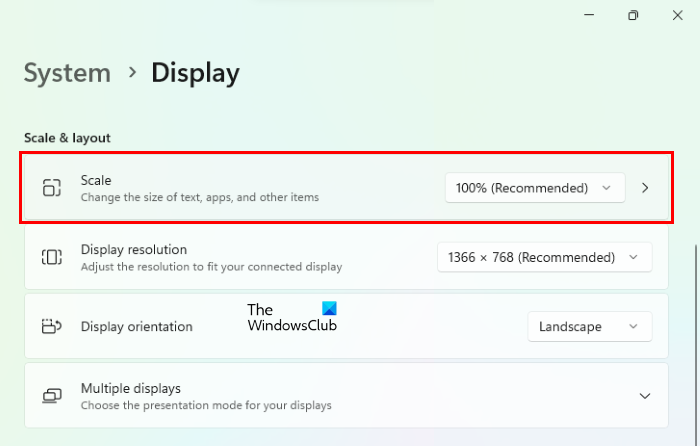
If you experience such a problem on your display, change the scaling level from 125% to 100%. The steps to do this are as follows:
- Open WIndows 11/10 Settings.
- Go to “System > Display.”
- Click on the Scale drop-down and select the 100% scaling option or select the one that is recommended by Windows for your display.
8] Check your Multiple Displays setting
If you have connected multiple monitors to your Windows computer and you are experiencing screen resolution problems on one of all of them, check your Multiple Displays setting. The following instructions will help you check your Multiple Displays setting.
- Open Windows 11/10 Settings.
- Go to “System > Display.”
- There, you will find a setting named Multiple Displays.
- If the Duplicate these displays is selected in the drop-down, change it to Extend these displays.
The “Duplicate these displays” setting copies the resolution of the primary monitor to all the monitors. If you want to set a different screen resolution for all your displays, you have to change this setting.
9] Adjust the screen resolution and scaling using your graphics card’s control panel
If you are unable to change your display resolution via the Windows 11/10 Settings, try to change the resolution and scaling via your graphics card’s control panel. We have explained the steps for some of the graphics cards.
Change the display resolution and scaling via Intel HD Graphics Control Panel
Follow the steps written below to change your display resolution and scaling via the Intel HD Graphics Control Panel.
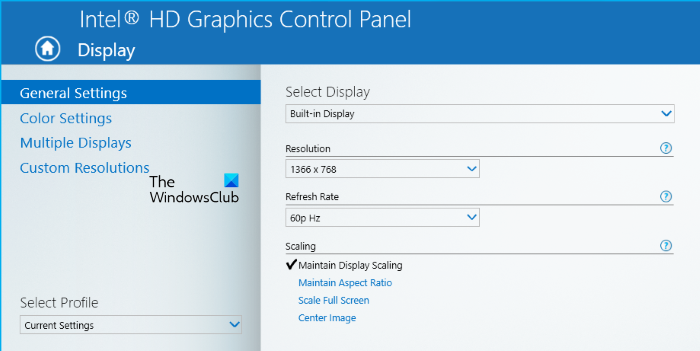
- Right-click on the empty space on your desktop and select Intel Graphics Settings. If you are a Windows 11 user, first select Show more options in the right-click context menu, then click Intel Graphics Settings.
- When the Intel HD Graphics Control Panel opens up, select Display.
- Now, select your display from the Select Display drop-down and change its resolution.
If an option to change the display scaling is available, change it accordingly.
Change the display resolution and scaling via AMD Catalyst Control Center
If your system has an AMD graphics card, you can change the display resolution via the AMD Catalyst Control Center. The steps for the same are written below:
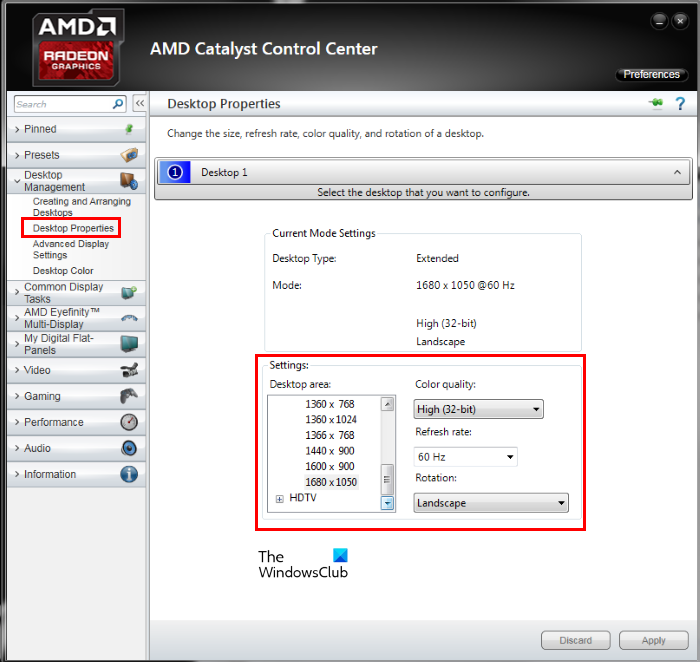
- Open AMD Catalyst Control Center.
- Expand the Display Management tab on the left side.
- Select Display Properties.
- Select the display resolution from the list shown on the right side.
- Click Apply.
Similarly, you can also change the display scaling. To do so, expand the My Display Flat-Panels tab on the left side and select Scaling Options (Digital Flat-Panel). You will see a slider on the right side. Move it to adjust the display scaling. According to the feedback of most users, 5% scaling fixed the display resolution problems on Windows 11/10.
Change the display resolution and scaling in NVIDIA Control Panel
If you have an NVIDIA graphics card, you can change the display resolution by following the steps below:
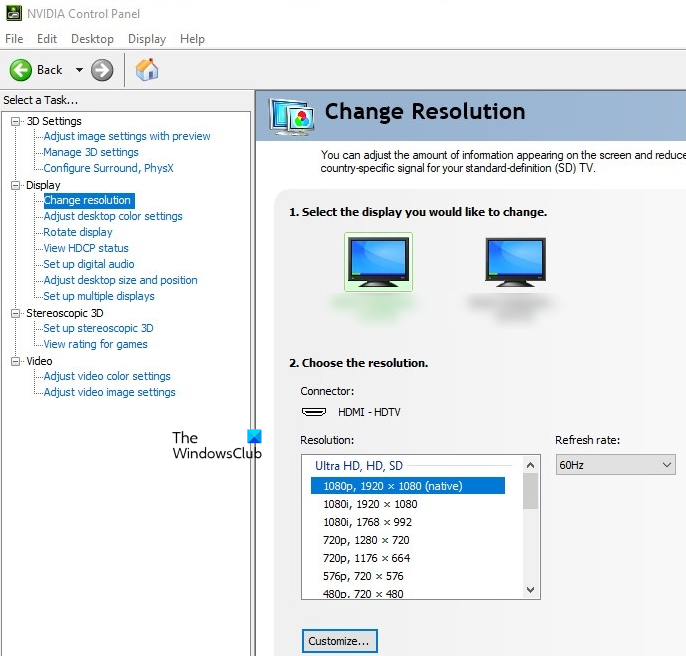
- Open NVIDIA Control Panel.
- Expand the Display node on the left side.
- Select Change resolution.
- Now, select the display resolution on the right side.
10] Change your TV’s aspect ratio and resolution (if you have connected your TV to your PC)
If you have connected your TV to your computer in place of a monitor, the problem might be associated with your TV display settings. We suggest you change the aspect ratio and screen resolution of your TV. You will find different aspect ratios and screen resolutions. Therefore, you have to use the hit and trial method to select the resolution that fits best to your TV screen.
Read: How to change Display Resolution in Windows 11/10.
Why can’t I change the screen resolution in Windows 11?
If you cannot change the screen resolution on your Windows 11 PC, the problem might be associated with your display driver. Update your display driver and check if this fixes the problem. If the problem started occurring after a certain Windows update, you can try rolling back the display driver or uninstalling the latest Windows update. If you are unable to change the screen resolution via Windows 11/10 Settings, you can try the same by using your graphics card’s control panel.
How do I get a 1920×1080 resolution on a 1366×768 screen on Windows 11?
To get a 1920×1080 resolution on a 1366×768 screen in Windows 11/10, change the display resolution in Windows 11 Settings. Open the Windows 11 Settings app and then go to “System > Display.” There you will see an option to change the display resolution. Click on the drop-down menu and select the desired screen resolution. If the 1920×1080 screen resolution is not available in Windows 11 Settings, your system might have outdated display drivers. To fix this issue, update your display driver.
Hope this helps.
Read next: How to create and set Custom Resolution on Windows 11/10.
Leave a Reply