The Steam Client Bootstrapper is an essential component of the Steam Client. It runs in the background and makes sure that all the dependencies are in their place so that the Steam Client can update itself without an interruption. It is normal that the Steam Client Bootstrapper shows high CPU usage when you update and install games through the Steam Client. But some users have reported that the Steam Client Bootstrapper shows high CPU usage even if the Steam Client is idle. In this article, we will see some solutions to fix the Steam Client Bootstrapper high CPU usage issue on Windows 11/10 computers.

What causes 100% CPU usage on Windows 11/10?
When you perform heavy tasks on Windows 11/10, CPU consumption generally goes high. Some heavy tasks include playing heavy graphics video games, running video editing software, performing an antivirus scan, etc. If despite being your system idle, the CPU consumption remains 100%, you can try some fixes to resolve the issue, like, running the CHKDSK, SFC, and DISM scans, updating your device drivers, disabling Windows Search Indexer, etc.
Fix Steam Client Bootstrapper high CPU usage on Windows 11/10
Sometimes, restarting a computer fixes the problems. Therefore, before proceeding towards the fixes described in this article, we suggest you restart our system and see if it fixes the problem. You can also try scanning your system with a good antivirus and antimalware software. If the Steam Client Bootstrapper still shows high CPU usage, try the solutions described below:
- Run SFC scan
- Disable Steam Overlay
- Update or reinstall your GPU driver
- Turn off Broadcasting in Steam
- Run Steam repair
- Set your Skin to default
- Change the Steam Window to Library
Let’s see how to perform these fixes.
1] Run SFC scan
Sometimes, the computer shows high CPU and high RAM usage when some of the system files get corrupted. If this is the case with you, running an SFC scan may fix the problem. The System File Checker is an automated tool from Microsoft that scans your system for corrupted system files and fixes them.
2] Disable Steam Overlay

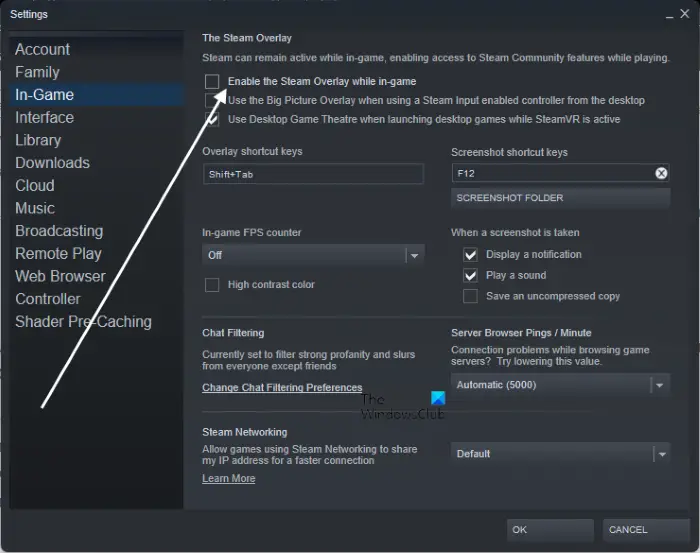
Many users have found the Steam Overlay the culprit of the problem. To check if this is the case with you, you can disable the Steam Overlay feature. Follow the instructions explained below:
- Launch the Steam Client.
- Click Steam on the top left side and then select Settings.
- Now, select In-Game from the left pane.
- Deselect the Enable the Steam Overlay while in-game checkbox.
- Click OK to save the changes.
Now, check if the issue persists.
3] Update or reinstall your GPU driver
If disabling the Steam Overlay does not fix the problem, try updating or reinstalling your GPU driver. First, open the Device Manager by right-clicking on the Start Menu and then update your GPU driver from there.
If updating the GPU driver does not work, download the latest version of the GPU driver from the manufacturer’s website and then install it on your system manually. But before you run the installer file, you have to uninstall the GPU driver from the Device Manager.
4] Turn off Broadcasting in Steam
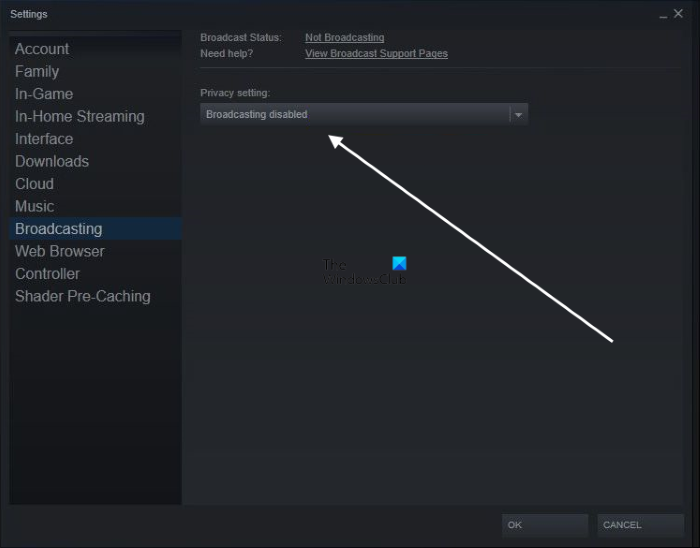
If you have enabled Broadcasting in Steam, you may experience high CPU usage by the Steam Client Bootstrapper. To fix this problem, disable the Broadcasting feature in Steam and check if it solves the problem.

We have explained the process below:
- Launch the Steam Client.
- Go to “Steam > Settings.”
- Select Broadcasting from the left side.
- Now, select Broadcasting disabled in the Privacy drop-down menu.
- Click OK to save the settings.
Read: Fix Steam update stuck on Windows PC.
5] Run Steam Repair
Running the Steam Repair has fixed the issue for many users. You can also perform a repair attempt and check if it works for you. Go through the process described below to repair the Steam Client.
Press Win + R keys. This will launch the Run command box. Now, type the following command and click OK:
"C:\Program Files (x86)\Steam\bin\SteamService.exe" /repair
Do note that, C:\Program Files (x86)\Steam is the default install location of the Steam Client. If you have installed Steam on another location on your computer, you have to replace the C:\Program Files (x86)\Steam with that path. If you do not know how to open the installation directory of Steam, right-click on its desktop icon and select Open file location. Now, click on the address bar of the File Explorer and copy that path. After that, paste the copied path in the above command in place of the C:\Program Files (x86)\Steam path.
6] Set your Skin to default
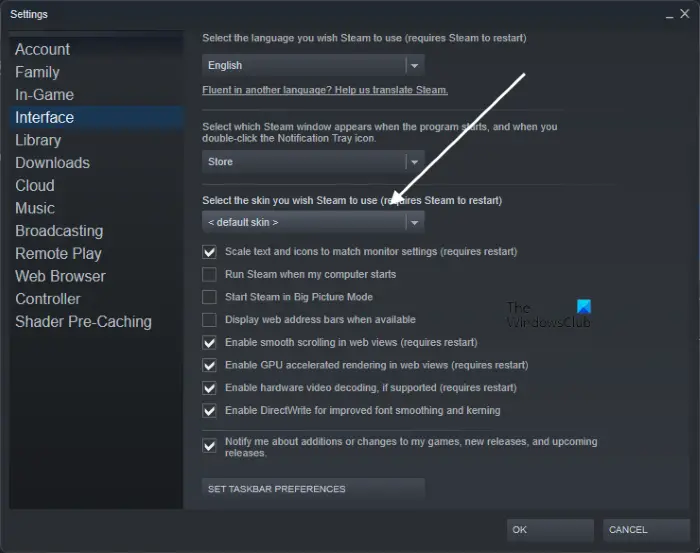
According to some users, changing the Steam Client default skin results in high CPU usage by the Steam Client Bootstrapper. If you also have changed the Steam Client’s default skin, restore it to default and see if it brings any changes.

The steps to set Steam Client’s Skin to default are explained below:
- Launch the Steam Client and open its Settings panel.
- Now, select Interface from the left pane.
- In the Select the skin you wish Steam to use drop-down menu, select default skin.
- Click OK.
- Restart the Steam Client to let the changes take effect.
7] Change the Steam Window to Library
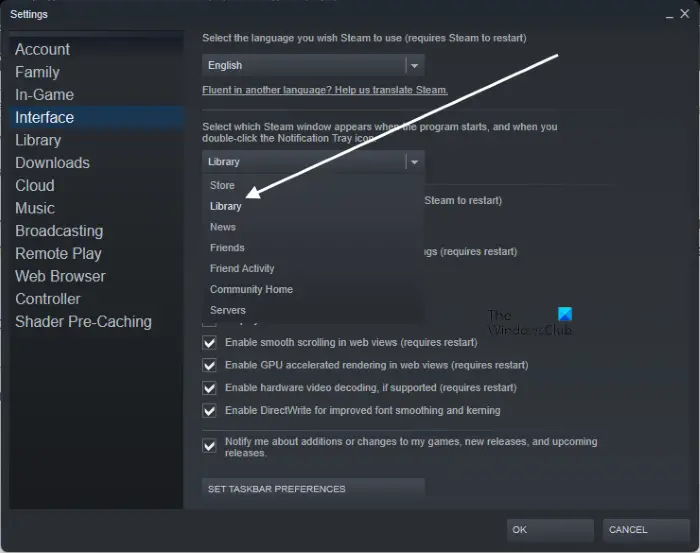
By default, the Steam Window is set to Default. According to some of the affected users, it was causing the Steam Client Bootstrapper to use high CPU. If none of the above solutions worked for you, you can try changing the Steam Window to LIbrary and see if it helps.

The following instructions will help you with that:
- Launch the Steam Client.
- Open its Settings and select Interface from the left side.
- Now, select Library in the Steam Window drop-down menu.
- Click OK to save the changes.
Should I disable Steam Client Bootstrapper?
As explained above in this article, the Steam Client Bootstrapper is an essential element of the Steam Client. It is a background process that downloads and installs updates and also makes sure that there are no missing dependencies. If you disable or force stop the Steam Client Bootstrapper, it may cause the Steam Client to become unstable or shut down. Hence, you should not disable Steam Client Bootstrapper.
If it is taking high CPU usage, you can try the solutions described in this article instead of disabling or force closing it.
Hope this helps.
Read next: Fix Steam needs to be online to update error on Windows PC.
Leave a Reply