Do you keep facing stutters while playing videos on your Windows 11/10 PC? As reported by some Windows users, they experienced stuttering and lagging issues during the playback of videos.
These issues when playing videos could very well be caused due to outdated graphics drivers and Windows OS. Also, if your video file is somewhat corrupted, you will likely face playback issues. Other reasons for the same could be your graphics preference, video playback configurations, issues with your media player app, etc. In case the issue occurs in a browser, it might be caused because of hardware acceleration.
Fix Video Stuttering and Lagging issues in Windows 11/10
If are facing stutters or lags while playing a video on your Windows 11/10 PC, perform a power cycle on your computer. Shut down your PC, unplug it, wait for a minute, plug it back, and then restart your PC. See if this helps. In case that doesn’t work, you can use the following methods to fix the video stuttering issue:
- Run Video Playback troubleshooter.
- Ensure that your display/graphics driver is up-to-date.
- Configure video playback settings.
- Update your media player app.
- Repair the corrupted video files.
- Decrease video resolution.
- Switch to Best performance power mode.
- Adjust your graphics settings for your Media player app.
- Enable Software Rendering.
- Turn off Hardware Acceleration (for browsers).
- Update Widevine CDM Component in Chrome.
1] Run Video Playback troubleshooter
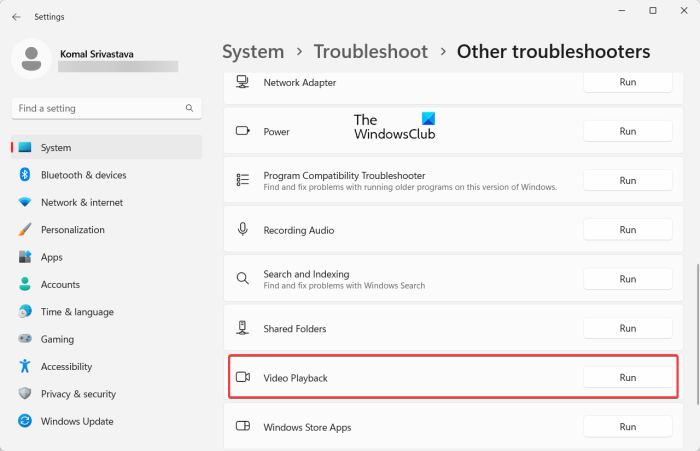
This could be a generic video playback issue that Windows can fix from its end. So, you can try running Video Playback troubleshooter which is present inside the Windows Settings app. It will address issues with video playback that might be causing video stutters or lags, and will eventually fix them. Here are the steps to run the Video Playback troubleshooter on Windows 11/10:
- First, press the Windows + I hotkey to open the Windows Settings app.
- Now, go to the System tab and click on the Troubleshoot option.
- After that, click on the Other troubleshooters option and then scroll down to the Video Playback troubleshooter on the next page.
- Next, click on the Run button present next to Video Playback. It will launch the Video Playback troubleshooting window. You can follow the prompted instructions to run this troubleshooter.
- Once the process is done, you can start playing your videos and see whether the problem is resolved.
Read: Video Playback issues, problems and errors on Windows
2] Ensure that your display/graphics driver is up-to-date

To avoid issues with video playback and play high-definition videos on your Windows PC, you better have up-to-date graphics drivers. An out-of-date graphics driver is likely to cause video playback issues, including stuttering, lagging, etc. Hence, update your graphics driver immediately and check if the video stuttering problem is gone.
Read: PowerPoint video export cause stuttering or audio glitch.
3] Configure video playback settings
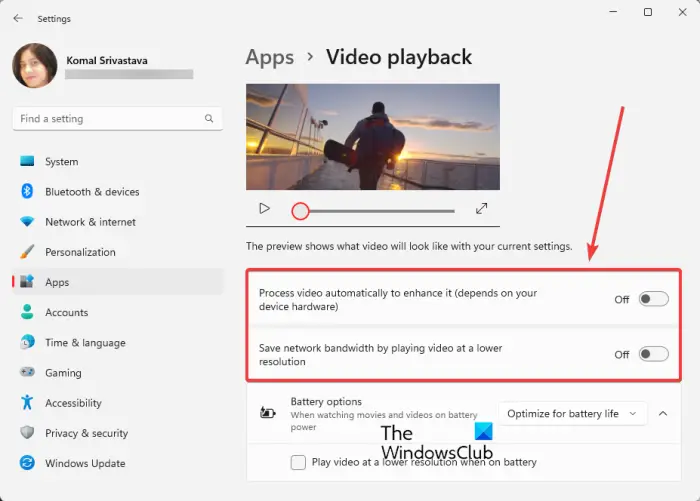
If the above solutions don’t work, you can try modifying some video playback settings and see if the problem is resolved. Here are the steps to do that:
- First, open Settings and go to the Apps tab from the left-side pane.
- Now, click on the Video playback option from the right-side pane.
- Next, disable the toggle associated with options called Process video automatically to enhance it and Save network bandwidth by playing video at a lower resolution.
- After that, try playing the video and see whether the stuttering or lagging issue is fixed.
If the issue is still there, move on to the next solution.
Read: How to stop Video Lag in PowerPoint?
4] Update your Media player app
Ensure the media player application you are using to play videos is up-to-date. You might face video playback issues if your media player app is outdated or corrupted. So, you can download the latest version of the media player from its official website and install it. If you are using a Microsoft Store app, update it by going to Microsoft Store > Library and clicking on Get updates.
Read: Best Windows Help & Tech Support websites
5] Repair the corrupted video files
The stuttering issue while playing a specific video might be caused due to an issue with the video file itself. Your video file might be corrupted which is why it is not playing well on your PC. Hence, if the scenario is applicable, you can fix the issue by repairing the corrupted video file. To do that, you can use a free third-party video repair application. There are free software like Meteorite, DivFix++, and DivXRepair that let you repair damaged video files.
You can also use the VLC media player to repair corrupted AVI video files. Open the app and go to the Tools > Preferences > Input / Codes option. Now, set the Damaged or incomplete AVI file option to Always fix and press the Save button. Now, open the video in VLC and see if the problem is fixed.
6] Decrease video resolution
If you still keep experiencing stutters in your videos, we recommend you lower the resolution of your video. It will help you run the video smoothly on a slow or low-end computer. To lower your video resolution, you can use a free third-party tool like FFmpeg, AV Video Converter, XMedia Recode, and other video resizers.
If you are using a laptop, you can use a handy video playback feature in your Settings. Here’s how:
- First, open the Setting app and go to the Apps tab.
- Now, click on the Video playback option.
- Next, under the Battery options drop-down, select the Optimize for battery life option.
- After that, tick the checkbox called Play video at a lower resolution when on battery.
- You can now try playing your videos and see if the problem is resolved or not.
7] Switch to Best performance power mode
In case your videos are lagging, try switching on the Best performance power mode on your Windows PC. To do that, open the Settings app and go to the System > Power & battery section. After that, under the Power mode drop-down option, choose the Best performance mode. When done, play your videos and check whether the problem is resolved.
8] Adjust your graphics settings for your Media player app
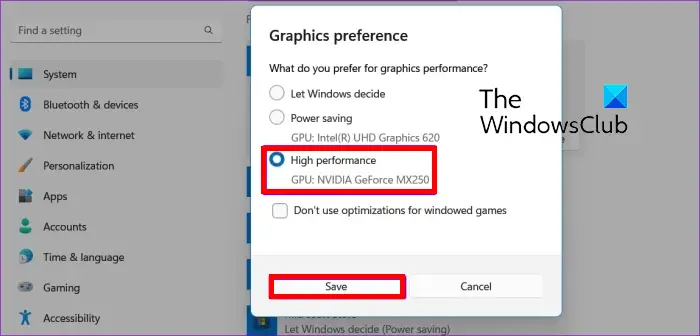
You can also adjust the graphics settings for your default or active media player app on your PC. Try using the dedicated GPU for the best video playback experience without stuttering and lagging issues. Here are the steps to do that:
- First, press Win+I to launch Settings and go to the System > Display tab.
- Now, scroll down on the right-side pane and click on the Graphics option.
- After that, under the Add an app section, select the Desktop app or the Microsoft app accordingly. If the app is not listed, you can click on the Browse button and choose your media player app.
- Next, select the media player app that you use (e.g., Movie & TV) and then press the Options button.
- Then, click on the High performance option and press the Save button.
Play your videos now and see if the issues are resolved or not.
9] Enable Software Rendering
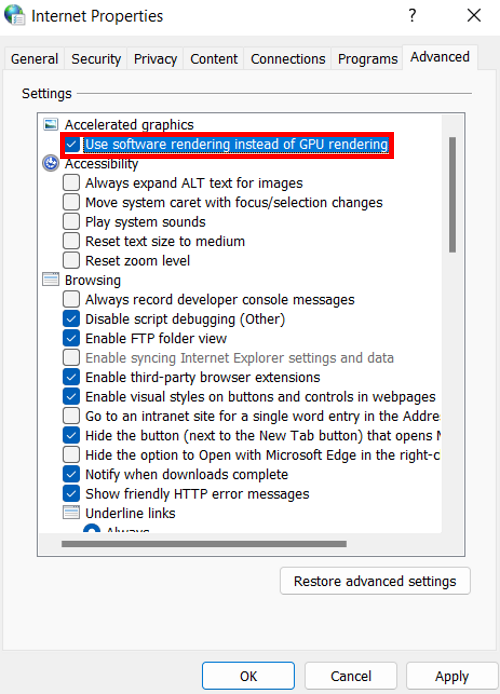
Another thing you can do to fix the video lagging issue on your PC is to enable software rendering. This is applicable if you are facing this problem while streaming videos. Also, if your PC has an old GPU chip, it will help you play your videos better. Here’s how you can use the software rendering:
- First, open the Control Panel and click on Network and Internet.
- Now, choose Internet Options, and in the opened dialog window, go to the Advanced tab.
- After that, tick the checkbox called Use software rendering instead of GPU rendering under the Accelerated graphics option, and click on the OK button.
- You can now try playing your video streams and see if the issue is fixed.
10] Turn off Hardware Acceleration (for browsers)
In case you are experiencing video stuttering while playing videos in browsers like Chrome, Firefox, Edge, Brave, etc., disable hardware acceleration and see if the situation has improved.
Google Chrome:
- First, open Chrome and click on the three-dot menu button present at the top-right corner.
- Now, click on the Settings option and then move to the System tab from the left-side pane.
- Next, disable the toggle associated with the Use hardware acceleration when available.
- After that, restart Chrome and see if you are able to play videos without issues like stuttering, lags, etc.
Microsoft Edge:
- First, open the Edge browser, and in the address bar, enter edge://settings/system.
- Now, switch off the Use hardware acceleration when available toggle.
- Finally, relaunch Edge to check if the problem is resolved.
Mozilla Firefox:
- First, launch Firefox and enter about:preferences in the address bar.
- Now, on the opened page, scroll down to the Performance section.
- After that, click the Use recommended performance settings checkbox and then uncheck the Use hardware acceleration when available option.
- Next, relaunch Firefox, and see if the problem is fixed.
11] Update Widevine CDM Component in Chrome
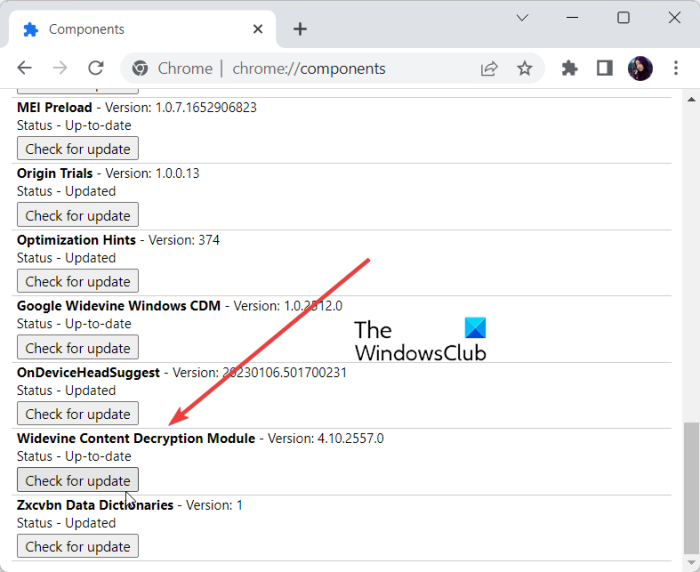
Widevine Content Decryption Module (CDM) component is built into Chrome. It basically allows you to play DRM-protected in the browser. If you are having video playback issues in Chrome while watching such videos, you can update Widevine CDM Chrome Component. Here is the procedure to do that:
First, open Chrome and clear your browsing data. To do that, press Ctrl + Shift + Delete, and in the opened dialog, tick all the data options and press the Clear data button. When done, close Chrome and make sure it is not running in the background.
Now, press Win+R to open Run and enter C:/Program Files/Google/Chrome/Application in the Open field. Next, open the version number folder by double-clicking it. After that, at the appeared location, delete the folder named WidevineCdm.
Next, reopen Run using Win+R and enter C:\Users\<YOUR-USER-NAME>\AppData\Local\Google\Chrome\User Data. Replace <YOUR-USER-NAME> with your username.
Then, delete the WidevineCdm folder in the opened location.
Now, reopen Chrome and type & enter chrome://components in the address bar. On the opened page, search for Widevine Content Decryption Module and then press the Check for update button.
Finally, relaunch Chrome and see if the issue at hand is fixed.
How do I fix stuttering on Windows 11?
To fix the stuttering issue on your Windows 11/10 PC, disable and re-enable the CD/DVD drive on your system and see if the problem is fixed. Apart from that, you can update IDE ATA/ATAPI controllers and graphics drivers to fix the issue. If that doesn’t help, disable Notifications and Action Center, turn off the wallpaper slideshow, download & install the latest chipset drivers, perform an SFC scan, or update your BIOS.
Is stuttering caused by GPU or CPU?
Stuttering can be caused either by CPU or GPU. When the utilization is high or 100%, you will start experiencing stuttering issues on your PC. It mainly happens while playing games as games are CPU and GPU extensive. If your game demands more system resources than your PC can allocate, you will face stutters.
Now read: Fix Game Stuttering with FPS drops in Windows 11/10.
Leave a Reply