Waiting for proxy tunnel is an error message that users sometimes see in Chrome browser while trying to load a webpage or open a website. On most occasions, tweaking or adjusting a few Chrome settings resolves the problem. However, this may not always work. Regardless of any website you try to access, the browser displays “Waiting for proxy tunnel” message and after a minute or so informs you the page is taking too long to load. Nevertheless, here are some suggestions to resolve the issue if you see it frequently.

Fix Waiting for proxy tunnel error in Chrome
Before proceeding further, you should confirm if the issue persists only with Chrome and not other browsers.
To verify this, restart Chrome and see if the page or site you’re trying to visit loads without effort. Next, open alternate browsers like Microsoft Edge or Mozilla’s Firefox and verify if the sites you are trying to open in Chrome load fine in these browsers without any issues. If yes, start investigating.
Launch Incognito window and check if the issue persists. If visiting a site in Incognito mode returns ‘404 not found error’, clear Chrome browsing data and check if the issue persists.
If this does not help, try these suggestions.
1] Disable IPv6
Disable IPv6 or get a valid IPv6 connection. You will see the option on the Networking tab for the Properties of connections in the Network Connections folder. It has been observed that some users experience this issue due to a change in the IP preference from IPv4 to IPv6. If your computer has an IPv6 address assigned, it will try IPv6 first, even if it’s just an automatically assigned address without a valid gateway. Once this connection has timed out, it will try IPv4, and your page will appear if it has a valid connection.
2] Change Proxy Settings
Launch Google Chrome browser. Click on ‘Menu’ (visible as dots). From the list of options displayed under ‘Customize and control Google Chrome’ menu, select Settings. A new tab will instantly open.
On the following page, scroll down to the bottom until you locate ‘Advanced’ option with a down arrow. Click the option to expand its menu of options.

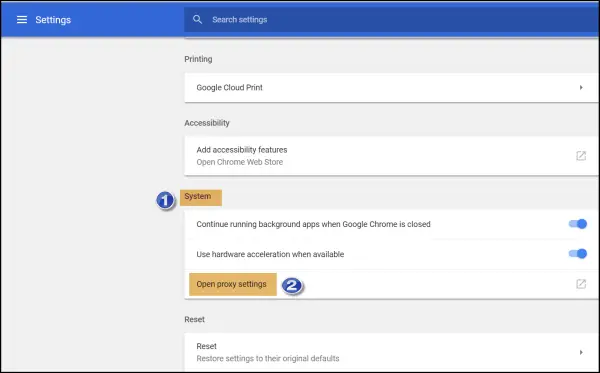
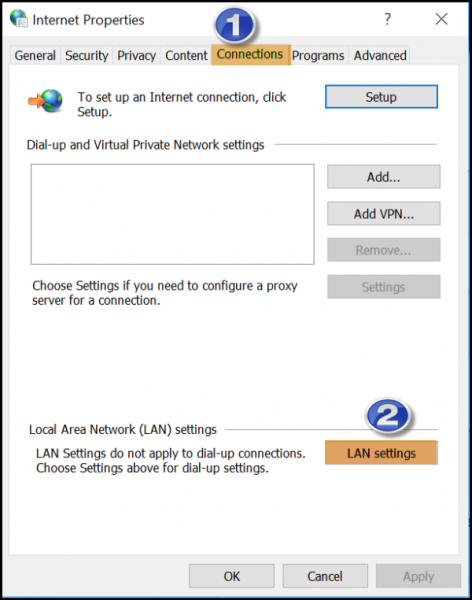
Here, look for the System section and when found, select its ‘Open Proxy Settings’ option. This will open a popup window of ‘Internet properties’ displaying several tabs alongside it. Click the Connections tab. In most cases, this tab opens first by default.

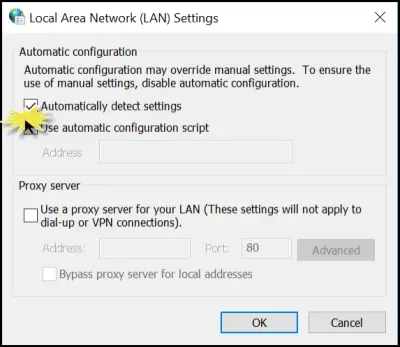
Here, hit the ‘LAN settings’ button, and in the window displayed after that, uncheck ‘Automatically detect settings’ option and press OK.

Now, moving back to the previous window, select Apply, then click on OK.
Let us know if this helps!