The webcam on a Windows computer is prone to all kinds of errors, one of them being the webcam turning off and then on again. Since webcams are used so extensively and are an integral part of most people’s desktop setup, it is important to be able to deal with this error. This error can be caused by a malware invasion on your computer or corrupt or dated system drivers. Today, we will be discussing how you can fix the webcam turning off and on issue in Windows 11/10.
Webcam keeps Turning Off and On again
There are certain measures that a user can take before implementing any of the workarounds that will be discussed in this article, like making sure that the camera is directly connected to the computer, and check if it is not set up as the default ‘video in’ option for streaming activities.
- Check for Windows, Drivers & BIOS updates
- Disable Power Saving for the Camera’s USB Port
- Reset/Reinstall the Camera app
- Disable access to the Camera
- Make changes in the Registry Editor
How to stop webcam from flickering in Windows
1] Check for Windows, Drivers & BIOS updates
This is pretty elementary. Outdated essential utilities like Windows and BIOS can create such issues because of incompatibility. If that is the case with you, updating Windows OS, Drivers, and BIOS can help you rectify the issue.
Visit your System settings and inside Updates and Security, check if there are any pending updates. You should also make sure that you are up to speed on all the optional updates. Check if the issue has been resolved after having installed all the updates.
Related: Webcam keeps freezing or crashing.
2] Disable Power Saving for the Camera’s USB Port
Such an issue may persist if you have configured your webcam to shut down during inactivity. Disabling the power-saving mode for your camera can help you solve this problem.
Open the Quick Access menu using the Windows + ‘X’ key combination and from the list of options offered, select Device Manager.
Locate Universal Serial Bus Controllers (USB) and upon expanding it, right-click on the USB port to which your camera is attached. You can check/verify what that port is by disabling each one of them in turns.
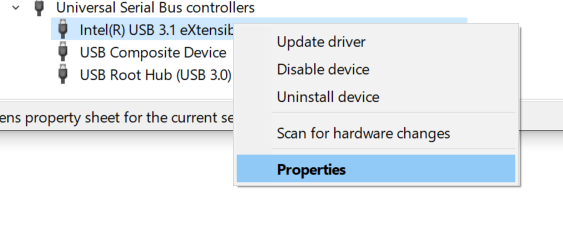
Open up its Properties and head over to the Power Management tab.
Here, uncheck the ‘Allow the computer to turn off this device to save power’ setting and save these settings.
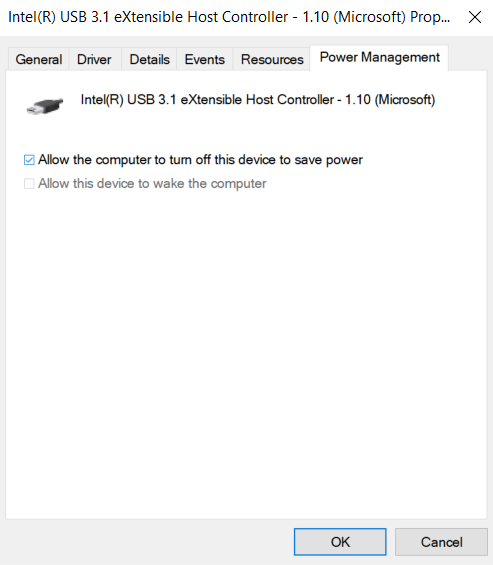
After applying the aforementioned change, reboot your PC and check if the issue has been solved.
Related: Laptop Camera or Webcam is not working.
3] Reset/Reinstall the Camera app
Windows 11
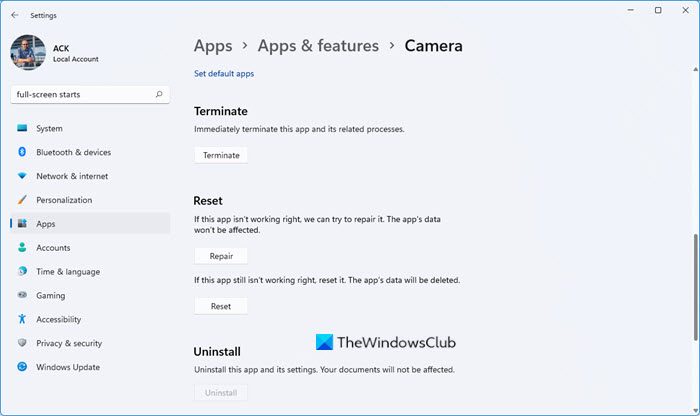
To reset Camera app in Windows 11, open Settings > Apps > Apps and features > Locate Camera app > Advanced Options > Press Repair or Reset.
Windows 10
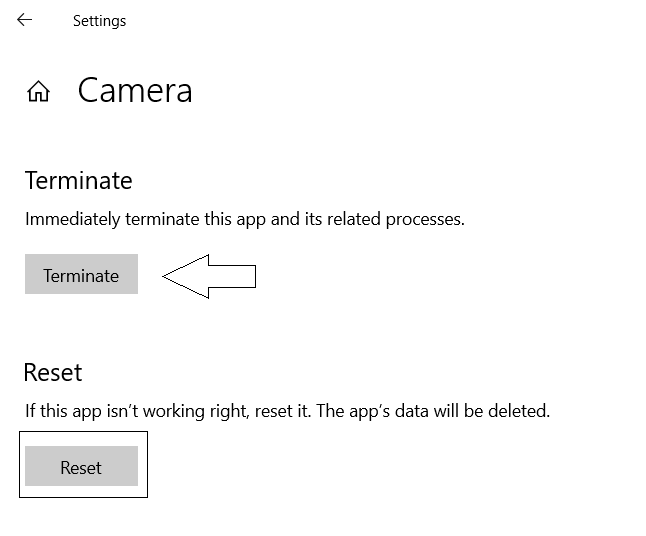
To reset the app to its default configurations, we’ll be making use of the app settings. Search for them in the taskbar’s search pane.
Scroll down a bit here, and click on the Reset button.
Using Windows PowerShell
If this doesn’t work out for you, you can try reinstalling the Camera app too. Since the camera app cannot be uninstalled like other apps, you will have to make use of Windows PowerShell to do so. Follow the steps below to uninstall the Camera app:
Search for the Windows PowerShell in the search pane on the Taskbar and select Run as Administrator.
Paste and execute the following line of code to remove the camera app.

Get-AppxPackage Microsoft.WindowsCamera | Remove-AppxPackage
Once the camera app has been successfully uninstalled, you can reboot your PC and visit the Microsoft Store to download it back.
Fix: Webcam Black Screen issue on Windows
4] Disable access to the Camera
If this error is caused because the camera app is being used by some other system process, what you can do is disable access to your camera. To do so, you have to follow the steps below:
Windows 11
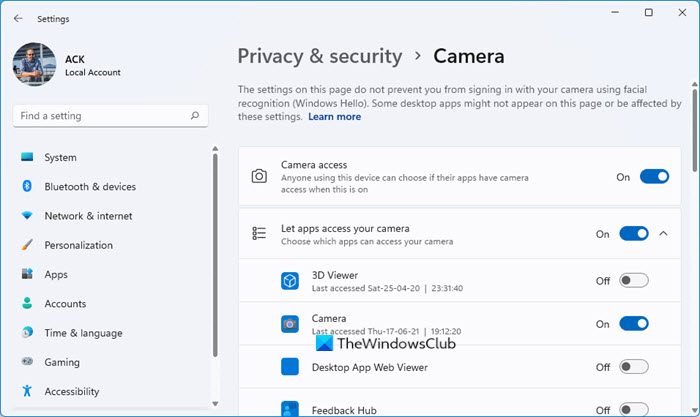
In Windows 11 you will see the settings here – Settings > Privacy and security > Locate Camera.
Windows 10
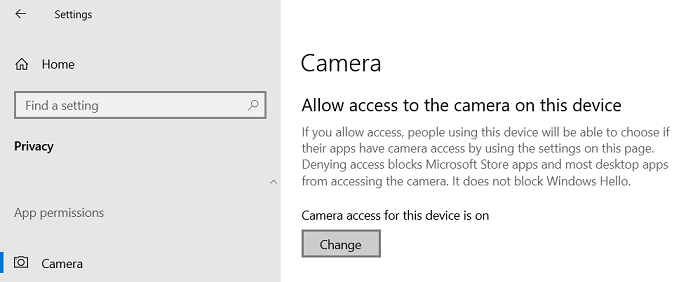
Open your Windows 10 Settings by pressing the Windows + ‘I’ key combination and select the privacy option here.
Under the sub-head App permission on the left pane of the privacy settings, select Camera.
Under the Camera Access for this device, click on Change and toggle off the subsequent ‘Camera access to this device’ setting.
Switch off the setting under Allow apps to access your camera. This will also disable the option under Allow Desktop Apps to Access Your Camera.
You can now reboot your PC and try operating your webcam to check if it is working properly.
5] Make changes in the Registry Editor
If the issue persists after having gone through all the fixes that have been mentioned above, you can try making edits in some registry editor. Before you make any changes, it is recommended for you back up your existing registry.
Open the Run command and type ‘Regedit’ or type the words ‘Registry Editor’ in the search pane and run it as Administrator. Give UAC access thereon too.
Navigate to the path prescribed below
HKEY_LOCAL_MACHINE\SOFTWARE\Microsoft\Windows Media Foundation\Platform
From the Directory on the left, right-click on Platform, and from the New option create a new 32-bit DWORD value.
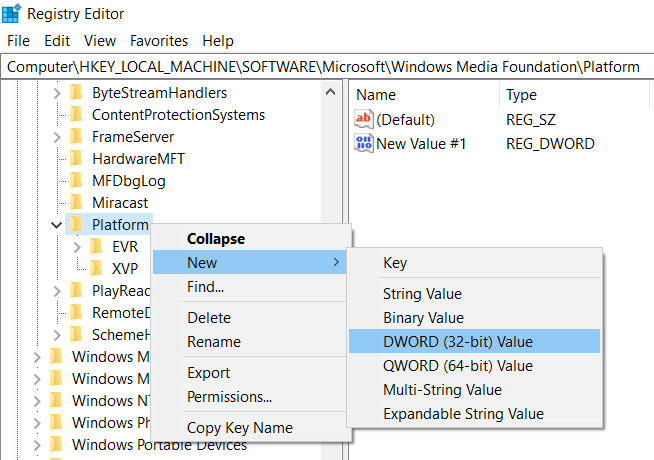
Rename this key as EnableFrameServerMode and set its bit value to 0.
The process isn’t done (for 64-bit systems), as you have to repeat the above process on the following path, after which you can exit the Registry Editor and reboot your PC to see if the error has been fixed.
HKEY_LOCAL_MACHINE\SOFTWARE\WOW6432Node\Microsoft\Windows Media Foundation\Platform
You can also try reinstalling the Camera driver or scan for applications that may be conflicting with the camera’s functioning, though we believe one of the above-mentioned solutions will do the trick for you.
I hope that I was able to clear your doubts about the error of the webcam flickering between off and on again and how it can be remedied.
Leave a Reply