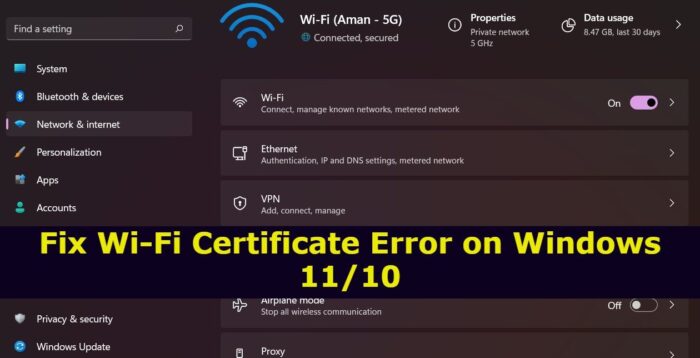
In this post, we will see how to fix Wi-Fi Certificate Error Windows was unable to find a certificate to log you on to the network on your Windows 11/10 computer. The Wi-Fi certificate errors on Windows 11/10 prevent users from accessing the internet. The issue may occur due to incorrect network settings or due to incorrect date and time. Continue with this troubleshooting guide to fix the problem on your Windows PC.
Windows was unable to find a certificate to log you on to the network
Wi-Fi has become the go-to option to connect to the internet. However, like anything else in the world, it isn’t free from problems. But among all, the one that has been troubling users the most is the Wi-Fi certificate error. This error prevents users from accessing certain websites. Whereas, there have also been reports that users cannot access even the internet. So, here’s how you can fix this problem on your Windows PC.
Fix Wi-Fi Certificate Error on Windows 11/10
Below is a list of solutions to fix the Wi-Fi Certificate Error on Windows 11/10.
- Set the correct Time and Date
- Change Windows Time properties
- Download the latest network driver update
- Check Network Authentication settings
- Registry workaround
- Turn on Hyper-V
- Reset Network settings
- Contact your IT Support
Now, let’s check out all these solutions in detail.
1] Set the correct Time and Date
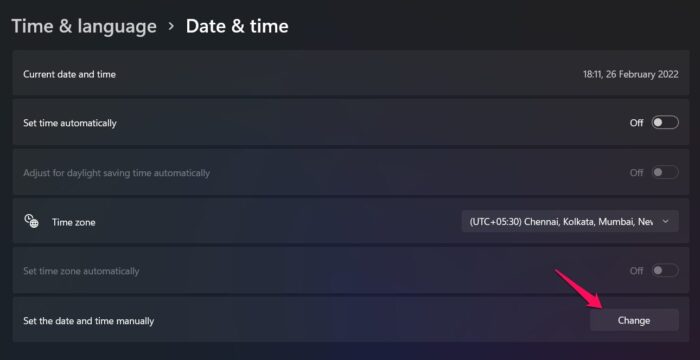
The first thing you should do is ensure that your system is showing the correct date and time. As it turns out, if there’s any difference between the system and the regional time, you will face different network problems, including the mentioned issue. To resolve the issue, you have to change your system’s date and time settings. Here’s how it’s done.
- Open the Settings menu on your system by pressing Windows + I shortcut key.
- Click on Time & language option present at the left panel of the screen.
- Click on the Change option present next to Set the date and time manually.
- In the following window, enter the correct date and time, and click on the Change option.
That’s it. Now restart your system, and check if the problem is fixed or not.
See: Windows showing Ethernet icon instead of WiFi
2] Change Windows Time properties
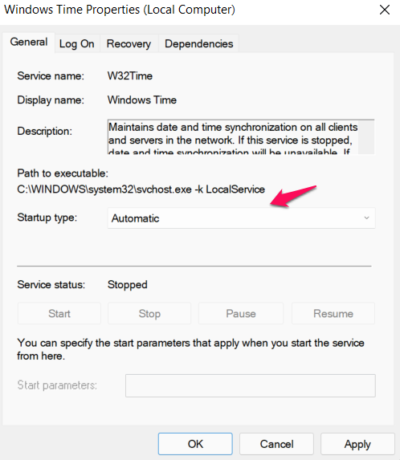
The next thing you can try is to change the Windows time properties. To do so, follow the below steps.
- To begin with, click on the magnifier icon present at the taskbar to open the Search menu.
- Type Services and press enter.
- Locate and right-click on the Windows Time option.
- From the context menu, choose the Properties option.
- Click on the dropdown icon next to Startup type and set it to Automatic.
- Click on Apply > OK.
Now, restart your system and check if the problem persists. If yes, try the next solution.
See: How to fix WiFi problems in Windows 11/10
3] Download the latest network driver update
Another primary reason behind the issue can be an outdated network driver. If you don’t remember updating the installed network drivers, it’s no surprise your face the mentioned problem. Download the latest network driver update to fix the issue. You can update the drivers by following either of the below-mentioned methods.
- You need to visit the official website, check if any update is available, and download it.
- You can use some of the best free driver update software to get the work done.
- Update the network drivers in Windows 11 using Windows Updates.
Restart the system after updating the drivers.
Read: How to change Wi-Fi band from 2.4 GHz to 5 GHz in Windows
4] Check Network Authentication settings
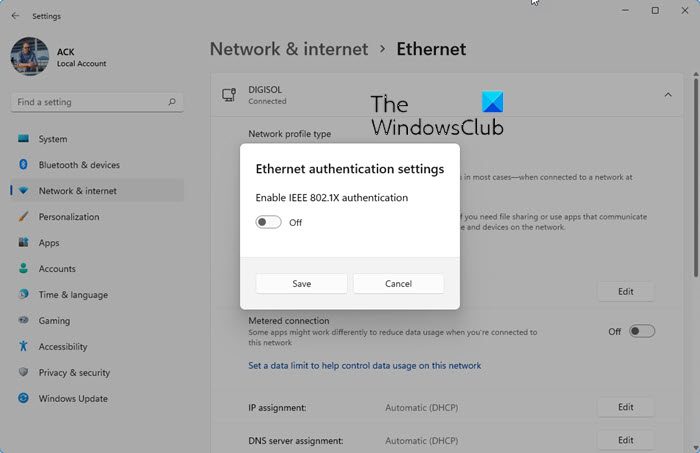
Open Windows Settings > Network & internet > Your network > Properties >and click on the Edit button against Authentication.
Ensure that Enable IEEE 802.1x authentication for this network is turned off.
Related: Cant connect because you need a certificate to sign in
5] Registry workaround
If you can’t connect to an 802.1x environment then this point applies to you.
Microsoft has fixed this issue by releasing a patch, so first, update your Windows 11/10 and see. If it does not help, create a system restore point first and try the following:
Open Registry Editor and navigate to the following key:
HKEY_LOCAL_MACHINE\SYSTEM\CurrentControlSet\services\RasMan\PPP\EAP\13
Create New > DWORD Value. Name it TlsVersion and in its Value data box, use the following values for the various versions of TLS:
- TLS 1.0 – 0xC0
- TLS 1.1 – 0x300
- TLS 1.2 – 0xC00
Restart your computer and see.
If it does not help, reverse the changes made or go back to the created restore point.
6] Turn on Hyper-V
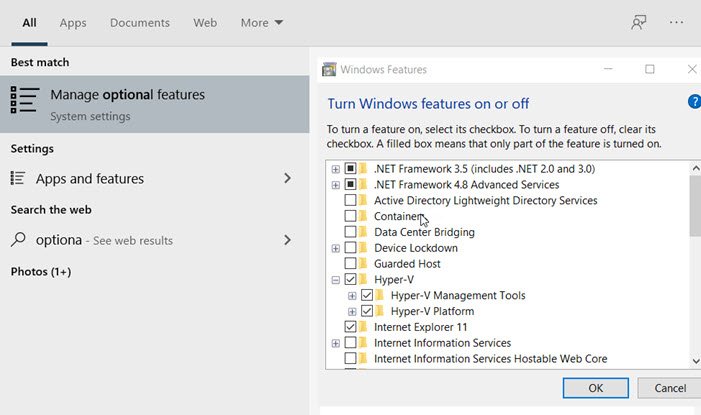
A few users have reported that enabling Hyper-V has solved the problem for them. Thus, you can go through the same process and check if it makes any difference. Here are the steps you need to follow.
- Open the search menu by pressing the Windows key.
- Type Turn Windows features on or off and press enter.
- Locate Hyper-V and checkmark the box present before the name.
- Click on OK.
That’s it. Check if the problem is fixed. In case you can’t find Hyper-V listed in the Window, check out our guide on How to install enable Hyper-V through Windows Optional Features.
7] Reset Network settings
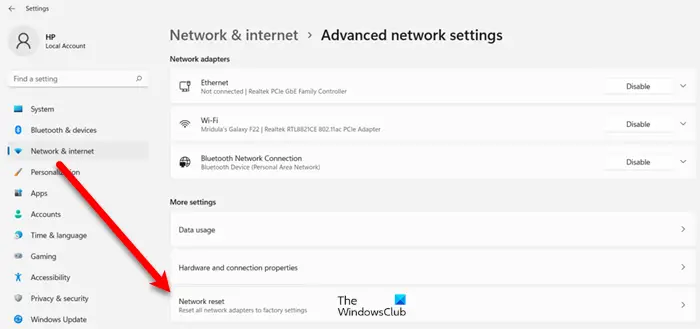
If none of the above-mentioned workarounds helped solve the problem, the last thing you can try is resetting the network settings. This will resolve any kind of network-related issue. You can do it by following the below steps.
- Open the Settings menu on your system by pressing Windows + I shortcut key.
- Click on Network & internet present at the left panel of the screen.
- Choose Advanced network settings and then Network reset.
- Click on the Reset now option present next to Network Reset.
- Click on Yes to the confirmation box that pops up.
Restart your system once the process is complete. Now, check for the problem.
8] Contact your IT Support
If nothing helps, you may need to contact your system administrator and tell him about your problem.
Read: This server could not prove that it is its security certificate is not valid at this time
Where are Windows Wi-Fi certificates?
It’s pretty straightforward to view certificates for the current user. To begin with, open the run dialogue box, type, and enter cetmgr.msc. It will open the Certificate Manager tool. Now, view the certificate of your choice by expanding the different types of certificate directory present on the left pane of the screen.
What causes the Wi-Fi Certificate Error on Windows 11/10?
There can be multiple reasons behind the Wi-Fi certificate error on a Windows PC. But among all, the main culprit can be the incorrect date and time. If the system shows the wrong date and time, you will face the mentioned issue. The problem will also occur if you haven’t downloaded the latest network driver update.
Read Next: How to use Microsoft Wi-Fi in Windows.
Leave a Reply