For most Windows computers, a WiFi connection is a typical internet source. At the same time, computers need to be able to detect the networks in their immediate proximity before they can establish a WiFi connection. However, what if networks are not seen on a Windows 11/10 computer?

There are various factors that lead to this extremely frustrating issue, which frequently affects many Windows users. Among the common reasons for the WiFi networks not showing up on Windows 11/10 is your computer’s inability to detect available networks due to a significant distance between it and the internet source, issues with the network adapter, and sometimes an unstable internet source.
You shouldn’t be too alarmed, though, as we’ll cover some proven ways to troubleshoot this issue in this article.
How to Fix Networks Not Showing Up on Windows 11/10
Anytime you experience the network not showing up on Windows 11/10, here are solutions you should try out to fix it:
- Move your PC Closer to the Router or Internet Source
- Turn off and on the Internet Source
- Restart your computer
- Enable and Disable Airplane Mode
- Delete your WiFi Profile
- Disable and Re-enable Network Adapter
- Run Network Troubleshooter
- Update Network Drivers
- Reset TCP/IP and Flush DNS Cache
- Check WLAN AutoConfig Service
- Set Channel Width to Auto
1] Move your PC Closer to the Router or Internet Source
For a WiFi network to be visible by your Windows 11 computer, your computer must be in close proximity to the internet source. If barriers separate your PC from the internet source, you should attempt to remove them or move your computer closer to the internet source. That might be the only method to resolve the WiFi networks not showing on Windows 11 issue.
Read: WiFi option not showing in Windows 11
2] Turn off and on the Internet Source
This problem can be caused by the internet source, as they sometimes have glitches. However, it might be really helpful to simply turn off and on your router or the device you want to connect with. Hence, we suggest you try this approach and see if the network is now available.
Read:
3] Restart your Computer
Even though it sounds cliche when discussing how to fix problems on Windows PCs, restarting your computer can be the answer that will help you to fix this issue. In order to possibly solve the problem, simply restart your computer.
4] Enable and Disable Airplane Mode
Another common way to fix issues like this is to enable and disable Airplane Mode on your computer. Doing this will give your PC network connection a refresh and can help fix the networks not showing up on Windows 11 issue.
Read: Wi-Fi icon on the toolbar not showing the list of available networks
5] Delete your WiFi Profile

Your computer has a profile for each WiFi connection created on it. It may be necessary to delete the WiFi profile if a certain WiFi network you usually connect to on your computer isn’t visible, as follows:
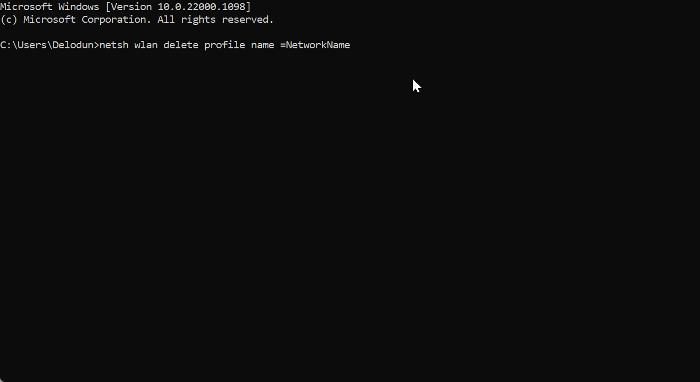
Open Windows Search, type cmd, and select Run as administrator on the result pane.
On the Command Prompt window, type the command below and hit Enter.
netsh wlan delete profile name =NetworkName
The NetworkName in the command should be the name of the WiFi network you are trying to connect to.
6] Disable and Re-enable WiFi Network Adapter

The Network Adapter is behind the functionality of your computer’s WiFi connection. When you experience network issues like this one, you can disable and re-enable the WiFi network adapter to fix it.
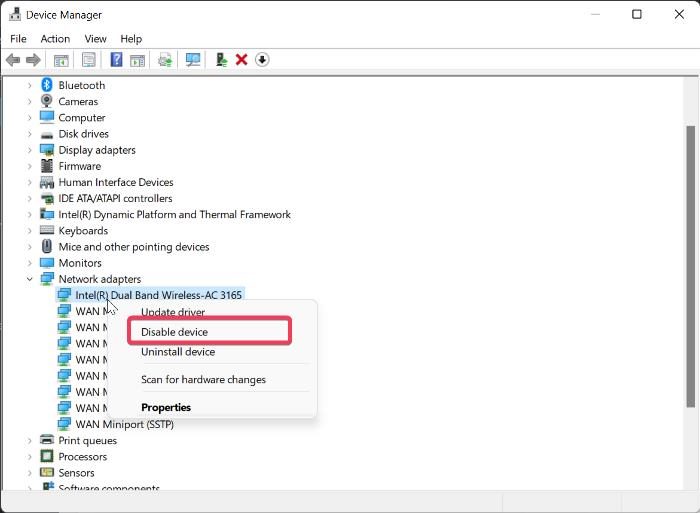
- Right-click the Start menu and select Device Manager.
- Navigate to Network adapters and double-click it.
- Right-click on your WiFi adapter and select Disable device on the resulting dropdown menu.
- Wait for some time and right-click the WiFi adapter.
- On the resulting drop-down, click on Enable device to restart your WiFi driver
After this, you can restart your computer and check for the WiFi networks.
Read: Wi-Fi icon not showing or missing from Taskbar
7] Run Network Troubleshooter

If the issue persists, you can use the built-in Windows Troubleshooter to figure out and resolve it.
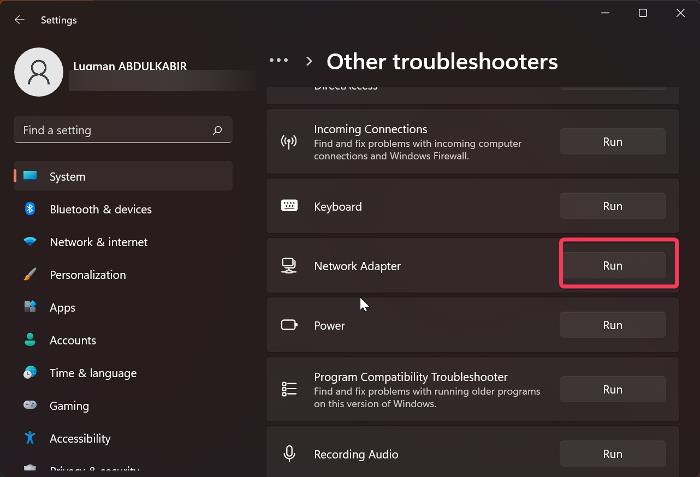
- Press Windows + I to open Windows Settings and select the System on the left pane.
- Navigate to the Troubleshoot option and click on it.
- Under the Troubleshoot page, select Other troubleshooters.
- Now click on Run next to the Network Adapter option.
If the troubleshooter identifies any problem, follow the on-screen prompts to fix it. If not, move to the next solution.
8] Update Network Drivers
Outdated or corrupt network drivers may be the cause of the networks not showing up on Windows 11. As a result, you should update the Network drivers by following any of the methods below:
- Through Windows Update
- Download the Updated driver from the Manufacturer’s website
If you have already downloaded the updated driver version to your computer, this is what you should do to install it through Device Manager.
- Search for Device Manager in the Windows Search box and open it
- Navigate to the Network adapter and double-click it.
- Right-click your Wireless network adapter and hit the Update driver option on the resulting drop-down menu.
- Select Browse my computer for driver software and follow other prompts to select the downloaded driver on your computer.
Read: None of the networks previously connected to are in range
9] Reset TCP/IP and Flush DNS Cache
An issue with the TCP/IP could also be the cause of this issue you are facing. Hence, you should reset the TCP/IP and Flush DNS Cache on your computer by following the steps below:
Open Command Prompt on your computer.
Run the following commands one after the other.
netsh winsock reset
netsh int ip reset
ipconfig /release
ipconfig /flushdns
ipconfig /renew
Afterward, restart your computer and check if the issue has been fixed.
TIP: Network Reset will Reinstall Network adapters, Reset Networking Components to default in Windows 11/10
10] Check WLAN AutoConfig Service

The WLAN AutoConfig Service ensures that your PC doesn’t have issues with ting WiFi networks. However, if you can see WiFi networks on your computer, you can check the WLAN AutoConfig Service to make sure its settings are intact.
- Press Windows + R to open the Run box.
- Type services in the Run command box and hit Enter.
- In the Services window, navigate to WLAN AutoConfig Service and double-click it.
- You’ll be prompted with the Properties dialogue box where you should set the Startup type to Automatic.
- Click Apply, then OK to save the changes.
Also, restart the computer after this solution and check if the issue has been fixed.
Read: How to fix WiFi problems in Windows
11] Set WiFi Channel Width to Auto
One other solution you could try to fix when you can’t find WiFi networks on your computer is to set the WiFi Channel Width to Auto.
- Right-click the Start menu and select Device Manager.
- Double-click on the Network adapters options and right-click your WiFi adapter.
- Select Properties on the resulting drop-down menu and switch to the Advanced tab.
- Now set the Value option to Auto and tap on OK to save the changes.
Those are the proven methods you try anytime your computer isn’t showing WiFi networks.
Related read: Can’t connect because you need a certificate to sign in to Wi-Fi
Why are none of my Wi-Fi networks not showing up?
There are several variables that could cause WiFi networks not to show on your computer, and one of the common ones is an issue with your network adapter. Also, if your computer is not in close proximity to your internet source, you may encounter this issue. However, we’ve discussed the best methods you can use to fix this issue in this article.
How far can my computer be from an internet source?
While this mostly depends on your internet source, for the majority of them, it is advised that your computer and the internet source be placed between 100 and 150 feet apart. If you do not have a strong WiFi network, you may not get the connection even being 30 feet away from the router.
Leave a Reply