Many users have reported a weird issue that their computer automatically wakes up from sleep for no reason. This leads to more battery consumption and makes your computer accessible to others if it was unlocked or didn’t have a password.
Why is my computer waking up from sleep mode on its own?
There are several potential reasons why your computer may be waking up from sleep mode on its own, including Scheduled tasks, Power Settings, External devices, conflicting settings in the operating system or device drivers, and malfunctioning power supply or another hardware issue
Computer automatically waking up from Sleep in Windows 11/10
Third-party software products usually cause this problem. Additionally, system settings, wake-up LANs, networking devices, and wake times can automatically trigger the computer to wake up from sleep.
- Check up if any scheduled tasks are waking your PC
- Disable wake timers
- Prevent devices from waking up your system
- Disable Wake on Magic Packet for Network Adapters
- Registry level fix
- Run the Power troubleshooter
- Uninstall third-party programs which trigger the system to wake up automatically
- Re-install Spotify.
If your computer automatically wakes up from Sleep in Windows 11/10, try the following solutions sequentially to resolve the problem:
1] Check up if any scheduled tasks are waking your PC

- To find out which program last woke your computer, you may open CMD, type powercfg /lastwake and hit Enter. It will show you what last woke your computer.
- Next, you will have to open Task Scheduler. To do so, type Task Scheduler in start search and hit Enter. Expand Task Scheduler Library.
- Check here to see if any programs are scheduled to perform the task which requires your PC to be woken.
- For instance, the Windows Media Center automatic update function (in earlier Windows versions) could be the culprit.
- To check this, expand Microsoft > Windows > select Media Center > mcupdate_scheduled
- Double-click mcupdate_scheduled to open its Properties box.
- Edit the trigger and from the drop-down menu, select when you want to Begin the task.
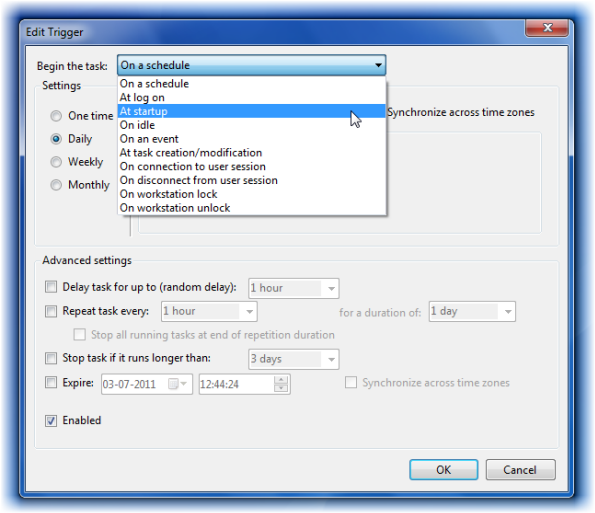
- You may select it to check only at Windows startup.
- Click OK/Apply/Exit.
Read: Why did my Windows PC wake up automatically?
2] Disable wake timers
Wake timers are in-built tools in your system used by Windows updates and the system’s automatic maintenance tools to wake up a sleeping system for updating Windows or performing the desired tasks.
By default, the timers are set to wake the system and perform the tasks at odd hours, like 2 am, since most systems are idle. Usually, that’s the time when most people put their systems to sleep. To disable wake timers on your system, use the following procedure:
- Search for Control Panel in the Windows search bar and click open the option.
- Select Power Options.
- Click on Change plan settings next to the power plan you are using.
- On the Plan settings window, select Change advanced power settings.
- On the Advanced settings menu, expand Sleep (by clicking on the + symbol next to it) and then expand Allow wake timers.
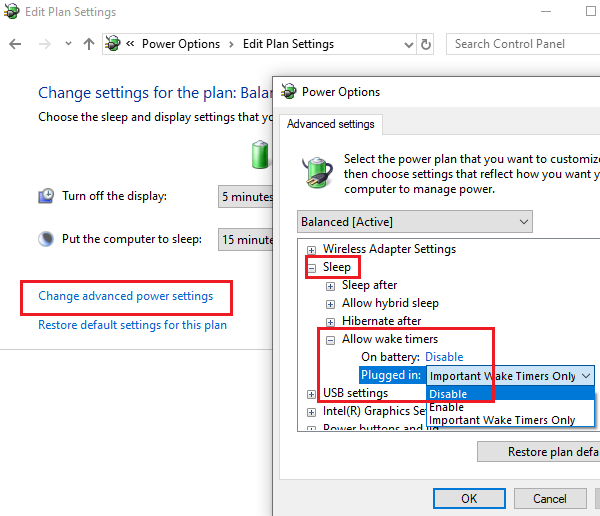
- Select Disabled for both On battery and Plugged in modes.
- Click on Apply and then on OK to save the settings.
Read: How to check which Devices CAN wake your computer from Sleep Mode
3] Prevent devices from waking up your system
Some devices can wake up your system. You can check which all devices are allowed to wake your system from sleep automatically through Command Prompt as follows:
- Press Win+R to open the Run window and type the command cmd. Hit Enter to open the Command Prompt window.
- Now type the following in the Command Prompt window and hit Enter:
powercfg -devicequery wake_armed
- This command will populate the list of devices allowed to wake your computer from sleep.
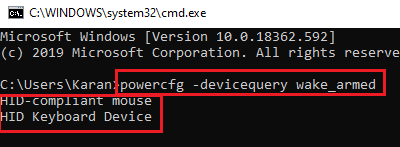
- You can prevent these devices from waking your computer automatically as follows:
- Press Win+R to open the Run window and type the command devmgmt.msc. Hit Enter to open the Device Manager window.
- Right-click on the first device you wish to prevent from waking up your computer.
- Select Properties.
- In the Power Management tab, uncheck the box corresponding to Allow this device to wake the computer.
- Click on OK to save the settings.
TIP: This tutorial will show you how to wake Windows 11 PC when you approach using Presence Sensing feature.
4] Disable Wake on Magic Packet for Network Adapters
Even though your computer might be at sleep, it would probably still be connected to the internet. If anyone pings your system, it can wake you up from sleep. To change this case, you can disable Wake on Magic Packet for Network Adapters in the Device Manager. The procedure to do so is as follows:
- Press Win+R to open the Run windows and type devmgmt.msc. Press Enter to open the Device Manager.
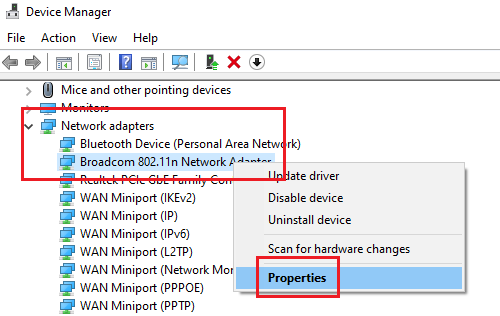
- Scroll down to Network Adapters and expand the list of network adapters.
- Now, right-click on the Broadcom Network Adapter and select Properties.
- Go to the Advanced tab and scroll to Wake on Magic Packet on the Property list.
- In the Value list, select Disabled.
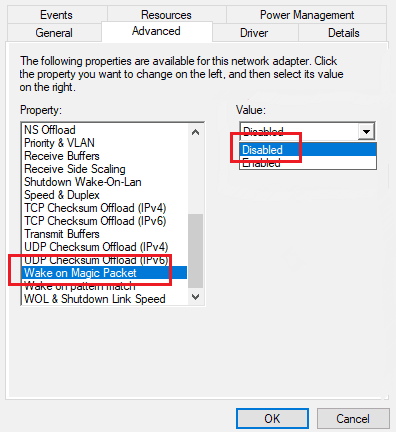
- Press the OK button to save the settings.
If Network Adapters are one of the devices which can wake your computer from sleep, remember to disable them as explained in Solution 2.
Read: How to find out what woke your computer from Sleep Mode
5] Registry Fix
A computer setting disallows the systems from completely going into sleep mode if its value in the Registry Editor is zero. We can change it as follows:
- Press Win+R to open the Run window and type the command regedit. Hit Enter to open the Registry Editor window.
- In the Registry Editor window, navigate to the path:
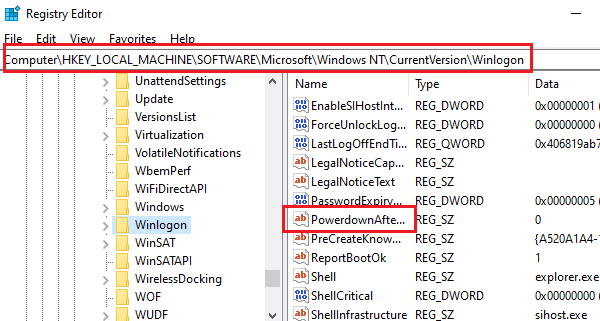
HKEY_LOCAL_MACHINE\SOFTWARE\Microsoft\Windows NT\CurrentVersion\WinLogon
- On the right pane, locate the entry PowerdownAfterShutdown and double-click on it to open its properties.
- If you don’t find the entry PowerdownAfterShutdown, right-click anywhere on the free space in the right pane and create a new DWORD(32-bit) entry with the same name.

- Change the value of the Value Data to 1 and click OK to save the settings.
- Restart the system.
Read: How to disable ACPI wake alarm in Windows?
6] Run the Power Troubleshooter
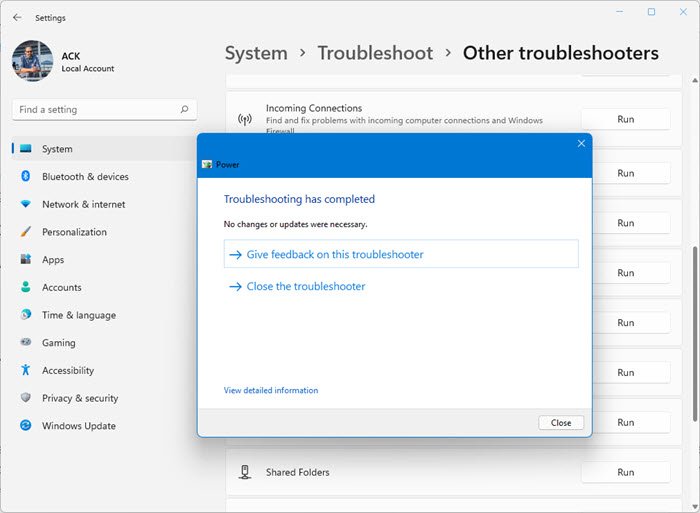
The Power troubleshooter checks for problems with the system’s power settings and resolves them if possible. The procedure to run the Power Troubleshooter is as follows:
- Open Windows 11 Settings > System > Troubleshoot. Select the Power Troubleshooter and run it.
- Open Windows 10 Settings > Updates & Security > Troubleshoot. Select the Power Troubleshooter and run it.
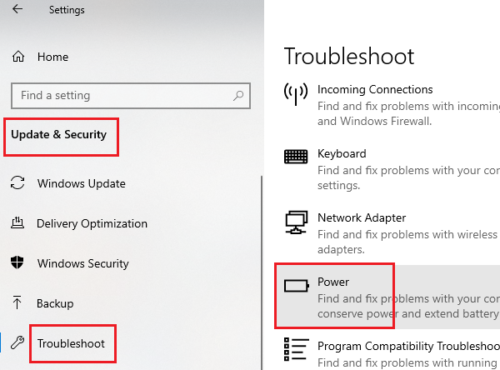
Restart the system once the troubleshooter has done its job.
7] Uninstall third-party programs which trigger the system to wake up automatically
Many third-party programs, especially those that schedule tasks, can wake the system from sleep. You must identify such programs in Clean Boot State and uninstall them from the Programs and Features menu.
To open the Programs and Features menu, press Win+R to open the Run window, type appwiz.cpl, and hit Enter.
8] Re-install Spotify
One of Spotify’s versions had a bug that automatically woke systems from sleep. The company has rectified this. It is advisable to re-install the Spotify application rather than merely update it.
Uninstall the Spotify application from the Programs and Features menu, as explained in Solution 6, and re-install it from Spotify’s official website.
If you have noticed any other reason or solution for the issue in the discussion besides the ones mentioned in this post, please let us know in the comments.
This post shows additional ways to Prevent the computer from waking up from Sleep.
Also see:
- Windows computer turns on by itself
- Sleep Mode is not working in Windows.
- Windows computer does not Sleep
- Wake up computer from Sleep, at a particular time
- Windows will not wake up from sleep mode
- Windows PC goes to sleep automatically.
What are the risks of preventing my computer from waking up from sleep mode?
While there is no significant risk, if the PC hangs when trying to wake up or slow down, it can result in missed updates, missing app notifications, and loss of unsaved work. Lastly, if the PC doesn’t go into sleep mode quickly, it will lose energy.
Thanks man, this is exacctly what I was looking 4. Congrats!
thanks bud!
Thank you!
awesome. thanks
I cant find the Media Center ;n;
i’m not found ‘media center’ on task scheduler;;;